Wednesday, January 30, 2008

Banana Date Coffee Cake


This is a recipe I used to make all the time in college. At the time, I was doing a lot of work with Native Americans, and it seemed like most of them were diabetics. For some reason, unbeknownst to me at this present time, we had a lot of potluck-type things. The Native Americans were sooooooo excited that this recipe has no sugar (other than the minimal amount on the coconut and dates). I used to place a stack of recipe print-outs right next to the pan of coffee cake. I lost the recipe, but found a very similar one online, which I then fixed--the guy had added sugar! No!! He ruined the very essence of it!!--So, I brought it back to its former healthful, delicious, sugar free glory. Enjoy.

P.S. Preschool snack, here we come!

  • 1/2 cup butter - softened
  • 2 medium bananas
  • 3 large eggs
  • 1 and 1/4 cups water
  • 1 teaspoon vanilla extract
  • 3 cups flour
  • 1 and 1/2 cups chopped dates
  • 2 teaspoons baking powder
  • 1 teaspoon baking soda
  • 1/2 teaspoon salt
  • For Topping:
  • 1/2 cup (heaping) chopped dates
  • 1/2 cup (heaping) flaked coconut
  • 1/2 cup (heaping) chopped walnuts

Preheat oven to 350 degrees. Prepare a 13x9 baking pan with a generous coating of cooking spray.

Cream butter and bananas in a mixing bowl. Add eggs, water and vanilla extract and mix well.

In a large bowl, sift together flour, baking powder and salt. Add to butter mixture and mix well. Add chopped dates and mix well.

Pour batter into prepared pan and smooth out evenly with the back of a spoon.

Combine all topping ingredients in a small bowl or cup and sprinkle topping evenly over batter.

Bake for 20 to 25 minutes or until a toothpick inserted in the center comes out clean.

Monday, January 28, 2008

About Leeks...

Leeks are notoriously hard to clean; dirt gets trapped in the layers as the plant grows. If you don't remove all the dirt, it ends up in your soup or whatever dish you're making. I cannot remember where I learned this method for cleaning them, but it seems to work.

Remove the roots and green tops where they start to leaf out. You can use the lighter green parts. Slice, chop and/or dice until the leeks are the size you want for your recipe. Place the leeks in a large bowl, and fill with cold water. Stir them around a bit, then let the leeks sit. All the dirt will go to the bottom of the bowl, while the leeks themselves will float to the top.

Carefully remove the leeks with a slotted spoon, don't scoop too low in the bowl so you don't disturb the dirt. Place the leeks on a paper towel to drain, and pat dry with another paper towel on top. Now they are clean and ready to use!

Min's Saffron Vegetable Soup

I ran across this recipe this morning while I was looking for a different one that seems to have disappeared. I made this soup several years ago, luckily I wrote down the amounts. This is another "pantry soup" or what I happened to have around at the moment. You'll also notice that I make all soups using essentially the same methods. I have my reasons.

Saute 1 diced yellow onion and 1 diced leek in olive oil in a dutch oven pan until the onion is translucent. Add two diced carrots and about 6 diced potatoes, one can (drained) baby corn, 1 package Mahatma Saffron Rice Mix, 6 cups water, 6 cubes chicken bouillon, and a large sprig of fresh rosemary.

Bring this to a boil, reduce heat and simmer until rice is done. Season with kosher salt, freshly ground pepper and some fresh Italian (flat-leaf) parsley.

This is a delicately-flavored, beautifully-colored, delicious soup. If I had a leek and some baby corn, and some rosemary, I would make it right now.

Saturday, January 26, 2008

Min's Pantry Fiesta Soup!


"Only the pure of heart can make good soup."

-Beethoven, 1842


I have that quote hanging above my stove top, I just love it. It reminds me of myself. You know, pure, driven snow, wait. Why do I hear laughter? Anyway, it's a good quote. And I do make good soup. No matter the level of pureness...oh, who am I kidding. Never mind.

Tonight, I didn't have any dinner planned for various reasons. One, I have been working on perfecting my 2009 calendar, which I am proud to announce will soon be available for purchase on my blogs! Exciting! But time-consuming.

So when it was after 5pm, and there was no dinner on the horizon, I decided on soup. I asked Number One "Mexican or Asian?" and he chose Mexican. So I ran with it.

I grabbed some chicken thighs from the freezer, thawed them briefly in the microwave, then diced them. I melted butter in a dutch oven pan and added the chicken.

While the chicken was thawing/cooking, I sliced half an onion and a few cloves of garlic. Put those in the pan with the chicken and butter.

From the pantry, I grabbed a can of pinto beans and a can of diced tomatoes. Drained them, added them to the pan. I added about six cups of water, and six chicken bouillon cubes because we have no chicken broth in the pantry.

From the freezer, I added what we had leftover of a bag of frozen corn and some frozen broccoli. (broccoli is not quite Mexican, but it needed some color) For flavor and spice, I added some lime juice (probably almost 1/4 cup of ReaLime), cumin, oregano and marjoram. And salt. I heated it all through, and that was that.

In about 30 minutes, a delicious Mexican-inspired soup. Served with corn chips on top. It would also be good with fresh avocado on top. And perfect with fresh diced tomato on top instead of canned diced tomato in the soup, but as much as I'm wishing for it, it's not summertime yet.

Friday, January 25, 2008

Baking Powder Biscuits


I have had this recipe, the very one pictured above, since the 8th Grade. I will not tell you how many years that has been, but I will tell you I am not joking. Observe the roundish cursive handwriting. Cute, right?

So it probably goes without saying since I've had this recipe so long, it makes good biscuits. Make sure you have fresh baking powder, and they will turn out flaky and delicious.

Preheat oven to 425 degrees.

Mix together:

2 cups flour

1 Tablespoon baking powder

1 teaspoon sugar

1/2 teaspoon salt

Cut in: 1/4 cup shortening or butter with fork or pastry blender thingie. Stir in 3/4 cup milk. Knead on a lightly floured surface 5 to 6 times. Cut out and place on a baking sheet.

Bake for 12 minutes, or until slightly golden brown.

Pear Pie


I was asked to take a pie to a church function last night, so I thought I would share the recipe. We are a family of pie lovers, so it was hard when I baked this pie and then left the house without sharing with my husband. So while I was out with women and enjoying homemade pies he was home eating leftover gingerbread cake. I really can't feel to sorry for him. So if you ever get in the mood to make a pie try this pear pie , it is one of our favorites. Just a note about the crust recipe, I have found a local flour mill that has pastry flour and it is the best for pie crusts, scones, biscuits etc. Also I usually double, triple it etc . and keep the dry mix in the freezer and just pull it out when I want to make a pie---makes the process super quick. Another thing I also keep my flour in the freezer, one of the keys to making good pie crust is having all the ingredients cold.

Happy Pie Making!

Pear Pie

7-8 large pears, pared, cut into slices
3 TBL lemon juice
1/4-1/2 cup sugar
3 TBL flour
1 tsp. lemon zest
Mix all together and spoon into one 9 inch unbaked pie shell
Sprinkle with the following mixture:
[ 1/2 cup flour, 1/2 cup sugar, 1/2 tsp. each ginger & cinnamon
cut in 4 TBL butter until crumbly ]
Bake Pie in preheated 400 oven for about 45 minutes.

My Favorite Pie Crust

1 1/4 cups pastry flour or all-purpose flour
1/2 teaspoon salt
1/2 teaspoon sugar
1/2 cup (1 stick) unsalted butter, cold
2 to 4 tablespoons ice water

I usually make a large batch in my food processor (make sure not to over mix--easy to do in the processor) WITHOUT the water. Then I package it into single pie crust portions in zip lock bags then freeze till needed. Add the water later by hand with a fork.

I also have made the pie crust including the water and then put in the freezer in individual single crust packets as well as actually rolled out the crust into the pie plate and then freeze till needed. I now prefer to just do the dry mix, works best for me.

Yummy Oatmeal


I found this recipe when I was pregnant, perhaps in one of the pregnancy books in which I was living. This makes one generous serving: creamy, filling, delicious and comforting. A triple batch will more than feed our little family of four, but if you have older kids, you'll probably need to make more.

Also, I get the ingredients all ready while the water is coming to a boil. Just measure the oats and wheat germ into a cereal bowl, and sprinkle with salt. Measure the dry milk into another cereal bowl. I then use these bowls for serving the oatmeal so there are less dishes to wash.

We serve ours with brown sugar, milk, and seasonal fruit. You can also add raisins or chopped dried fruit about halfway through the cooking time.

1 serving Oatmeal:

Boil 1-1/4 cups water in a saucepan.

Stir in: 1/2 cup oats
2 Tablespoons toasted wheat germ
Salt
about 1 Tablespoon butter (to prevent boiling over)

Cook for 5 minutes, stirring occasionally. Lower heat just a bit if you need to. Remove from heat, stir in 1/3 cup dry milk.

Wednesday, January 23, 2008

Min's Favorite Banana Bread

A.K.A. Martha's Banana Bread, this is another of Martha Stewart's recipes, from The Martha Stewart Cookbook. It makes the best banana bread I've ever had.

Makes 1 large loaf or 4 small loaves. *I've noticed it typically makes more than one large loaf. That's okay since I like to freeze some. I'll tell you about that in a bit.

1/4 pound (1 stick) unsalted butter, at room temperature

1 cup sugar

2 eggs

1 1/2 cups unbleached all-purpose flour

1 teaspoon baking soda

1 teaspoon salt

1 cup mashed very ripe bananas (I use about three bananas, and I don't mash them.)

1/2 cup sour cream (I heap this in the measuring cup)

1 teaspoon vanilla extract

1/2 cup chopped walnuts or pecans


Preheat oven to 350 degrees F. Butter a 9 x 5 x 3-inch loaf pan or several smaller pans.

With an electric mixer, cream the butter and sugar until light and fluffy. Add the eggs, beating well.

Sift the dry ingredients together and combine with the butter mixture. (does anyone ever do this? I just dump it all in.) Blend well. Add the bananas, sour cream and vanilla. Stir well. Stir in the nuts and pour into the prepared pan.

Bake 1 hour, until a cake tester (I call it a "knife") comes out clean. Turn out onto a rack to cool.


The only problem I have had with this recipe is that the bread tends to stick to the bottom of the pan, no matter how much I butter it and no matter whether I turn it out immediately or wait several minutes. I don't know if this has something to do with our altitude?

To freeze these loaves, let them cool completely. Then wrap them securely in aluminum foil and place in a ziploc freezer bag. Label and date, of course. I'm not sure how long these will last, we seem to eat them quickly.

Tuesday, January 22, 2008

Bad Bananas?


I'm sure most of you know that you can make banana bread from overripe bananas. But what if your bananas are overripe and you don't have time to make banana bread? Did you know you can freeze them for later? (Incidentally, the bananas pictured above are still "good." They just happen to be the only bananas around right now.)

Just peel your bananas and place them into a ziploc bag, I usually try to put three in a bag because that's how many I use to make my favorite banana bread recipe, and stick them in the freezer.

When you're ready to make your bread, thaw the bananas in the bag, then use in your recipe. There may be some juice in there as they thaw, just go ahead and pour it in with your bananas. Works like a charm.

Sunday, January 20, 2008

A Bad Girl's Cookbooks


Most of us have been taught to respect books. Take good care of books, don't write in books, etc.

I personally am of the opinion that we ought to write in cookbooks. They are ours, after all. If you typically make changes, add more or less spice, or try something that just simply didn't work, you should make a note of it somewhere.

What better place to make a note than in the margins of your own cookbook? That way, the next time you make it, you'll be reminded that it needs less sugar or more baking time or you like it best whatever way. Sometimes I just cross out the original amounts and write in my own. I have also been known to cross out entire recipes so I'm not tempted to try them again. That's the way I like it.

Don't be afraid, there is no such thing as The Cookbook Police. A pristine cookbook is a sign of a book that hasn't been used, and what's the point in that? I give you permission to embrace the Bad Girl that you are, and write in your cookbooks. You know you want to! Go ahead, put a star or two next to a favorite recipe. Write "We Love This!" You won't be sorry. And your kids (and others!) will also appreciate being able to recreate their favorite dishes, just the way you made them in your kitchen. What a lovely gift.

Tofu Burgers


Okay okay...   I know what you're thinking.  "TOFU burgers?!?!?   Gross."  So wrong!!!  These tofu burgers are from the Moosewood Restaurant in Ithaca NY.  The Moosewood is a famous vegetarian restaurant and I've sampled several of their dishes...  all excellent.   I got the recipe from Vegetarian Times.

I usually serve these burgers as the recipe suggests:  on whole wheat sandwich rolls with tomato, lettuce and Russian dressing.  For the kids, I stuff it into pita bread.  Slightly less messy for them.  The recipe serves 8 so I usually freeze half of the patties prior to baking.  These tend to be a bit time consuming to make but SO well worth it.  It's nice to be able to take them out of the freezer and have them on a weekday.

A couple notes about the recipe...  It calls for 2 Tbs of miso.  If you can find miso, more power to you.  I've never been able to find it so I never add it.  Tastes perfectly fine to me. 

I'll be making these tomorrow night so I'll post a picture if I remember!

What you'll need...

2 packages of firm tofu
2 Tbs vegetable oil
2 cups diced onion
1 cup peeled grated carrots
1 cup diced bell peppers
1 tsp dried oregano
1 tsp dried basil
1 tsp dried dill
2/3 cups chopped walnuts
1 cup plain bread crumbs
2 Tbs tahini
2 Tbs light miso
2 Tbs soy sauce
1-2 Tbs Dijon mustard (optional)

1)  Preheat oven to 400 degrees.  Spray a baking sheet with cooking spray

2)  Sandwich tofu between two plates, and rest a heavy weight on the top plate.  Press for about 15 minutes, draining the liquid occasionally.

3)  Meanwhile, heat oil in skillet and saute onions, carrots, peppers, oregano, basil and dill for about 7 minutes or until veggies are just tender.  

4)  Crumble pressed tofu in a large bowl.  Stir in walnuts, bread crumbs, tahini, miso and mustard if using.  Add sauteed veggies and mix well.  

5)  Use about 3/4 cup of mix per burger.  Form into a pattie and place on baking sheet about 2 inches apart.  

6)  Bake for about 30 minutes or until burgers are firm and browned.  Serve immediately.


Friday, January 18, 2008

Min's Mexican Hot Cocoa Mix

This makes a dry hot cocoa mix, and packaged in quart jars with raffia and/or ribbon it makes a pretty gift.

1 cup cocoa powder

3 cups powdered milk

1 cup sugar

dash salt (or two)

2 Tablespoons cinnamon**

2 Tablespoons Ghiardelli Sweet Ground Chocolate (no substitutes!)

Dried mini marshmallows (optional, but fun. To dry, if you live in the desert you can just leave them on a baking sheet in your kitchen for a day or two. Or, stick them in a dehydrator.)


Whisk all ingredients into powder until well-blended. Store in glass jars. To serve, add about 4 or 5 Tablespoons of mix to a mug of hot water.


**The cinnamon is what lends the "Mexican" flavor. You can leave it out for just plain old Hot Cocoa.

Infamous "Neiman Marcus Cookies"


This is an Urban Legend recipe that has been circulating probably longer than there's been an Internet...you have probably heard it: Some lady having lunch at Nieman Marcus, asked for their cookie recipe and ended up getting charged $250 for it. Circulating the recipe is her way of getting even. (I just found it online, link above! It's at least 50 years old, the dessert and the confectioner change while the story remains the same)

Regardless of where it came from, it makes a darn good cookie. I am posting it here just in case I ever lose the version I have on paper. I'm going to make some today. You should try them too!

(Recipe may be halved) *Recipe should be halved. My Kitchenaid mixer couldn't handle it, and it makes a boatload of cookies. I have four dozen in the freezer, and untold dozens more to give away-and I made the cookies fairly big.*

5 cups blended oatmeal ***
2 cups butter
2 cups sugar
2 cup brown sugar
4 eggs
2 teaspoons vanilla
4 cups flour
1 teaspoon salt
2 teaspoons baking powder
2 teaspoons baking soda
24 oz. chocolate chips
1-8 oz. Hershey bar (grated)
3 cups chopped nuts (your choice)

***Measure oatmeal and blend in a blender to a fine powder.

Cream the butter and both sugars. Add eggs and vanilla, mix together with flour, oatmeal, salt, baking powder, and baking soda. Add chocolate chips, Hershey bar and nuts.

Roll into balls and place two inches apart on a cookie sheet.

Bake for 10 minutes at 375 degrees F. Makes 112 cookies.

Thursday, January 17, 2008

Rescue for Fruit that's On The Verge!

I mentioned this in my coconut fruit smoothies recipe, but I thought I would elaborate.

We buy lots of fruit when it's on sale, but unfortunately sometimes we can't eat it all before it starts going bad. When I notice the first bit of "bad" fruit, I prepare the rest of it for freezing. I'll use strawberries as an example. Take off the stems and cut out any bad spots. Place fruit on a rimmed baking sheet and freeze for a couple hours. When frozen, simply pour fruit into a ziploc bag--it is now "individually frozen" and perfect for making smoothies or anything else.

And it's probably cheaper and healthier than commercially frozen fruit as well.

Min's Coconut Fruit Smoothies

This will make about 4 servings (if 2 are for little kids). We love these smoothies because they are refreshing and flavorful, and healthy! If you have strawberries or other fruit that are on the verge of going bad, just stick them in the freezer for when you will make these smoothies...

In a blender, place 1 or 2 whole bananas and 1 can coconut milk (preferably organic for best flavor). Turn on blender, blend coconut and banana until smooth, then while blender is still running add a variety of frozen fruit: strawberries, peaches, whatever you're in the mood for. Or just add one type of fruit. (we like strawberry. They also sometimes have a "smoothie combo" of fruit that is quite good.)

Add as much frozen fruit as your blender can handle: it will either fill up or thicken up to desired consistency. Spoon into cups and enjoy!

Wednesday, January 16, 2008

Scotto's Pasta Italiano--Technique & Recipes

This recipe and lesson came from Scotto, right before I convinced him to sign up! There are several Bad Girl Hints in here, so pay attention. Thanks, Scotto!


On New Years day I cooked 4 lbs of angel hair pasta. For those of
you that saw, the serving pot it was 3/4 full of water , somewhat salty
to taste, an important part of cooking pasta. This was hammered into
me when I spent 4 months in Italy. Also that Americans put Too much
sauce on their pasta . Also we (Americans ) tend not to oil (extra
virgin olive) or butter the pasta IMMEDIATELY and we get a sticky
mess. Between those three things (usually all three) I do not order
pasta in my homeland when out to dinner. I could criticize my New
Years pasta but I will hold back on that one.

So figure one pound for 4-5 hungry ones. The following recipe will be
for one pound of pasta.

For one pound of dry pasta I use about a gallon (4 quarts) of water in
a 5-6 quart pot. Add 2 Tablespoons of salt, (yes 2 Tablespoons).

Cappilinni (Angel hair) is easy to over cook - so be careful. 3-4
minutes I think. Go for al-dente or it turns into a "blob".

When done, melt butter and use or put olive oil IMMEDIATELY on the pasta. then
immediately add the sauce, parsley and toss again.


The Sauce:

Use 8 ounces of canned diced tomatoes. (my favorite is
Muir Glen fire roasted)

4 large cloves of garlic - smashed with the side of a large knife and chopped.

Hot chile peppers(crushed like the kind you will find in pizza joints) to taste ( maybe a teaspoon.
depends on the heat of the pepper)

Olive oil or Butter

Good Salt (I use Real Salt for the sauce and just plain sea salt for the pasta
water).

Cook the 4 large cloves of "smooshed and chopped" garlic and the hot
peppers in olive oil in a pan at LOW heat and when the garlic is ABOUT
to brown add 1/2 the tomatoes. Get back to temp and add the other
half. Add then a Pinch of "Real Salt". Garlic press another clove (or
even a 1/2 clove) onto the cooked hot pasta (that you have drizzled
and tossed with butter or olive oil), add sauce and chopped parsley
and toss again.

Notice , no cheese, un-American isn't it. If you must, small bits of
grated romano or parma might not kill it.


Another make life simple trick for pasta, is to put chile peppers
and chopped garlic (fresh basil in season too) in olive oil in the
pantry or fridge and just pour on pasta, straining the herbs. Real
fast and real good.

Min's Cashew Chicken Salad


This is a recipe I came up with when I couldn't find a decent serving of chicken salad. It is scrumptious.

Start with 1 whole roasted chicken, deboned and chopped in a fairly small dice. I'd say about 1/2-inch or less. (you can also use 1/2 the chicken if you don't want a lot. But I think you will want as much of this as you can get.) Place chicken in a large bowl.

Add to chicken:

Diced celery, about 4 to 6 stalks (or so) for a whole chicken, or to taste

Chopped cashews, at least 1 cup (I used two big handfuls this time)


Green onions, chopped, probably half a bunch, more or less (about 6)

You can see that there's a good mix of ingredients, lots of celery, cashews, etc. to complement the chicken.


A healthy amount of real mayonnaise (1 cup? enough to coat--you'll know. Remember, you can always add more but you can't take it out if you've added too much)


Mix this all together and taste a spoonful. It should be delicious and crunchy and flavorful. (See how you can still see the colors below, you can tell it's coated but not too much).


I serve this on little dinner rolls, as sandwiches.

cas' savory eggs benedict

I hate eggs benedict! I think it's gross to put mayonaisse on slimy, sloppy aigs! So I created this new twist on eggs benedict to make it not only edible, but delicious.

You'll need:
Two english muffins
Four eggs
Eight thick cut slices of bacon
Flour
Butter
Half and half
A bunch of Gruyere cheese, grated
Salt and Pepper
Fresh chives or basil
Fresh tomato, diced

Directions:
Chop the fresh herbs and tomato. Set aside.
Fry the bacon 'til crispy. Drain it. Crumble four pieces into bits.
Poach the eggs, but actually cook 'em most of the way through so they're not slimy and sloppy.
While the eggs are cooking, begin toasting the muffins and making the cheese sauce:
The cheese sauce is really easy to make! Just begin by making a roux (melt butter in a medium saucepan and mix in flour until it's a nice, sort of thick consistency). Remove saucepan from heat and slowly begin to add half and half. Move saucepan back onto burner on low heat. Continue to add half and half until cheesesauce-like consistency is obtained. Add salt and pepper to taste. Last, add shredded Gruyere until cheesiness is ideal. If you live in a rural no man's land like I do, you can always substitute baby swiss for gruyere.

Now you're ready to assemble these delicious babies.
Place split muffins on plate. Put one egg on each muffin. Pour cheese sauce liberally over egg/muffin stack. Sprinkle crumbled bacon on top, then tomatoes, then fresh chopped herbs. Serve with bacon on the side. Delicious!

tangy and spicy cranberry relish

This is the perfect complement to any turkey dinner. And it's surprisingly easy to make.

You'll need:

1 bag of fresh cranberries
water
lemon zest
clementine or other orange-y citrus fruit zest.
brown sugar
ground clove
ground ginger

Pour the cranberries into a medium saucepan. Cover with water and begin to boil.
While the cranberries are boiling, add the zest of the lemon and clementine. Add lots of brown sugar, to taste. Add lots of clove, and bit of ginger, to taste. Squeeze the juice of the clementine into the mix. Boil until the cranberries are fully cooked, and the mixture has a thick, cranberry sauce-y consistency. Cover and chill until ready to eat. Yum!

Dark-Chocolate Ganache Glaze

The companion recipe to Chocolate Hazelnut Cheesecake, also from the book Pure Chocolate, by Fran Bigelow.


makes enough for 1 double-layer 9-inch round or quarter-sheet-pan layer cake


8 ounces semisweet chocolate, finely chopped

1 cup heavy cream


Place the chopped chocolate in a stainless-steel mixing bowl.

In a small saucepan heat the cream over medium-high heat until it begins to boil. Remove from the heat and pour over the chocolate. Let sit 1 minute and then start gently stirring with a rubber spatula from the center out, until smooth.

Cool at room temperature about 30 minutes, uncovered, stirring occasionally, until the ganache thickens enough to ribbon off the end of the spatula when lifted. The ideal pouring temperature is 80-85 degrees F.

Chocolate Hazelnut Cheesecake

This is a recipe from the book Pure Chocolate, by Fran Bigelow. And there is a story behind it...

I believe it was Bon Appetit, one Christmas, published a recipe for a gorgeous Chocolate Hazelnut Cake. I know the recipe had a much fancier name, it had layers and a creamy moussey filling and it called for gianduja. Gianduja is a fine Italian chocolate, smooth and pure with very finely ground hazelnuts in it. It is not easy to find around these parts. Bon Appetit (if it was them!) had made a deal with a chocolatier somewhere, to sell 1 pound chunks of gianduja, which would perfectly suit the amount needed for their recipe, with some left over for sampling.

As luck would have it, the chocolatier had long since sold out of gianduja by the time I called them. By now I was on a mission. I had to make this cake, and I had to find this chocolate. And find it I did, on the glorious Internet. Eleven pounds of Gianduja arrived at my remote ranch door via UPS. That was the smallest amount I could find (it's only sold in professional quantities, apparently). So, besides the Bon Appetit cake, I had to find other recipes in which to use this fine chocolate, so I could prevent Number One from eating every last bit of it.

And that is how I came to find this recipe. I also divided the remaining chocolate into chunks, and froze it. I made at least two of these cheesecakes at different times, once actually in Michigan! (yes, I packed a pound of gianduja in my suitcase) They are delicious. If you are able to find Gianduja, I highly recommend it. Just maybe not 11 pounds...

By the way, this recipe is a bit complex, but if you have the time and equipment required, it is fabulous and impressive.


serves 16


14 ounces gianduja, finely chopped, OR 9 ounces 36-46% cacao milk chocolate, finely chopped and 5 ounces hazelnut paste

4 ounces semisweet chocolate, finely chopped

1 1/2 pounds cream cheese, room temperature

1/2 cup sugar

5 large eggs, room temperature

3 Tablespoons heavy cream

3 Tablespoons Frangelico or Amaretto liqueur

Dark-Chocolate Ganache Glaze (optional, but worth every minute)

Position a rack in the middle of the oven and preheat the oven to 300 degrees F. Butter a 9-inch round cake pan and line with parchment paper.

In a double boiler over low heat, melt the gianduja (or milk chocolate with hazelnut paste) and semisweet chocolate. Remove the top of the boiler when the chocolate is nearly melted and continue stirring until smooth. Let the chocolate cool to 90 degrees F, stirring occasionally.

In a mixer fitted with the paddle attachment, beat the cream cheese at medium-high speed until smooth, about 2 minutes. Add the sugar and continue beating for an additional 3 minutes, until the sugar is dissolved and the mixture is light, fluffy and lump-free. Stop several times to scrape down the sides of the bowl.

In a small bowl whisk together the eggs. Turn the mixer speed to low and slowly add half of the eggs. Stop, scrape down the sides of the bowl, and continue mixing, adding the remaining eggs. Pour in the cream and Frangelico, and thoroughly mix on low.

Remove the bowl from the mixer and with a rubber spatula fold in the melted chocolate. Continue folding until no traces of the cream cheese remain. The mixture will thicken as you fold in the chocolate.

Pour into the prepared pan, smoothing the top. The pan will be about three-quarters full. Place on a rimmed baking sheet and place into the oven. Pour about 1/2 inch of simmering water into the baking sheet for a bain-marie. Bake for 1 hour and 10 minutes, until the top is smooth and slightly dull. The edges should start to pull away from the sides of the pan.

Let cool at room temperature for 2 to 4 hours.

To remove the cake, run a thin knife around the edges to loosen. Place a piece of parchment or waxed paper over the top of the cake and invert it onto a plate. Remove the parchment paper round from the bottom and turn the cake right side up onto its serving plate. Remove the paper from the top.

If you are adding the glaze, set the room-temperature cake on a cake board. Place on a rack over a baking sheet. Have the glaze ready.

When the glaze reaches 80-85 degrees F, beginning 1-1/2 inches from the edge of the cake, slowly and evenly pour the glaze around the rim, making sure that the sides are sufficiently covered. (she has detailed pictures of this process in the book) Then pour the remaining glaze onto the center of the cake. Working quickly, using a metal offset spatula, spread the glaze evenly over the top, letting the excess run down the sides.

**I did not do this process with the glaze. No rack, no cake board, etc. I simply put the cake onto the serving plate, then glazed it. I'm not averse to puddles of glaze on the serving plate.**

Let set at room temperature until the glaze is slightly firm, about 20 minutes. Once set, slide an offset spatula under the board, rotating the spatula to release any spots where the glaze has stuck to the rack. Carefully lift the cake and, supporting the bottom with your free hand, slide it onto its serving plate. May be stored in the refrigerator as long as 1 week.

Monday, January 14, 2008

Grilled Garlic-Rosemary Elk Roast


This is a recipe from one of our favorite cookbooks, The Complete Hunter: Venison Cookery. I have posted another recipe from this book on The Cowgirl's Kitchen blog. Every single recipe we have tried from this cookbook has been excellent, so I'm hopeful for this one as well. Right now I have an elk roast marinating. I will post a picture and let you know how it turned out later this evening.

Makes 6 to 8 servings

MARINADE:

1 1/2 cups dry red wine

1/2 cup packed brown sugar

1/2 oz. fresh rosemary sprigs, cut into 1-inch pieces (1/2 cup) *(my fresh rosemary is currently at the house in town, where it receives more sunlight and I hope will recuperate from accidentally getting too cold this winter. I used a bunch of dried rosemary, that I crumbled into the bag)

4 to 5 cloves garlic, crushed

1/2 teaspoon freshly ground pepper


2-lb. venison top round roast, 1 1/2 to 2 inches thick (obviously, I am substituting elk)


In 4-cup measure, combine all marinade ingredients. (I just combined in the bag) Stir to dissolve sugar. Place roast in large sealable plastic bag. Add marinade, seal bag and turn to coat roast. Refrigerate roast several hours or overnight, turning bag occasionally.

Prepare grill for medium direct heat. Drain and reserve marinade from roast. (I have a problem with this. They recommend basting your roast with the marinade every 10 minutes, but that is raw meat juice! I'm not going to do it. Possibly in the beginning, but not near the end.)

Grill roast, covered, for 30 to 40 minute for medium-rare, or until desired doneness, turning roast every 10 minutes. Tent with foil. Let roast stand 10 minutes before carving.


Now, for those of you who may not know this: "Tent with foil" does NOT mean to cover it tightly with foil. It means to take a sheet of tin foil, and loosely place it on top of the meat. You can conform it to the top of the meat a bit so it doesn't fall off, but DON'T tuck it underneath as you may be tempted to do.

Grilled Pizza & Baking Bread

reddquilter has included an awesome hint about a surprising use for red clay saucers in her Artisan bread post! Thanks, reddquilter!

Bad Girl's Blogging 101

In case you're not familiar with the blogging process!

After you sign in and go to the webpage, you should have a blue stripe at the top with your email address. Next to your address, you will find New Post. This is where you need to be.

The posting process can be confusing until you get used to it. But, I am here to help you! Just email me or leave a comment here and I will help you out.

Begin with the Title. Here you will put in the name of your recipe.

In the box below, you will see the toolbar. This is where you can adjust the font, text size, spell check (highly recommended!) and add pictures or hyperlinks.

Below the toolbar is where you type your recipe. If you have the recipe in your computer already, you should be able to Copy and Paste it right into the text box. Copy your recipe and either right click/paste OR Ctrl/V to paste (if you have a PC--if you're on a MAC, Shell will have to assist).

If for some reason your copy/paste isn't working, you might just have to type in the recipe manually...

You can do any editing at this time, for spacing, add pictures by clicking on the picture icon next to the spell checker (ABC with a check mark), or add hyperlinks by copying the webpage address you want the link to point to, highlighting the text you want linked, then click on the little world icon with the chain link above it (next to the T color icon). Paste your web address in the box that pops up, and click Ok. And that's a hyperlink.
Please, please, please use spell check so I don't have to edit your posts! *I do reserve the right to edit all posts, by the way, for spelling, formatting, content, what-have-you. Please don't be offended.

At the bottom of the text box, don't forget to enter the labels for your recipe. Please be sure to use the labels we've already established: on the right, hit Show all and they will all come up. Just start typing and the box will auto-fill.

If you get called away, you can Save Now and come back to it later. To get back there, you can select New Post again, and then under Posting there will be an Edit Posts tab, where you can find your draft and Edit.

PUBLISH POST will put your recipe on the webpage, finished or not. And that's okay. You can always edit a published post by clicking on the pencil icon at the bottom right of your post.

COMMENT on other people's (or your own) recipes by clicking on the word Comment at the bottom of the post.

This is all I can think of for now, if you have more specific questions, please email me.

Artisan Bread in 5 minutes a day!

I heard about this recipe on NPR---The Splendid Table. I hurried home and checked out the recipe online and quickly made up a batch. I tried several other batches with my own variations and then of course I just had to buy the book. I've tried this basic recipe using half whole wheat flour. Also have added about 1 cup sourdough starter to the basic recipe. I have made bread for many years and this is probably the easiest recipe and also one of the best for crusty, hearty bread (our favorite type of bread). If you don't have a baking stone you really should get one, but until then a good substitute is a clay saucer from the garden shop---the ones that are red and go with the red clay pots. We use these outside on our barbecue for cooking pizza in the summer and they work great. Also, I have found that using parchment paper to raise the dough works easier than using the pizza peel, just pick up the edges of the paper and lift everything onto the stone.

Note from Min, 2/2009: I watched Becky make this bread this past weekend, and it is fast, easy, and delicious. I am embarrassed it has taken me so long to make any! Also, for anyone who's wondering, you can check out the authors', Jeff and Zoe, website at http://www.artisanbreadinfive.com/.


Five-Minute Artisan Bread

December 15, 2007


From Artisan Bread in Five Minutes a Day: The Discovery That Revolutionizes Home Baking by Jeff Hertzberg and Zoe Francois (Thomas Dunne Books, 2007). Copyright 2007 by Jeff Hertzberg and Zoe Francois.


Serves 4

Note: This recipe must be prepared in advance.

1-1/2 tablespoons granulated yeast (about 1-1/2 packets)
1-1/2 tablespoons kosher salt
6-1/2 cups unbleached flour, plus extra for dusting dough
Cornmeal
In a large plastic resealable container, mix yeast and salt into 3 cups lukewarm (about 100 degrees) water. Using a large spoon, stir in flour, mixing until mixture is uniformly moist with no dry patches. Do not knead. Dough will be wet and loose enough to conform to shape of plastic container. Cover, but not with an airtight lid.

Let dough rise at room temperature, until dough begins to flatten on top or collapse, at least 2 hours and up to 5 hours. (At this point, dough can be refrigerated up to 2 weeks; refrigerated dough is easier to work with than room-temperature dough, so the authors recommend that first-time bakers refrigerate dough overnight or at least 3 hours.)

When ready to bake, sprinkle cornmeal on a pizza peel. Place a broiler pan on bottom rack of oven. Place baking stone on middle rack and repeat oven to 450 degrees, preheating baking stone for at least 20 minutes.

Sprinkle a little flour on dough and on your hands. Pull dough up and, using a serrated knife, cut off a grapefruit-size piece (about 1 pound). Working for 30 to 60 seconds (and adding flour as needed to prevent dough from sticking to hands; most dusting flour will fall off, it's not intended to be incorporated into dough), turn dough in hands, gently stretching surface of dough, rotating ball a quarter-turn as you go, creating a rounded top and a bunched bottom.

Place shaped dough on prepared pizza peel and let rest, uncovered, for 40 minutes. Repeat with remaining dough or refrigerate it in lidded container. (Even one day's storage improves flavor and texture of bread. Dough can also be frozen in 1-pound portions in airtight containers and defrosted overnight in refrigerator prior to baking day.) Dust dough with flour.

Using a serrated knife, slash top of dough in three parallel, ¼-inch deep cuts (or in a tic-tac-toe pattern). Slide dough onto preheated baking stone. Pour 1 cup hot tap water into broiler pan and quickly close oven door to trap steam. Bake until crust is well-browned and firm to the touch, about 30 minutes. Remove from oven to a wire rack and cool completely.

yellow curry chicken with potatoes


gaeng kah-ree gai

Of course I don't speak Thai, so don't ask me how to say that. (If you want a hint at pronunciation, there are some audio food files here-kind of fun). This is what we had for dinner last night.

This delicious curry recipe comes from a cookbook I need to pull out more often, Quick & Easy Thai from Chronicle Books. (An aside, here: I don't know if you're familiar with Chronicle Books, but they are so artfully done. I love them. They are now selling my favorite, Moleskine Notebooks, and they have great clearance sales!) Is that enough links for ya?


On to the curry. We just love curry. As usual, I've made some modifications. You'll see.


2 3/4 cups unsweetened coconut milk (I just used two whole cans)

3 Tablespoons yellow (kah-ree) curry paste, OR 3 Tablespoons red curry paste plus 1 Tablespoon curry powder (We don't have yellow paste, so I used the red + powder. Next time, I will back it off to 2 Tablespoons of red paste, this was a bit spicy for the kids.)

6 boneless chicken thighs, cut into big, bite-sized chunks, or about 1 pound boneless chicken breast, sliced crosswise into 2-inch strips

2 cups chicken broth or water (I used 1can chicken broth)

2 medium potatoes, peeled and cut into big, bite-sized chunks (about 1 1/2 cups)

1 medium onion, cut lengthwise into thick wedges (about 1 cup)

2 Tablespoons fish sauce

1 tablespoon palm sugar OR brown sugar


In a medium saucepan or heavy skillet, bring 1 cup of coconut milk to a gentle boil over medium-high heat. Cook for 2 to 3 minutes, until it begins to thicken and becomes fragrant. Add the curry paste and cook 2 to 3 minutes, pressing and stirring to dissolve it into the coconut milk. Add the chicken and cook another minute or two, tossing to coat it with the sauce. (I cooked my chicken a bit longer here because some of it was still frozen--oops! And, I had to put in a couple "in process" pictures because the color is so vivid and beautiful!)


Add the remaining 1 3/4 cups coconut milk, the chicken broth, potatoes, onion, fish sauce, and sugar, and bring to a boil. Reduce heat to maintain a lively simmer and cook, stirring now and then, until the chicken is cooked and the potatoes are tender but still firm, 6 to 8 minutes. Remove from the heat and serve hot or warm.


We served ours with rice and sliced cucumbers. It was delicious.


Saturday, January 12, 2008

Hot Cocoa for A Winter's Night


Now, here's the thing. When Ad and I make hot cocoa, we add Peppermint Schnapps. It's minty and delicious. When Shell makes hot cocoa, she adds Bailey's Irish Cream. It's creamy and decadent.

Ad just tried his first cup of Shell's cocoa, and he wanted me to put it on the blog as "Ad's Hot Cocoa" because it's his favorite. But, truthfully we learned about it from Shell, so this is one of her recipes. And now, it's also one of ours. Ad said something about drinking Hot Cocoa with Bailey's every night!

So, here goes:

Hot cocoa (however you make it, we use Swiss Miss)
Boiling water
*Sometimes we add about 1/3 milk and 2/3 hot water
About one shot of Peppermint Schnapps OR Bailey's Irish Cream
Whipped cream is optional, but darn good!

Try it both ways. Let us know which you prefer.

OR, let us know what YOU add to your hot cocoa!
Cheers!

Grilled Lamb Chops with Garlic and Fresh Thyme

This recipe comes from one of our favorites, Bobby Flay. We just call him Bobby. In his cookbook, Boy Gets Grill, he lists this recipe as Grilled Lamb Chops with Garlic, Fresh Thyme, and Grilled Lemons. Which sounds amazing, but we have not remembered to get any lemons. The chops from our fresh lamb are perfect without the grilled lemons; we'll suffer through!

Serves 4; can be doubled for 6 to 8 (no need to double the marinade)

1/2 cup extra virgin olive oil

6 cloves garlic, finely chopped

8 sprigs fresh thyme (we've also used a bunch of dried thyme because it's winter. Still delicious)

8 (4- to 6-ounce) lamb rib chops

Salt and freshly ground black pepper

4 lemons, cut crosswise in half


1. Combine the oil, garlic and thyme in a shallow large dish or a thick, sealable plastic bag. Add the chops and turn to coat. Cover and refrigerate for about 1 hour. Remove the chops from the refrigerator 20 minutes before grilling.

2. Heat your grill to high. (Bobby is very particular about his grill and grilling, so if you really want to learn about grilling techniques, you should purchase one of his books. He knows his stuff). Season the chops on both sides with salt and pepper.

3. Grill the chops (do not close the grill lid) until lightly charred and crusty, 4 to 5 minutes. Turn the chops over, reduce the heat to medium or move to a cooler part of the grill, and grill until just cooked through, 3 to 4 minutes more. (do not overcook. you will regret it)

(This is where we stop and start eating. If you have lemons, you might try this next part as well).

4. Brush the cut sides of the lemons with olive oil and grill cut side down until lightly charred, 3 to 5 minutes. Serve immediately, placing two chops and two lemon halves on each plate.

Leftover Lamb Curry

This is a recipe I used to "woo" my husband. I did a lot of cooking for him back then. This is one of our favorites, and although it is called "leftover" lamb curry, most of the time we make it with raw lamb, because we love it too much to wait! We recently butchered one of our lambs, so I am looking forward to several batches of lamb curry!

This is from the cookbook, Sunset Recipe Annual 1999, and the recipe itself is attributed to Will Bucklin of Oregon. It looks like you can pick up a paperback copy on amazon fairly cheap. I have doubled the spices to suit our tastes; I will note my changes in italics below.

The most significant and delicious change: substitute organic coconut milk for the chicken broth. See below; it is fantastic!

Prep and cook time: About 30 minutes

Notes: cooked chicken can be substituted for the lamb; increase total broth to 2-1/2 cups.

Makes: 4 servings

1-1/2 cups long-grain white rice (or Minute Rice, whatev)

1 pound cooked lamb, fat-trimmed (or 1 pound raw lamb, just cut it into strips and cook it up first)

1 teaspoon vegetable oil

1 cup chopped onion

2 cloves garlic, minced

2 Tablespoons curry powder (we use 4 Tablespoons)

1/2 teaspoon ground cumin (we use 1 teaspoon)

1-3/4 cups chicken broth (just use the whole can! Or, this is our favorite substitute: 1 can organic coconut milk--you must try this.)

2 Tablespoons cornstarch

Salt and cayenne

Optional condiments: (we usually just serve with yogurt and cucumber)

1 firm-ripe banana, diced

1 cup plain yogurt

2/3 cup chutney

1 cup diced cucumber

1/2 cup dried currants

1. In a 2- to 3-quart pan, combine rice and 2-3/4 cups water. Bring to a boil over high heat and cook until most of the water is absorbed, 7 to 10 minutes. Reduce heat to low, cover and simmer until rice is tender to bite, 10 to 15 minutes longer. (OR, just follow the instructions on whatever rice you're using!)

2. Cut the lamb into strips about 1/4 inch thick.

3. In a 5- to 6-quart pan over medium heat, combine oil, onion and garlic; stir often until onion begins to brown lightly, 6 to 7 minutes.

4. Add curry powder and cumin and stir until spices are fragrant, about 30 seconds.

5. Stir in meat. Add 1-1/2 cups broth or coconut milk and bring to a boil over high heat. Mix cornstarch and 1/4 cup broth. Stir into pan and stir until boiling resumes. Add salt and cayenne to taste. Spoon curry into a bowl.

6. Place condiments in small bowls. Serve curry with rice and condiments to add to taste.

Classic Prime Rib

Ingredients:

1 bone in rib eye roast from your favorite butcher (2 bones should serve 3-4 people, a four bone roast will serve 6-8 depending on how thick you like your prime rib!!)
1/4 cup of equal parts onion salt, seasoned salt and garlic powder

Directions
Pat the salt mixture on both ends and the fat side of the roast. The salt may not stick that well on the fat side but, no worries
Pre heat oven as high as it will go (Usually 500 degrees F)
Put roast in a dutch oven preferabley on a small rack to lift it out of the juices. Place it bone side down, fat side up, put your meat thermometer well into the middle of the roast.
Cook the roast 5-6 minutes per pound
Don't open the oven door while it is cooking!
When the time is up, check the thermometer, if it is 140 degrees it is perfect medium rare prime rib.
If it is not at the temp yet pop it back in the oven at 375 degrees until it hits the 140 mark.
If you must cook it more, keep checking your meat thermometer at regular intervals until is is where you would like it. But don't over cook!
Let the roast cool for 15 minutes or so before slicing and enjoy with some of your favorite horseradish sauce!
you can use the drippings for Au jus.
Be sure to invite me over!

Simple Green Salad

This is super easy to throw together, and it's a favorite of ours. It takes about 10 minutes to make, and yields 4 generous servings. It's from a cookbook called The Minimalist Cooks Dinner, but honestly I don't recommend this book. We have only tried a few recipes out of it, and aside from this salad they have required huge modifications in order to taste good! I'm all for minimalism, but not at the expense of flavor!

4 to 6 cups trimmed, washed, dried and torn assorted greens (who am I kidding, we usually just use Romaine!)

1/4 to 1/3 cup extra virgin olive oil

1 to 2 Tablespoons balsamic vinegar (he also says "or sherry vinegar or fresh lemon juice, but we've only used balsamic)

Salt (imperative--we use Kosher)

Freshly ground black pepper, optional (we leave this out most of the time)


Place the greens in a bowl and drizzle them with oil, vinegar and a (generous) pinch of salt. Toss and taste. Correct the seasoning, add pepper if desired, and serve immediately.

Balsamic Lemon Heirloom Salad

This is my most favorite salad. I found this recipe in the Raley's grocery store. Especially good when tomatoes are in season!
Prep time is 10 minutes
Salad Ingredients
4 large heirloom tomatoes ( I have also used red, yellow and orange, very pretty! I LOVE yellow tomatoes)
1 8 oz. ball of FRESH mozarella or, the smaller balls of fresh mozarella if you can find them.
Snipped fresh basil
Dressing Ingredients
1/4 cup light olive oil
1 1/2 tbsp eash of Balsamic vinegar and fesh lemon juice
1 tsp. of sugar
1/2 tsp of salt
Freshly ground pepper to taste
minced garlic optional
Directions
Slice tomatoes and cheese 1/4 inch thick and layer on a large platter. whisk together all the dressing ingrdients in a small bowl and drizzle over the salad. Top with the basil and serve.
Variation 1. you may layer whole basil leaves in salad instead of snipping
Variation 2. use can substitute some spinach for less of the basil taste, if preferred

Crab Soup

INGREDIENTS
1/2 Gallon whole milk (I have substituted 1 qt. half and half as well)
1/2 pound of butter
3/4 cup flour
1Tbs. sugar
2 cups chicken broth
1 1/2 lbs crabmeat
Lump crabmeat is the best...I have used canned and it is good. Drain well if you use canned crab meat
Salt and pepper to taste
dash of cinnamon and nutmeg (optional)
DIRECTIONS
in double boiler heat milk to steaming (careful! don't boil!)
Melt butter in medium saucepan and add flour stir until lightly browned
Add seasonings and sugar to butter mixture, mix well.
Transfer the butter mixture to soup pot
add broth and milk and mix well heat over medium heat and stir it often
Add crabmeat stir gently, turning heat to simmer for about 5 minutes.
Serve hot and enjoy!
great with some homemade bread and a good salad!

Fish Tacos


This recipe is one that I created with my dear friend and fellow Bad Girl, Kiza. I think of her every time I make these. And for some reason I usually burst in song: specifically, Holiday, by Madonna. I just can't imagine why... They go especially well with an icy Corona with lime, right Kiza?

(because this is a homemade recipe, we've never measured our ingredients. I'll do my best to lead you to success)


2 lbs. white, firm boneless fish (anything that flakes well--we have used halibut, rockfish...)
chopped onion (about one medium)
Cajun Seasoning
Chopped cabbage
1 part sour cream
1 part mayonnaise (real)
Freshly ground pepper
Cumin
Corn or flour tortillas
Lime wedges (1 lime = about 8 wedges)

Heat some vegetable or olive oil in a large saute pan. Fry up the fish all at once. About halfway through frying the fish, add the onions. The fish is done when it flakes easily, so just flake it all up (removing any large pieces of skin) in the pan, and sprinkle liberally with Cajun Seasoning. Historically we have used Cajun Seasoning from LePak, it seems to have the best flavor. Just use a prepackaged Cajun Seasoning that you enjoy, and don't be afraid to Use It. You're going for flavor, here. If you can't taste it, you haven't used enough. Turn off the heat and set fish aside.

While the fish is frying, you can be chopping up your cabbage (probably half a head will be plenty), as if you're making coleslaw--there's no real science to this step, just use your best judgement.

In a separate bowl, mix up about 1/2 cup sour cream, 1/2 cup mayonnaise, pepper and cumin to taste. (again, if you can't taste the cumin, you haven't added enough!). This may or may not be enough to coat your cabbage, so just mix up a bit more if you need to. Just remember to use the same amounts of sour cream and mayo. If you haven't already guessed, you pour this dressing over the cabbage and mix it together. You want enough dressing on the cabbage to coat it, but not drown it. If you put in too much dressing, simply add more cabbage. Simple.

You should probably warm your tortillas a bit. If you have a gas range, just do this over a low-medium flame, flipping every couple seconds until toasty (I just use my fingers to do this, and this is a skill that requires some finesse. And caution). If you don't have a gas range, just heat a pan on the stove top over about medium heat, and do your tortilla warming/flipping in there.

To serve:

Load up your tortillas with fish, top with cabbage and squeeze a lime wedge on top.

I honestly have no idea how many people this will serve. When we first made this recipe, it seemed like we fed a lot of people, because several unplanned guests stopped by and they simply could not resist making a couple tacos. This is a FUN dish to make and eat, and it's quite simple. You will love it.

Don't forget the Coronas!

Baked Pancake


These are simple, delicious and can be quite elegantly presented. Cowboys love them too! (My cowboy husband said they were "like a German pancake," whatever that means.) One batch will make 4 servings, although they are so tasty you might decide you want two. I got this recipe from a friend in Colorado; it's a great and impressive recipe to serve to guests. It also makes a special family breakfast.

Preheat oven to 400 degrees.

Place 2-1/2 Tablespoons butter in 9-inch glass pie pan and melt in oven. When butter is melted, use a pastry brush to cover the bottom and sides of the pan with butter. This will help greatly when trying to remove the pancake.

In blender or food processor, combine:
1-1/4 cup milk
3/4 cup flour
3 eggs
1/3 cup sugar
1/4 teaspoon salt
1/4 teaspoon vanilla
Process until smooth.

Remove pie pan from oven and increase temperature to 425 degrees. Pour batter into pie pan and return to oven. Bake 20 minutes.

Reduce oven temperature to 325 degrees and bake 8 to 10 minutes longer.


Invert on serving platter. (This part is sometimes a bit tricky, to be honest. You may need a knife to loosen the edges, place the serving platter upside down on top of the pancake and invert, then use your knife to loosen any stuck parts of the bottom as you are hovering the hot pie pan over the serving platter with oven mitts because it rarely just comes right out. It's possible you may need to assistance of another person until you get the hang of it. That's what I did. But now I can do it all by myself! usually...)


Sprinkle with powdered sugar, cut into four or more wedges and serve with fresh berries and warm maple syrup on the side. Of course a true cowboy will ask for whipped cream, so you should be sure to have some of that handy as well.

Enjoy this delectable breakfast!

Friday, January 11, 2008

Easy Crab Dip

Here's a recipe for when you decide to go to a party at the last minute, and are told you have to bring something...

1 brick cream cheese, room temperature
1 jar cocktail sauce
1 can crab meat
1 box Wheat Thins (or other sturdy cracker)

Pick a pretty plate to serve this on, roughly dinner plate-sized. Spread cream cheese on the plate, about 1/2-inch thick or so. Top evenly with cocktail sauce. If needed, shred crab a bit and sprinkle evenly over cocktail sauce. (think three-layer dip). And you're done! Serve with crackers.

It tastes great, and no one will ever know it took you less than 5 minutes to put together. Unless you tell them, you Bad Girl!

Thursday, January 10, 2008

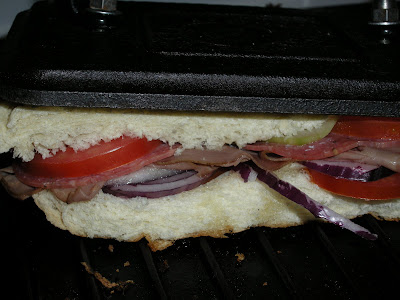
Min & Ad's Panini Sandwiches


Å¡ Fresh French bread, cut in four segments; one loaf will make about four large sandwiches

Å¡ Thinly sliced roast beef

Å¡ Pancetta or procuitto

Å¡ Thinly sliced Provolone

Å¡ Thinly sliced:

o Tomatoes

o Cucumbers

o Red onions

o (red, yellow or green bell peppers, optional)

Å¡ Salt

Å¡ Olive oil

  1. Preheat grill pan and grill press on medium-high
  2. Slice each piece of French bread, careful to keep it parallel with the flattest side—top or bottom—of the bread. (to avoid sliding)
  3. Drizzle inside bottom piece of bread with olive oil—the bread will go on the grill dry, so don’t oil the bottom.
  4. Carefully layer on bottom bread:
    1. cheese
    2. pancetta
    3. cucumbers (lightly salt cucumber layer—important)
    4. roast beef
    5. tomatoes
    6. onions (just a few, not a whole slice)
    7. cheese
    8. top piece of bread
  5. Carefully transfer sandwich to grill pan. Drizzle top of sandwich with olive oil and press down gently. Once you’re sure things won’t slide around too much, press harder. Sometimes if your bread is uneven on top, you will need to keep hold of the press the whole time.
  6. Grill sandwich, pressing, until bottom cheese is melted. Carefully flip sandwich, drizzle with olive oil and press and grill again until warm, melted and nicely toasted.

We purchased a nice Lodge cast-iron grill pan specifically for making this sandwich. We have even made these out in the middle of the desert, over a campfire with our grill pan. We did get a grill press on amazon also, but have since found a bigger, better one from Pampered Chef.

P.S. It's difficult to take a picture that does this sandwich justice! I'll try again next time.

Shell's Vodka Cocktails

This is a great summer drink. My husband and I vacationed in Canada every year for a while and these were GREAT sitting out on the porch of the cabin! Very simple, economical (buy a bottle or 2 at Duty Free!) and you can change the flavor of water to suit your taste! Get the best vodka you can afford... Skyy, Absolut, Finlandia, Friz, Grey Goose, Chopin are all great. No need to buy the HIGH HIGH quality stuff, after all, you ARE mixing it with something. But if you use something too cheap, it will taste like you're drinking rubbing alcohol with lime. Not good.

What you'll need...

1 bottle of vodka (see above)
1 bottle of carbonated "sparkling" lime water (usually sugar, caffeine and sodium free!)
Lime slice for garnish

Get yourself a cup... any cup. If you're on vacation in a cabin, a coffee cup will do just fine. :) Put some ice in it. Add a shot (@2-oz) of vodka. Fill the rest of the glass with sparkling water. Add a slice of lime. The limes serve double duty... they add a little extra flavor and they also serve as markers to how many drinks you've had. Just add a new lime slice every time you refill!

You could use any flavor of sparkling water you like and an appropriate fruit garnish.
Blog Widget by LinkWithin