Saturday, May 31, 2008

Pulled Pork Sandwiches


This is a combination of recipes that add up to fabulous results. It might sound like a lot of work, but it's really not. The pulled pork is cooked in the crock pot. While there is a bit of preparation required, it's not too much. You simply have to taste this sandwich; you will know every ounce of effort was worth it.


The pork recipe is from Williams-Sonoma Kitchen, of course they sell their own dry rub and BBQ sauce, but I make my own. The Dry Rub for Barbecue and the Mid-South Carolina Mustard barbecue sauce are both from The Cook's Illustrated Guide To Grilling And Barbecue, which is an excellent reference guide.

Serve on toasted buns topped with fresh coleslaw. (the coleslaw is my addition, not Williams-Sonoma, by the way). This is the way pulled pork is meant to taste.

Ingredients:

3 1/2 Tbs. Dry Rub for Barbecue
1 quart warm water, plus more as needed
5 lb. boneless pork shoulder
1 yellow onion, thinly sliced
2 1/2 cups
Mid-South Carolina Mustard barbecue sauce,
plus more for serving (optional)
8 to 10 hamburger buns, split and toasted
Fresh coleslaw, for topping

Directions:

In a large bowl, dissolve 2 Tbs. of the dry rub in the 1 quart warm water.

Put the pork in a slow cooker. Add the onion and carefully pour in the water mixture, adding more water if needed to almost cover the pork. Cover the slow cooker and cook on high for 3 hours. Using roast lifters or tongs, turn the pork over and cook until the meat shreds easily when pulled with a fork, about 2 hours more. Continue cooking as needed, up to 1 hour more.

Transfer the pork to a baking sheet, cover loosely with aluminum foil and let cool for 1 hour. Using 2 forks, shred the meat, discarding any fat, and transfer to a large bowl. Stir in the remaining 1 1/2 Tbs. dry rub and the 2 1/2 cups barbecue sauce.

To serve, place about 2/3 cup of the pork on the bottom of each bun. Top with more sauce, a mound of coleslaw and the tops of the buns. Arrange the sandwiches on a platter and serve immediately. Serves 8 to 10.


Friday, May 30, 2008

Mid-South Carolina Mustard Sauce

{picture soon!}

This is the sauce that I use, in combination with Dry Rub for Barbecue, to prepare my fabulous Pulled Pork Sandwiches. It is from The Cook's Illustrated Guide To Grilling And Barbecue.

The authors say: Here is another classic sauce for Pulled Pork that works well with other cuts of grilled pork, too.

Makes about 2 1/2 cups.

1 cup cider vinegar
1 cup vegetable oil
6 tablespoons Dijon mustard
2 tablespoons molasses (or maple syrup or honey. for this Pulled Pork, I use molasses)
4 teaspoons Worcestershire sauce
2 teaspoons salt
1 teaspoon hot pepper sauce, such as Tabasco
Ground black pepper

Mix all of the ingredients, including black pepper to taste, together in a medium bowl. (The sauce can be refrigerated in an airtight container for several days)

Dry Rub for Barbecue


This is the rub that I use, in combination with Mid-South Carolina Mustard Sauce, to prepare Pulled Pork Sandwiches. The rub recipe is from The Cook's Illustrated Guide To Grilling And Barbecue.

The authors say: "You can adjust the proportions of spices in this all-purpose rub or add or subtract a spice, as you wish. For instance, if you don't like spicy foods, reduce the cayenne. Or, if you are using hot chili powder, eliminate the cayenne entirely. This rub works well with ribs and brisket as well."

Makes about 1 cup

4 tablespoons sweet paprika
2 tablespoons chili powder
2 tablespoons ground cumin
2 tablespoons dark brown sugar
2 tablespoons salt
1 tablespoon dried oregano
1 tablespoon sugar
1 tablespoon ground black pepper
1 tablespoon ground white pepper
1-2 teaspoons cayenne pepper

Mix all of the ingredients together in a small bowl.

This rub should be stored in an airtight container and used within a week or two of preparation, because it contains brown sugar.

Thursday, May 29, 2008

Macaroni & Cheese


This recipe is a new one, from Betty Crocker Country Favorites. It's one of those cookbooks that kind of sucks you in--it comes in the mail, you don't think you'll keep it, then recipe after recipe catches your eye and before you know it, you're sending them a check. (Please tell me I'm not the only one).

Anyway, the boys wanted macaroni and cheese, and we were completely out of the boxed kind. (at least they had been boxes of Annie's organic). So, I whipped this together. It didn't take too long, just the attention to stirring of the white sauce and the baking at the end. I didn't have elbow macaroni, so I used fusilli. I sliced up some tomatoes to put on top before I baked it. It was cheesy and delicious, and H-Bomb cleaned his plate.

Macaroni & Cheese
6 servings
Prep time: 25 minutes
Start to Finish: 50 minutes


1 package (7 ounces) elbow macaroni (2 cups)
1/4 cup butter
1/4 cup all-purpose flour
1/2 teaspoon salt
1/4 teaspoon pepper
1/4 teaspoon ground mustard
1/4 teaspoon Worcestershire sauce
2 cups milk
2 cups shredded or cubed sharp Cheddar cheese (8 ounces)

1. Heat oven to 350 degrees.

2. Cook macaroni as directed on package.

3. While macaroni is cooking, melt butter in 3-quart saucepan over low heat. Stir in flour, salt, pepper, mustard and Worcestershire sauce. Cook over low heat, stirring constantly, until mixture is smooth and bubbly; remove from heat.

4. Stir in milk. Heat to boiling, stirring occasionally. Boil and stir 1 minute. Stir in cheese. Cook, stirring occasionally, until cheese is melted.

5. Drain macaroni. Gently stir macaroni into cheese sauce. Pour into ungreased 2-quart casserole. Bake uncovered 20 to 25 minutes until bubbly.

Wednesday, May 28, 2008

Bacon-Wrapped Jalapeños


This is a recipe from Pioneer Woman's website, but she doesn't list the quantities for some reason. So here's my take on it. The quantities below used all of the cream cheese, and nearly all of the bacon. Could vary depending on size of your jalapeños, etc. but I like to have an idea before I get started.

They are awesome and delicious, and when Ree said "make about 4 or 5 times more than you think you'll need," she wasn't kiddin'. Number One and I polished off 16 of these puppies tonight, and I think we could have eaten more if I hadn't put the rest in the freezer.

Go. Make. Some. Right. Now.

Bacon-Wrapped Jalapeños

8 oz. cream cheese, softened
14 or so jalapeños, about 2-3 inches in size (I ran out of cream cheese at 28 halves)
1 lb. thick bacon, cut in thirds (she said thin, but I used thick. I tried to use thin, but it just doesn't hold up and is difficult to work with. Use thick.)

Preheat oven to 375 degrees.

Cut jalapeños in half lengthwise, and carefully scrape out seeds and white membrane with a spoon. Fill each jalapeño half with cream cheese. Wrap each jalapeño half with 1/3 slice bacon, and secure with a toothpick. (make sure toothpicks go through each side of the jalapeño to hold)

At this point you can place the uncooked jalapeños on a baking sheet and stick them in the freezer. When individually frozen, place the jalapeños in a plastic ziploc bag and bake them when you're ready. I baked my frozen jalapeños at 375 degrees, for about 1/2 hour--just watch them. These would be an easy, make ahead appetizer for a dinner party. I plan on keeping bags of these in the freezer to pull out whenever we want!


Place jalapeños on a rack on a baking sheet. Bake at 375 for 20 to 25 minutes, until bacon is browned. (you can put them under the broiler for a minute or two to finish them off, but I didn't have to)

These are amazing.

Llajua pronounced "YAH-kwa"

This recipe is NOT for the meek.  If you find Senor Pepe's Mild Salsa a bit too fiery than DO NOT MAKE THIS RECIPE!!!    You have been warned.

We were recently at a birthday party for another child in our son's daycare.  The family is Bolivian and both grandmothers were visiting.  They were getting the food out and put this pleasantly green "salsa" in front of us.   My husband innocently asked, "What's this?"  Apparently it is common recipe in Bolivia and is used as a salsa-like dip or a sauce on various dishes.  We also found out that just like most traditional recipes, no one makes it exactly the same.  One grandmother said just to throw everything into the food processor, seeds and all.  "If too hot, just add a little tomato."  The other grandmother swore the entire recipe would be ruined if you added tomato!  

It took a while and much deliberation on the grandmother's part but we got the gist of the recipe.  Enough so that we could play around with proportions until we got something we really liked.  I don't have a picture yet but will post one soon!  

Min!  Perhaps I'll bring this to the BBQ in July!

Here's what you need...

8-10  Jalapenos (seeded)
1 medium red onion
coarse salt (maybe a 1/2 tsp or so)
fresh cilantro (about a palm's worth)

Roll the jalapenos on the table before you cut them open.  Apparently this helps get the seeds out.  After seeding the jalapenos, cut both onions and peppers into uniform size pieces and put everything into a food processor.  Cutting it uniformly will help everything get processed more evenly.  Pulse the processor until you have a very finely chopped consistency.  You may have to adjust and add more salt and/or cilantro to taste.  

We played with this recipe a couple times...  we preferred red onion to white onion and leaving the seeds OUT.  The llajua we tried at the party had one habanero pepper in it which added pretty reddish flecks of color but I couldn't feel my lips after 3 bites.  Feel free to take out a jalapeno or two and add the habanero if you're brave!

Great with a Corona!!

French Toast Soufflé


This soufflé is wonderful, and you can make it ahead of time! We prepared a triple batch for a family brunch where it was devoured with many complements.

It is from Better Homes & Gardens Annual Recipes 2004.

French Toast Soufflé

PREP: 20 minutes CHILL: 4 to 24 hours

BAKE: 40 minutes STAND: 15 minutes

1 cup packed brown sugar

½ cup butter

2 Tbsp. light corn syrup

1 1-lb. loaf unsliced cinnamon bread, sliced 1 inch thick

8 eggs, beaten

3 cups half-and-half or light cream

2 tsp. vanilla

½ tsp. salt

1 Tbsp. orange liqueur (optional)

  1. In a medium saucepan combine brown sugar, butter and corn syrup; cook and stir until mixture comes to a boil. Boil, uncovered, 1 minute. Pour into a 3-quart rectangular baking dish.
  2. Arrange bread slices on top of brown sugar mixture. In a bowl, combine eggs, half-and-half, vanilla, and salt; pour over bread slices. Cover and chill in the refrigerator for 4 to 24 hours.
  3. Preheat oven to 350°F. Let baking dish stand at room temperature while oven preheats. Bake, uncovered, for 40 to 45 minutes or until top is browned and puffed and a knife inserted near center comes out clean. Let stand 15 minutes before serving. If desired, drizzle with orange liqueur. Makes 8 servings.

Summer Garden Pasta Salad with Olive and Feta

This recipe is from The Best Make-Ahead Recipe. Right up my alley, as you know. I made the Asiago, Capers and Basil variation for Miss Jenny's baby shower last year, and it was excellent! I'm sure either variation is sure to please. The thing about these Best Recipe folks, they have tried every different way of preparation, so if they say to do something specific (for storing, serving, etc) they have their reasons, and you'd best follow their directions, especially if you plan to make ahead!

Summer Garden Pasta Salad with Olives and Feta
serves 12 to 14

We like the size of farfalle (bow-tie) pasta here, however, you can substitute any small pasta, such as rotini or penne. If using a different pasta shape, note that the yield may change significantly. Cooking the pasta until it is completely tender is crucial here--undercooked pasta becomes tough as it sits in the salad overnight.

DRESSING
6 tablespoons extra-virgin olive oil
3 tablespoons red wine vinegar
3 tablespoons juice from 2 lemons
1 medium shallot, minced
1 tablespoon Dijon mustard
1 tablespoon minced fresh oregano, or 1/2 teaspoon dried
1 teaspoon salt
1/4 teaspoon garlic powder
1/4 teaspoon ground black pepper

SALAD
Salt
1 pound farfalle pasta
2 medium carrots, peeled and grated over the large holes of a box grater
1 large yellow bell pepper, stemmed, seeded and cut into 1/4-inch-thick strips
8 ounces feta, crumbled (about 2 cups)
1 cup pitted kalamata olives (about 6 ounces), chopped coarse
1/2 cup minced fresh parsley leaves
1 pint cherry tomatoes (about 12 ounces), quartered

1. For the dressing: Whisk all of the ingredients together in a medium bowl, set aside.

2. For the salad: Bring 4 quarts of water to a boil in a large pot. Stir in 2 tablespoons of salt and pasta and cook until completely tender. Reserve 1 cup of the pasta cooking water, then drain the pasta in a colander. Transfer the hot pasta to a large bowl.

3. Stir the reserved pasta water into the dressing. Pour half the dressing over the pasta and toss to coat. Stir in the carrots, bell pepper, feta, olives and parsley. Scatter the tomatoes on top of the pasta (do not mix in).

4. TO STORE: Cover the pasta salad tightly with plastic wrap and poke several vent holes in the plastic. Transfer the remaining dressing to an airtight container. Refrigerate the pasta salad and reserved dressing separately for up to 2 days.

5. TO SERVE: Bring the pasta salad to room temperature (or microwave on high power for 1 to 2 minutes to remove the chill). Shake the reserved dressing to combine, then pour half of the dressing over the salad and toss to combine. Add the remaining dressing as needed to keep the salad moist.

TO SERVE RIGHT AWAY: Refrigerate the pasta salad as described in step 4 until just slightly chilled, about 1 hour, before tossing with the reserved dressing.

  • VARIATION:
Summer Garden Pasta Salad with Asiago, Capers and Basil
Follow the recipe for Summer Garden Pasta Salad with Olives and Feta, omitting the feta, olives and parsley. Add 3 ounces Asiago cheese, grated (about 1 1/2 cups), and 3 tablespoons capers, rinsed, to the pasta with the carrots in step 3. Stir in 1/2 cup coarsely chopped fresh basil leaves just before serving.

Tuesday, May 27, 2008

Steak Fajita Marinade

This is a fabulous fajita marinade from my sister-in-law. We use flank steaks for fajitas, and this meal has rendered guests speechless in the past. I believe that is the best complement. Enjoy!

In a large ziploc bag, or non-reactive dish, mix:

1/4 Cup Olive oil

1/4 Cup lime juice

Tons of chopped garlic

2 Tablespoons cumin

2 Tablespoons coarse salt (Kosher)

1 Tablespoon Pepper

2 Tablespoons Mexican Oregano

1 teaspoon cayenne

2 Tablespoons tequila


Place your flank steaks in the bag or dish and turn to coat. Marinate in the refrigerator for a couple hours, turning over every half hour or so. Don't marinate it much longer.

We marinate flank steaks for fajitas, then grill the steaks on high to medium-high about 5 minutes on a side along with onions and colorful bell peppers. Slice the meat thinly against the grain, and serve with warmed tortillas and some beans (these beans or these beans), and you have the Best Fajitas Ever.

Come over, I'll make you some.

Saturday, May 24, 2008

Chiles Rellenos

This recipe is authentic Tex-Mex. While a bit tricky and time-consuming, the end result is delicious, worth the effort and you will NOT be sorry! I will post a picture this summer...the red chile sauce is so fabulous, you will want to use it as a condiment for other dishes. I've even thought of canning it, but so far have not done so.

Chiles Rellenos

_______________________

SERVES 4

IN THE HANDS OF Aida Gabilondo, a longtime resident of the border region where West Texas meets Mexico, these charred, stuffed peppers are a masterpiece of subtlety. Her recipe is an example of real border food.


8 Anaheim chiles

1 lb. Monterey jack cheese, sliced into 3” x 1” strips

2 cups flour

Salt and freshly ground black pepper

4 eggs, separated

Vegetable oil

3 cups red chile sauce (recipe follows)

RED CHILE SAUCE:

1 small onion, peeled and sliced

4 Tbsp. vegetable oil

1 28-oz can whole plum tomatoes

1 clove garlic, peeled and chopped

½ tsp. crushed fresh oregano leaves

1 tsp. sugar

Salt and freshly ground black pepper

1 cup chicken stock (optional)

1. Char chiles by placing over a gas flame, turning often until skin is blackened all over. Or arrange chiles on baking sheet and place under the broiler, turning often until blackened all over. Place hot chiles in a brown paper bag, close tightly, and allow to steam for 15 minutes. Peel off and discard skin. Cut a slit lengthwise at the top of each chile, about ½” from the stem. Use a small spoon to scrape out veins and seeds. Slip cheese slices into the chiles.

2. Pour flour into a shallow bowl and season liberally with salt and pepper. Place egg whites in a large glass bowl and yolks in a small one. Beat whites with an electric mixer or whisk until foamy, add a pinch of salt, then continue beating until whites are stiff but not dry. Lightly beat yolks, then gently fold into whites with a rubber spatula.

3. Pour oil into a heavy skillet to a depth of 1” and heat over medium heat until oil reaches 375°. Dredge chiles first in flour, then in egg mixture, then fry in batches, turning once, until evenly browned all over, about 10 minutes. Drain on paper towels. Serve with red chile sauce.

_______________________________

RED CHILE SAUCE: Sauté onions in oil in a large skillet over medium heat until soft, about 15 minutes. Puree onions, tomatoes and garlic in a blender or food processor, strain, and return to same skillet. Add oregano and sugar, then season to taste with salt and pepper. Cook, covered, over medium heat, for 5 minutes. Thin with chicken stock if sauce is too thick. Keep sauce warm over low heat until ready to use. Makes 3 cups.

FROM SAVEUR COOKS: authentic AMERICAN, page 210


Friday, May 23, 2008

Cacciatore Style Chicken Thighs

At 5:00PM, with no plans for dinner, I pulled out my One-Armed Cook cookbook. I just bought chicken thighs at the store yesterday because they were on sale, and what do you know, here's a recipe for chicken thighs. Not only is it easy, I had all the ingredients on hand and it's quick! (the recipe calls for frozen onions, bottled garlic and the like, but I used fresh because that's what I've got. so it took me a bit longer for prep time, but not too much--I'll put what I used, then what they called for.)


Cacciatore Style Chicken Thighs
servings: 4 to 6
Preparation time: 5 to 10 minutes
Start to Finish time: 45 minutes

1 tablespoon vegetable oil
1 cup chopped onion (1 cup frozen chopped onion)
2 cloves garlic, minced (1 tablespoon bottled chopped garlic)
1 (1-1/2 to 2-pound package chicken thighs, about 8 (I used 8)
1/2 cup white wine or chicken broth (wine, baby, always wine)
1 (28-ounce) can diced tomatoes
2 teaspoons dried Italian seasoning (I don't have this. I looked it up, then threw basil, oregano and thyme in the pot)

1. In a large deep skillet with a lid, heat the oil over medium-high heat. Add onion and garlic and cook 1 to 2 minutes. (I always cook onion and garlic longer)

2. Add chicken thighs, skin side down, and brown for 5 to 6 minutes. *the authors say: The extra step of browning the chicken thighs gives the recipe a real boost in flavor. It's worth those extra five minutes at the stove.*

3. Turn thighs to other side. Add wine or chicken broth, then the tomatoes and Italian seasoning.

4. Reduce the heat to low, cover; cook for 35 minutes, stirring occasionally.

Wednesday, May 21, 2008

Strawberry Almond Muffins


H-Bomb has the distinction of being "the leader" on the final day of preschool, so he gets to bring the final snack! I asked him what he wanted; he said "how about muffins?!" I asked what kind; he requested strawberry. I rifled through my extensive recipe collection, and here we are. I got this off the Internet years ago, from some random strawberry recipe website that I didn't write down.

They sounded good, and somewhat healthy, so we tried them. Every single time it was H-Bomb's turn to be the leader and bring snack, we brought something relatively healthy. Snack time is around 10:am, and I just felt like it was too early for a bunch of sugar. I was in the minority! Every day he wasn't the leader, I would ask him what he had for snack, and he was say something along the lines of "cookies with frosting!" or "chocolate and marshmallows!" or "sugar covered sugar!" until I had just about had it. Poor Miss Julie!

Whenever it was H-Bomb's turn, he brought some flavor of homemade muffins, homemade granola and bananas, fruits and veggies in rainbow hues, that kind of thing. ONE time he did bring cupcakes, but they formed a rabbit-shaped cake for Magic Week. (I tried to follow the themes too, but it was difficult) Anyway, I am looking forward to a preschool "snack"-free summer!

I guess I'm out of almond extract, so I used hazelnut extract. I'm a little bummed--the recipe made more than 12 muffins, so I put the rest into my mini muffin pan. I didn't have any more mini muffin liners, and although I cooked them for half the time, they burned. :-( The big ones are good though! I also meant to sprinkle the muffin tops with raw sugar, but I forgot! Next time for sure...

Here's the recipe.


Strawberry Almond Muffins

1/2 cup butter, softened
3/4 cup sugar
2 eggs
1/2 cup milk
1 1/2 tsp. almond extract
1 1/2 cups all-purpose flour
1/2 cup whole wheat flour
1 tablespoon baking powder
1/4 teaspoon salt
2 cups strawberries, chopped
3/4 cup slivered almonds

Preheat the oven to 375 degrees and line a 12-cup muffin tin with paper liners.

In the bowl of an electric mixer or food processor, cream the butter and sugar. Add the eggs, one at a time, and blend until fluffy. Mix in the milk and the almond extract. In a separate bowl, sift the flours, baking powder and salt. Add the flour mixture to the milk mixture and blend until just combined. Fold in the strawberries and almonds. Fill the muffin cups to the top and bake for 30 minutes, or until golden brown. Makes 12 muffins.

Beef Taco Filling


I can't recall if this is a Martha Stewart recipe or Real Simple...but it's a "Real Good Thing!" (that should cover my bases)

I love this taco filling, it's easy and you can freeze it. I have given it to expectant friends to pull out of the freezer for an easy meal after their little babies come into the world. Everyone loves this...we usually make it into tacos, but you could also use it in taco salad, on top of baked potatoes, or even add it to stews. I usually leave out the jalapeño so the boys will eat it, it is plenty spicy without it.

Makes 6 cups; Prep time: 30 minutes; Total time: 45 minutes


1 tablespoon vegetable oil

3 cups finely chopped onions (about 3 medium onions)

6 garlic cloves, minced

1 jalapeño chile, minced (seeds and ribs removed for less heat, if desired)

1 tablespoon chili powder

1 tablespoon ground cumin

1 tablespoon ground coriander

2 pounds lean ground beef

1 can (28 ounces) crushed tomatoes

Coarse salt

1. Heat oil in a large skillet over medium-high heat. Add onions; cook until softened, about 5 minutes. Add garlic, jalapeño, chili powder, cumin, and coriander; cook, stirring, 1 minute.


2. Add beef; cook, breaking up meat with a wooden spoon, until no longer pink, about 5 minutes. Stir in tomatoes; cook, stirring occasionally, until liquid has evaporated, 15 to 20 minutes. Season generously with salt.


Note: To freeze, cool filling completely, then divide among small airtight containers; freeze up to three months. If using in the other recipes, freeze filling in two containers, putting three cups in each. Before using, defrost overnight in the refrigerator (or in the microwave).

Organize Your Spices!


I have a lot of spices, some that I use on a regular basis, others only on occasion. As far as I am concerned, the ONLY way to make efficient use of time is to have the spices alphabetized. There, I said it. I started with Allspice and worked my way to Wasabi Powder. I have a lazy susan in my upper corner cabinet, where all my spices reside, and the shelves have little labels on them: A-O, P-Z.

It took a bit of work and brain power to set them up, but now every spice has a home, and I can easily find them and put them away. No more annoying, last-minute, empty-the-cabinet-to-find-the-Paprika moments of despair. I know it's right there, between the Oregano and the Parsley. And you won't end up with duplicates--you'll be able to find the Coriander and you won't need to go out and buy another one to make that special recipe.

I find I do have to explain my system to guests in my kitchen, but most agree that it is helpful. (I even know one other person who has alphabetized her own spices!) It's just one simple step you can take to save time and sanity in the kitchen. Trust me, it will make you happy. Go for it.

Taste & Create X: Mom's Banana Apple Bread


I was paired with Steph of a whisk and a spoon for this month's Taste & Create event, hosted by Nicole of For The Love Of Food. Taste & Create is a food EVENT in which participants are randomly paired up and tasked with preparing a recipe of their choice from their partner's blog. Steph, a New Yorker currently living in Sydney, has some amazing recipes on her blog, but I quickly narrowed it down to two or three.

I was very intrigued by Steph's rendition of Caramel-Topped Flan, with lime-infused coconut milk. This is definitely on my list! However, a last-minute camping trip caused time to escape me, and I decided to make my second choice recipe for the event, Mom's Banana Apple Bread. Since I also have to make muffins for H-Bomb's final day of preschool this week, and the store is 35 miles away, I decided to improvise a bit and make the banana bread today. I had a Jonathan apple in the fridge, and some other random apples leftover from our trip, so I used those instead of the Granny Smiths for which the recipe called.

The apples smell heavenly when they are caramelizing, especially after you add the vanilla. I will definitely make the apples alone; they would be excellent in crepes, over ice cream or even alone!


I have altitude issues, so I lowered the oven temperature, which in turn increased the baking time, but my loaf was not burned! If you live at a normal altitude, it should be fine.


This bread is amazing. Just the right amount of spices, and the apples are a fabulous addition. As you can see, I couldn't wait to try it and sliced it when it was still a bit warm. My sons and I ate half of the loaf for lunch! You should try this.

Mom’s Banana Apple Bread- makes one 1/2-quart loaf pan
from The Sweet Melissa Baking Book by Melissa Murphy. All rights reserved. Copyright © Melissa Murphy, 2008


For the apples:
2 tablespoons unsalted butter
3 tablespoons firmly packed dark brown sugar
2 Granny Smith apples, peeled, cored, and cut into 1/2-inch pieces
½ teaspoon ground cinnamon
1 teaspoon pure vanilla extract


For the banana bread:
2 cups all-purpose flour
1 teaspoon baking soda
½ teaspoon ground cinnamon
¼ teaspoon ground cloves
¼ teaspoon freshly ground nutmeg
½ teaspoon kosher salt
8 tablespoons (1 stick) unsalted butter
1 cup granulated sugar
2 large eggs
¼ cup fresh orange juice
1 teaspoon pure vanilla extract
1 ¼ cups very ripe mashed bananas (2 to 3)


Before you start:

Position a rack in the center of your oven and preheat the oven to 350°F. Lightly butter and flour a 1 1/2-quart loaf pan.


To make the apples:

Preheat a medium skillet over medium-high heat. Add the butter and brown sugar and heat until bubbling. Add the apples and cinnamon and sauté until golden and tender, about 5 minutes. Stir in the vanilla. Remove from the heat and set aside to cool.


To make the banana bread:

-In a medium bowl, whisk together the flour, baking soda, cinnamon, cloves, nutmeg, and salt.


-In the bowl of an electric mixer fitted with the paddle attachment, cream the butter and sugar until light and fluffy, 1 to 2 minutes. Add the eggs, one at a time, mixing well after each addition. Scrape down the sides of the bowl.


-In a small bowl, combine the orange juice and vanilla.


-Add the flour mixture to the butter mixture in three batches, alternating with the orange juice mixture, mixing well after each addition. Scrape down the sides of the bowl after each flour addition. Stir in the mashed bananas until combined. Then stir in the reserved apples.


-Pour the batter into the prepared loaf pan. Bake for 55 to 60 minutes, or until a wooden skewer inserted into the center comes out clean. Remove to a wire rack to cool for 20 minutes before unmolding onto the rack to cool further.


*Serve slightly warm or at room temperature. The banana bread keeps well wrapped in plastic wrap at room temperature for up to 3 days. For longer storage, freeze well wrapped in plastic wrap and then aluminum foil for up to 3 weeks. Defrost (still wrapped) at room temperature.

Pasty Pie

This is a true Michigan specialty from the U.P. (Upper Peninsula). It's pronounced "pah-stee." As opposed to "pay-stee." Miners used to take individual meat pies down into the mines with them for lunch. While this isn't individual, it is easy and just as tasty. You could easily use the filling to make individual pasty pies if you wanted to, although I haven't done that yet. You can either make your own pie crust, or use Pillsbury, whichever you prefer.

I have always loved these whenever we went to the U.P. I got this recipe from my friend Taryn, a long time ago when I was living with her son. =) I don't know how many generations of her family lives/has lived in the U.P., but as near as I can tell, most of them still do!

I feel like I need to clarify this post...my Dad is from the U.P., that means he is a "Yooper." My relatives have lived in the U.P. for years and years (I don't have time to count). So this recipe is really nostalgic for me, I feel like pasties are a part of my heritage. I don't know if my grandma ever made them, she died when I was 7 so I never got to ask her. I happen to have been born in the Lower Penninsula, but that does not diminish my affection for or connection to the Upper Penninsula of Michigan.

It's not like I just "found" this recipe...

Also, there are other ways to make these, naturally. Any kind of ground meat will do. Jimmy Dean HOT sausage simply adds a little flavor, but does not diminish the "comfort food" factor of this dish. We use other types of meat too.


Pasty Pie

1 pie crust (for double crust pie)
1 lb. ground sausage (we use Jimmy Dean HOT)
1 onion, chopped
about 4 carrots, peeled and diced
4-6 potatoes, peeled and diced
1-2 rutabaga, peeled and diced
salt
pepper
1/2 to 1 stick butter

Put pie crust in a 9- or 10-inch pie plate.

Cook and crumble sausage with onions until sausage is no longer pink. Place in large mixing bowl. Add carrots, potatoes and rutabaga, stir to mix well. Season liberally with salt and pepper. Pour into pie crust. You should have a mounding heap of vegetables filling your pie crust.


Sometimes I have too much filling and either make another pie or freeze the extra filling. Top generously with pats of butter.


Place second pie crust on top, flute edges and vent. Actually I vented this crust first--with an "R."


Bake in a 375 degree oven for about one hour until crust is golden brown and vegetables are tender.


Let cool a bit before serving, but serve warm/hot.


Pasty pie is traditionally (I think) served with a brown gravy, although some people (not me!) prefer ketchup. My dad uses both, if they're available! This pie is excellent with no accompaniments.


Tuesday, May 20, 2008

Roasted Red Pepper Panini w/Bacon, Brie, Caramelized Onions & Pesto

Tonight we made a new and different kind of panini. I was so hungry, I forgot to take a picture. This is from a friend of a friend's blog called Downright Delish. It's a decent sandwich, and I heard the leftovers are pretty good (I didn't get any leftovers!) The title says it all.

Of course our small grocery store didn't have Brie, so we used provolone. I used 1/2 pound of bacon for four sandwiches, but I wanted more bacon--next time I'll cook the whole pound! I also caramelized the onions with rosemary in the bacon grease--saved time and I didn't want another pan to clean! We used a sourdough loaf called a Jaco, which is kind of like a small French loaf size. (the store was also out of any other kind of sourdough--gotta love living in the middle of nowhere!)

Also, I don't put butter on the outside of the panini. I use olive oil, and I don't put it directly on our cast iron grill. I put the panini on a dry grill, drizzle the top with olive oil, then place the grill press on top. Flip, then drizzle olive oil on the top again.

My husband thought it tasted too "pizza-y" but my MIL loved it. I thought it was good, but I think it would be better with Brie. Boys weren't crazy about it (hence the leftovers!)

You can see the full recipe (and a picture!) here.

Friday, May 16, 2008

Roasted Potato and Turkey Salad

This meal was a HIT for my family...my favorite part is the potatoes...and the "dressing" gives everything such a yummy flavor.

Roasted Potato and Turkey Salad
12 whole tiny new potatoes (about 1 pound)
2 tbsp olive oil
1/2 tsp salt
1/2 tsp pepper
1/3 cup olive oil
2 tbsp dijon-style mustard
4 cloves garlic, minced
1/2 tsp pepper
1 pound cooked turkey, cut into bite-size strips (3 cups)
4 slices turkey bacon, crisp-cooked, drained and crumbled
1 small red onion, sliced and separated into rings (i used a sweet onion, red are too strong for me)1/4 cup snipped fresh Italian Parsley
6 cups torn mixed greens (such as romaine, spinach and leaf lettuce)

Scrub potatoes; prick each potato 2 or 3 times with a fork. Place potatoes in a shallow baking pan, drizzle with the 2 tbsp olive oil. Sprinkle with the salt and pepper. Bake in a 400 degree oven for about 45 minutes or until potatoes are tender; stirring twice. Cool completely. Cut cooled potatoes into quarters.

For dressing, in a small bown whisk together the 1/3 cup olive oil, mustard, garlic and 1/2 tsp pepper.

In a large bowl, combine the potatoes, turkey, bacon, red onion, and Italian parsley. Add the dressing, tossing gently to coat. Arrange the mixed greens on six dinner plates, spoon turkey mixture over greens. Makes 6 servings.

Monday, May 12, 2008

Jalapeño Flank Steak

We had Balsamic-Marinated Flank Steak last night; we hadn't had any kind of flank steak in a long time. It was delicious! You should try it! (I forgot to take pictures, but you should know that the balsamic marinade takes just a couple minutes to prepare, yet is one of the most flavorful marinades, our favorite in fact.)


Dinner also reminded us of the following marinade, which is a bit too spicy for the boys but is perfect for us! After a frantic search for a missing little cookbook, I realized once upon a time I had typed the recipe up to attach to an email-whew! When we get more flank steaks, we will marinade one (or two!) of them in jalapeños just for us...


The key to a good flank steak is NOT to overcook it. We just throw it on the grill (we always grill them, never broil) for a few minutes a side, and it is excellent. As I said on the Balsamic Marinated Flank Steak post, don't be afraid of a rarer steak--this steak is best on the medium rare side, or even rarer than that.

{picture soon!}

Jalapeño Flank Steak

3 jalapeños

4 garlic cloves, peeled

½ tablespoon cracked black pepper

1 tablespoon coarse salt

¼ cup lime juice

1 tablespoon dried oregano

½ cup olive oil

1 ½ pounds flank steak


Combine the jalapeños, garlic, black pepper, salt, lime juice and oregano in a blender or food processor and purée. Pour over steak in shallow roasting pan and rub all over. Cover and marinate in refrigerator 2 to 24 hours. Preheat grill or broiler.


Grill or broil 5 minutes per side for medium-rare. Let sit 5 minutes before slicing. Cut in thin slices across grain and serve hot or cold. Leftovers are great on sandwiches.


Serves 4.

Saturday, May 10, 2008

We Have A Winner!


At long last! Sorry it's taken me so long, but in the middle of the Coconut Contest decision making we took a trip to Washington, I had decided to participate in the Taste & Create event...and life just happens sometimes!

Today, Number One and I made the final decision. The winner is...Cheryl! For the Italian Cream Cake. It's really not as complicated as a three-layer cake may seem (as long as you have three 9-inch cake pans!) and it is delicious! In fact, I ate some for dinner last night.

Thanks to everyone for the great recipes! All the other entries, White Chocolate Coconut Truffles, Coconut Peanut Dipping Sauce, and Granola, are delicious as well, and this was a very difficult call. I encourage you to try them all!

In the end, the Italian Cream Cake takes the cake!

Congratulations, Cheryl!

Sunday, May 4, 2008

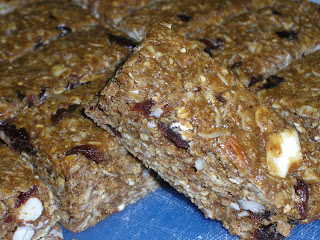
No-Bake Oatmeal Energy Bars with Cherries and Almonds


I found this recipe through fellow Bad Girl Miss Niss, on a blog she likes called Enlightened Cooking. (just for the record, Miss Niss may very well be the Baddest Bad Girl: she just finished her 2nd 1/2 marathon this year! Congrats! She has also run 272 miles so far this year. Yeah, well we just DROVE over 2,200 miles...take that...or something... ;-)

So anyway, I made these Energy Bars. They are quite easy. This time, I used almond butter (plus a little peanut butter to fill the cup), dried cherries and almonds. They are delicious! (next time, we will try blueberries and pecans or cashews!) I cut mine into about 21 servings.


No-Bake Oatmeal Energy Bars with Cherries and Almonds

These are also delicious with 1/2 cup miniature semisweet chocolate chips in place of the nuts or fruit.

2 and 1/2 cups old-fashioned oatmeal, uncooked
1/2 cup toasted wheat germ (e.g. Kretchsmer’s)
1/2 cup dried nonfat milk powder
1/2 cup dried cherries, blueberries, or other dried fruit, coarsely chopped
1/2 cup lightly salted roasted almonds (or other roasted or toasted nuts or seeds) I chopped mine.
1 cup natural-style nut or seed butter (e.g., peanut, cashew, almond, or tahini)
3/4 cup honey
1/3 cup dark molasses (not blackstrap)
1 teaspoon vanilla extract
1/4 teaspoon ground cinnamon
1/8 teaspoon salt

Line a 9x9-inch square metal baking pan foil; spray with nonstick cooking spray.

In a medium bowl mix the oatmeal, wheat germ, milk powder, dried fruit and nuts; set aside.

Place the nut butter, honey and molasses in a large heavy saucepan. Cook and stir over medium heat until bubbly, melted and smooth, about 1-2 minutes. Remove from heat and stir in the vanilla, cinnamon and salt. Mix in the cereal mixture (mix until well blended and all of the oat mixture is coated).

Transfer mixture to prepared pan. Using a large square of wax paper or foil, very firmly press mixture down into pan to compact.

Cool completely. Remove bars using foil overhang and then cut into 16 bars or squares. Tightly wrap each bar in plastic wrap. Store the wrapped bars in a plastic zip-top bag in the refrigerator. Makes 16 servings.


VEGAN No-Bake Oatmeal Energy Bars with Cherries and Almonds:
Use brown rice syrup in place of the honey and soy powder in place of the milk powder.

Thursday, May 1, 2008

Taste & Create! Chicken Mechbous


This month was my first participation in Taste & Create, hosted by Nicole of For The Love Of Food. Taste & Create is a food EVENT in which participants are randomly paired up and tasked with preparing a dish from their partner's blog. I was paired with Dita of My Culinary Sanctuarium, whose blog lists her location as Kuwait. My initial reaction: what language is this blog written in?? Thankfully the recipes are somewhat in English. Since I originally presumed she was from Kuwait, and there was an authentic Kuwaiti recipe, I decided to go the "ethnic" route. I planned to prepare Chicken Mechbous, for which all ingredients except one, called loomi, are readily available here.

After an exhaustive Internet search, I finally found a website called Sadaf.com that sells loomi, or dried black limes, although they are (mistakenly) marketed as "lemons," and are referred to by their Iranian name, omani. I found them! Whole, and ground, so I ordered both; the store is in L.A., and ships UPS, so I am excited! I am anticipating we will like this recipe, and I also found a sort of tea/drink recipe using the whole limes, so I'm anxious to try that as well. Later, after all this loomi searching business, I found out Dita is actually an Indonesian living in Kuwait. By then I was committed to the loomi, and to the Chicken Mechbous!

Oh! The drama! Awaiting my UPS package of loomi, we had a new driver "deliver" that day, and he left my package in a random truck on the ranch! Luckily, the owner of the random truck noticed the package in his truck, just before he left for the Big City (five hours away!). UPS got a complaint email, and I got my loomi! (and some other Middle Eastern treats: rose water, sesame cardamom candy and Chocodates!)


Incidentally, you'll notice that the label on the jar says "Ground Lemon (Omani)" but the ingredient list actually says "Lemon Omani ground is made from dried whole lime." Hmmmm.

~~~~~~~~~~~~~~~~~~~~~~~~~~~~~~~~~~~~~~~~~~~~~~~

So began my culinary journey. Having never had any sort of Kuwaiti food before, I honestly had no idea what to expect. I used a regular American-sized whole chicken, since Cornish hens, which are apparently closer in size to a Kuwaiti chicken, are not available in my small town grocery. A smaller chicken would have been much easier to maneuver in a frying pan!

The ingredients look simple. Deceptively so! This is an involved dish, which required the use of many pans. One to boil the chicken. Another in order to strain the broth. (I used the broth-straining pan to cook the rice!) Another to prepare the onions spiced with cardamom and loomi, and yet another to prepare the tomato sauce. Whew. I hope I can talk someone else into doing dishes tonight! (Thank you, Number One!)


The chicken has a delicate, yet savory flavor. You must eat all components of the dish together: the rice topped with spiced onions topped with chicken topped with tomatoes. I was tempted to throw a couple of my whole loomi limes into the broth, but didn't. I was also tempted to add more than 1/4 teaspoon ground loomi to the onion mixture but I didn't. Next time, I will.

I will definitely make this again, using much smaller chickens and more spices! My favorite part was the spiced onions--I will be thinking of different ways to use them! Overall, a delicious meal which stirs up my intrigue for more Kuwaiti/Middle Eastern dishes. (not to mention, I have a ton of loomi to use up!)


P.S. There is a new Taste & Create Event each month! Go here for the rules, and sign up by the 8th day of the month if you'd like to participate!

Italian Cream Cake

Frosting & Filling:

Combine 1c sugar & 1/4c flour in saucepan. Gradually stir in 1c milk. Cook over medium heat, stirring constantly, until thickened; about 10 min. Chill.

Combine 1/2c butter, 1tsp vanilla, 2oz unsweetened chocolate in pan & heat and stir until creamy. Gradually blend in chilled mixture. Add 1c nuts & 1 c coconut to this mixture. Add more of each to thicken consistency of filling, if necessary.


Cake batter:

1/2 c butter
1/2 c Crisco
2 c sugar
5 egg yolks
2 c flour
1 tsp soda
1 c buttermilk
1 tsp vanilla
1 c coconut
2 c chopped nuts**
5 eggs whites - beaten to soft peaks

Line bottoms of 3 9" pans w/waxed paper, then butter sides & bottom.

Cream butter, Crisco & sugar; beat well. Add egg yolks, vanilla & dry ingredients, mix well. Add buttermilk, coconut & nuts**, mix well. Fold in egg whites. Bake at 350* for 30-35 minutes. Remove from pans and carefully remove waxed paper. Let cool.

When cakes are cool, layer with filling, using about 1/3 of the filling between each layer. Spread the rest of the filling on top of the cake.


** I use walnuts but I'm sure any nuts would work as well.

Enjoy!
Blog Widget by LinkWithin