Showing posts with label Vegetarian. Show all posts

Friday, May 24, 2013

Greek-Style Panini

 
***Taste & Create is a fabulous monthly blog event 
in which participants are randomly paired off 
to choose and prepare a dish from their partner's blog. 
 If you'd like to join us, please email me at 
cowgirlmin07 [at] gmail [dot] com for more information!  
We'd love to have you.**
 
 
For this month's Taste & Create, I was paired with Pavani of Cook's Hideout.  She has a lot of great recipes, but I wanted something simple and these paninis caught my eye!  Pavani's recipe is for one sandwich, but we have 4 in our family so I increased all the ingredients.  I mixed most of a package of frozen spinach with an entire 4 ounce container of feta, and there is probably enough of the spinach mixture left to make two more sandwiches.  

I was generous with the hummus, using more than 2 tablespoons per sandwich (I just spread some on), and unfortunately I didn't have any roasted red peppers!  Our teeny tiny grocery store doesn't carry them, (quite honestly I was shocked to finally find feta there) and my stash was gone, so I bought some roasted red pepper hummus as a compromise.
 
My panini press is at the ranch and I was making these in town, so I improvised with a cast iron pan that fit inside my regular frying pan to weight the sandwiches down.  Worked great but I missed those signature ridges from the press!
 
 
These sandwiches are light but filling, and my husband and I thought they were delicious although they received mixed reviews from our sons.  I think I'll be making these again, at least for the adults!  I know they'll be even better when I get my pantry stocked up with roasted red peppers too.
 
Serves about6
 
6 Kaiser rolls, cut in half
about 1 cup frozen spinach, thawed and excess water squeezed out
4 ounces Feta cheese, crumbled
Jarred Roasted red peppers, cut into thin strips
Hummus (I used store-bought as Pavani did, but I agree, homemade would be even better!)

In a small bowl, combine thawed spinach and feta cheese. Spread this mixture on the bottom roll and top it with the red pepper strips. Spread hummus on the top half of the roll.
 
Heat skillet on medium-high heat. Pour about 1-2 tablespoons olive oil in pan.  Set the sandwiches on the skillet, pour a bit of olive oil on top of each one.  Weigh the sandwiches down with something heavy or with heavy cast iron skillet. Cook 2-3 minutes on each side until toasted and golden.


Wednesday, December 12, 2012

Easy Black Bean Soup

My daughter and I liked this soup so much that we made it twice last week and have vowed to eat it once a week in perpetuity. Consider adding a couple of spashes of half-and-half to the soup shortly before serving.


Easy Black Bean Soup
Serves 6 to 8

2 tablespoons vegetable or olive oil
1 large red onion, finely chopped
8 garlic cloves, minced
1 large jalapeño, minced
1 tablespoon ground cumin
1 teapoon cumin seeds
1 teaspoon ground coriander
¼ to ½ teaspoon cayenne pepper
6 15-ounce cans black beans, rinsed
7 to 8 cups vegetable stock
1 cup chopped cilantro, divided
Juice of two limes
Salt and freshly ground pepper to taste

1. Heat oil in heavy 5-quart pan over medium-high heat.
2. Add onion, garlic, and jalapeño, and sauté over medium heat until the onion is soft and the garlic is fragrant, stirring frequently, about 5 minutes. Do not let the mixture brown.
3. Add ground and whole cumin, coriander, and cayenne and cook for 1 minute, stirring constantly.
4. Add rinsed beans, stirring to combine.
5. Add about 7 cups of vegetable stock and bring the mixture to a boil.
6. Stir in ½ cup of the cilantro and reduce heat to a simmer.
7. Let simmer for 20 minutes or until thickened, stirring occasionally.
8. Puree with immersible blender to preferred consistency. Stir in additional broth if you want a thinner consistency.
9. Add salt and pepper to taste. Serve sprinkled with chopped cilantro.


NOTE: Have a party by making a huge batch of this soup and asking folks to bring a topping. Consider having cooked rice to put on the bottom of the soup bowls. Topping ideas: fried tortilla strips, Greek plain yogurt, sour cream, grated cheese, sliced green onion, chopped red onion, chopped hard-boiled eggs, crumbled sausage, crumbled bacon, chopped tomatoes, avocado slices.

Monday, November 12, 2012

Salsa Verde

Without further ado, my assignment for the Secret Recipe Club this month was:


Amy has many tempting recipes, including the Puffy Apple Pancake (quite similar to my Baked Pancake, but with apples!), Baked Vanilla Doughnuts (doughnuts, again?!!), and Pollo al Chilindron.  In the end, I ran across this Salsa Verde recipe (link below), and I had to make it for several reasons:

  • It is one of Rick's recipes.  
  • I love salsa verde, but I have never made it.   
  • Reading the recipe made me crave it, so I ran to the store for tomatillos and chips!  

I doubled it from the start, except I left out half of the water.  Below is the double batch recipe, follow the link for Amy's proportions.
This recipe is easy to put together, and tastes fresh and delicious!  Enjoy some today!


Salsa Verde
makes about 2 cups

1 pound (10 to 12 medium) tomatillos, husked and rinsed
2 jalapeno pepper, stemmed and seeded
10 or 12 sprigs fresh cilantro, roughly chopped 
1/2 cup finely chopped onion
1/4 cup water
coarse salt
 
Roughly chop the tomatillos and the chiles.
 

In a blender or food processor, combine the tomatillos, chiles, cilantro and water. Pulse briefly to a coarse puree; scrape down sides.  


Rinse the onion under cold water, then shake to remove excess moisture. Pulse a couple times into the salsa, then scrape into a serving dish.
 

Season with salt to taste.


Secret Recipe Club

Wednesday, July 25, 2012

Taste & Create: Gobi Masala/Cauliflower Curry

***Taste & Create is a fabulous monthly blog event in which participants are randomly paired off to choose and prepare a dish from their partner's blog. If you'd like to join us, please email me at cowgirlmin07 [at] gmail [dot] com by the 8th of the month!! *** 


This month I was paired with PJ of Seduce Your Tastebuds.  I love being paired with her, because she cooks delicious authentic Indian dishes, and her directions are quite easy to follow, once you figure out all the ingredients!  ;-)  Her blog is vegetarian, which is a welcome change from our usual fare.

Usually it takes me a while to choose which dish to prepare, but not this time.  This time I had just purchased an entire cauliflower, when I happened across this masala recipe!  It looked so good, and I had most of the spices, so I went for it.  I forgot that you can substitute basil for curry leaves, and used parsley instead.  Still good~

It's important with this dish to have your ingredients prepped before you start cooking, so everything is ready to toss in at the proper time.  Aside from that, it's pretty easy, and delicious!

Although PJ recommends serving with roti, we used tortillas because we always have them on hand.  Follow the link below for PJ's helpful step-by-step photos and many more yummy vegetarian recipes!
  

Serves 4-6
 
1 medium cauliflower
1 tablespoon salt
2 teaspoons oil
1 teaspoon fennel (anise) seeds
1 small onion, sliced
2 cloves of garlic, minced
1" piece of ginger, peeled and grated
a few curry leaves (I used flat Italian parsley) 
1 tomato, chopped (I forgot the tomato, so I added 1 can diced tomato, drained)
1 teaspoon garam masala
1 teaspoon red chili powder (I reduced to 1/2 teaspoon)
1 teaspoon ground coriander
1/4 teaspoon turmeric powder
salt, to taste
1 tablespoon kasuri methi (dried fenugreek) or celery leaves (I didn't have either of these, so I didn't add anything) 

Break cauliflower into florets in a large bowl.  Let it rest in hot water .Add a tablespoon of salt to that water and keep aside.

Heat 2 teaspoons oil in a pan and add fennel seeds.  When the fennel seeds sizzle, add onion, garlic, ginger, and a few curry leaves to the pan.  Saute until the onions turn soft.

Add 1 chopped tomato and cook till the tomato is mushy. Add garam masala, red chili powder, coriander, turmeric, and salt to taste.  Mix well. 

Discard the water that has the cauliflower and add the florets to the pan.  Mix well and add 1 cup of water. Cover and cook till the florets are soft but not mushy.  Stir a couple of times in between to prevent burning the florets and masala, add more water if needed.

When the cauliflower is cooked add 1 tablespoon kasuri methi.  Mix well and simmer over low heat for a few minutes. 

Serve with rice and tortillas.

Wednesday, May 23, 2012

Taste & Create: Puff Pastry with Poornam Filling

*Taste & Create is an amazing monthly food blog event, created by my friend Nicole of For the Love of Food. Participants are paired up randomly, and each create a recipe from their partner's blog! It is so fun! Please join us.

The deadline to sign up is the 8th day of each month, email me at cowgirlmin07[at]gmail[dot]com if you're interested!


For the month of March, I was paired with Jayanthi of  Sizzling Veggies.  I am so embarrassed that I have let this go for so long.  I'm not trying to make excuses about it, I just had a lot going on and did not get it done.  I had originally planned on making Jayanthi's Cabbage Koftas in Malai Gravy or her Baked Bread Koftas in Spinach Gravy, and one day I will probably make both of those!  All of her recipes sound so wonderful.

When it came right down to it though, I ended up choosing her Puff Pastry with Poornam Filling.  I have a huge container of jaggery for which I am always looking for uses, and I am a sucker for coconut.  Add cardamom to the ingredient list, and you didn't have to ask me twice!

These are interesting...I think they are good, but I'm not a huge fan.  They are sort of like chewy caramel with coconut in pastry.  My mother-in-law and my oldest son LOVE them.  Mixed responses from a couple neighbors and the rest of the family.  Maybe they are an acquired taste if you don't absolutely love them the first time? Also, mine look nothing like Jayanthi's...follow the link to see what they are probably supposed to look like!  ;-)

Puff Pastry with Poornam Filling

1/3 cup jaggery
1/3 cup shredded coconut (I used raw dried coconut, perhaps the smaller shred of the sweetened coconut would have worked better?)
1/2 cup sweetened condensed milk
a pinch of cardamon powder
1 puff pastry sheet

Thaw frozen puff pastry sheet for 40 minutes at room temperature before starting this recipe.  Preheat oven to 375 degrees F.  Line a baking sheet with parchment paper in case the poornam filling oozes out.

In a small pan, add jaggery powder with 2 tablespoons of water. Let the jaggery dissolve in the water and bring to a boil. Add cardamon powder and coconut and mix well. Let the jaggery and coconut filling thicken over medium-low heat.  I reduced until the liquid was almost gone.

Add sweetened condensed milk and mix well. Keep stirring until the poornam filling is thick and holds together.  You may want to reduce the heat during this step.

When pastry sheet has thawed, cut dough into circles. (not knowing exactly how big, I made mine about 3" diameter with a glass).  Roll the dough with a rolling pin (I flattened mine out with my fingers) and place a tablespoon of filling in the center.

Take two opposite ends of the circle and while holding this, pleat the entire outer part of the circle to form a shape of modakam.  (I have no idea what shape a modakam is, so I went by looking at Jayanthi's photos on her original post, see link above, and really just pleated around the outside to sort of hold in the filling)

Repeat steps 4 and 5 with other pastries. Jayanthi made 9 modakams with the given poornam filling measurements, I ended up with 11. 

 Bake the pastries in the oven till they turn golden brown, about 10 minutes.

Monday, April 30, 2012

Vegetable Quinoa Salad

This is a delicious salad that I've made several times now, most recently for a luncheon that I catered.  It paired well with this Watermelon and Citrus Salad with Mint, is perfect for a protein-packed light lunch or dinner, and is also quite good on top of hummus in a pita!

We love it.  I found this and other fabulous recipes compiled in Alisa's FREE eCookbook, Smart School Time Recipes. The recipe is by Marta of Yummy Veggies, and it is a keeper!  My changes are below, in italics.  Incidentally, I quadrupled (or perhaps quintupled??, I've forgotten now) this recipe, and I believe it would have served almost 50 people!  The original recipe says that it serves 4, but with all the vegetables I'd say it serves more.  You decide.  Anyway, the leftovers keep well, so it doesn't matter!

~~~Picture soon!~~~


Yummy Veggie Quinoa Salad

Salad:
1 tablespoon olive oil
3 cloves garlic, crushed (I mince)
1 cup dry quinoa
2 cups water (or vegetable broth and omit chicken-like seasoning)
1 tablespoon chicken-like seasoning (I found this weird, Vegan wet-sand-like bouillon called "Not Chick'n" and used 1 cube per 2 cups water)
1 cup edamame (soy beans, usually frozen, you'll need to shell them, but if you can find frozen mukimame they're already shelled!)
1 cup frozen corn
1 red onion (I omitted this)
1 red bell pepper, diced
1 cucumber, diced
2 to 3 carrots, diced

Dressing:
juice of 1 lime
3 tablespoons olive oil
1/4 teaspoon ground cumin
1 tablespoon chopped fresh cilantro (optional, but don't use dried)*I omit this
1 tablespoon chopped fresh parsley (optional, I prefer flat Italian parsley)
1 teaspoon sea salt

Add the 1 tablespoon of olive oil, garlic and dried quinoa to a nonstick skillet (that has a lid).  Allow to brown on medium-high heat for about 2 to 5 minutes.  Add water and chicken-like seasoning and turn to high.  Once it boils, turn heat down and cover.  Allow to cook about 15 minutes (this time keeps the quinoa a bit al dente).  You can add the shelled edamame and corn when you have about 7 minutes left.  Once the quinoa is cooked, remove from heat and remove lid, allowing it to cool.

*I'm not sure if it was the quantity of quinoa I was cooking, but I did need to add about 10 minutes to the cooking time, and even then there was a lot of liquid left...*

Meanwhile, chop up the fresh vegetables and set aside.  Marta likes the vegetables small, and I agree, maybe the size of a kernel of corn, but you can decide how you like it best.  Mix up the dressing (I use a jar with a lid) and set aside.  Once quinoa is cool, toss all together and serve.

*This keeps so well in the refrigerator that it can be prepared a day in advance.  To serve, I garnished with a few sprigs of Italian parsley.

Tuesday, October 25, 2011

Mushroom Turnovers with Sour Cream

As soon as I received my Dinner Tonight email, I said "Mushroom Turnovers with Sour Cream" out loud, and H-Bomb said, "Can you make those for dinner tonight??" We had everything except mushrooms and sour cream, and I was planning on going to the store anyway, so I said yes! I ended up with some white button mushrooms, cremini and a couple portabellos (H-Bomb's favorite mushroom). I weighed the mushrooms to equal about 20 ounces, because none of them were in the right size package, of course.

Easy to put together, the hardest part was rolling out the pastry dough evenly enough to make four turnovers of roughly equal size. I didn't trim the edges of the dough, honestly with my poor rolling I needed all the dough I could get!

These are quick, savory and delicious! Three out of four family members finished their dinner. We served them with edamame and green peas (each boy requested each vegetable) to green things up.


Mushroom Turnovers with Sour Cream

From Everyday Food, November 2008

Our flaky stuffed pastries are a vegetarian main that's easy and elegant. Store-bought puff pastry makes quick work of these savory turnovers that require only five ingredients.

Prep Time: 25 minutes
Total Time: 55 minutes
Serves 4

2 tablespoons olive oil
1 large onion, chopped
4 packages (5 ounces each) mixed mushrooms, trimmed and thinly sliced
Coarse salt and ground pepper
1 sheet frozen puff pastry (from a 17.3-ounce box), thawed
1/2 cup sour cream, for serving

Preheat oven to 425 degrees. In a large nonstick skillet, heat oil over medium-high. Add onion; cook, stirring occasionally, until golden brown, 5 to 6 minutes. Add mushrooms; cook, stirring occasionally, until mushrooms are tender, 4 to 5 minutes. Season with salt and pepper; set aside.

On a lightly floured work surface, roll out dough (still folded in thirds) to a 20-by-10-inch rectangle. Using a pizza cutter or sharp knife, trim edges straight; cut dough into four 10-by-5-inch rectangles. Dividing evenly, mound mushroom mixture on one half of each rectangle, leaving a 1/2-inch border on three sides. Lightly brush border with water; fold other half of pastry over filling, and press edges firmly to seal. With a floured fork, crimp edges.

Using a wide metal spatula, transfer turnovers to a large baking sheet. With a paring knife, cut 3 to 4 small slits in the top of each turnover. Bake until golden and puffed, 20 to 25 minutes. Let cool 5 minutes; serve turnovers with sour cream.

Thursday, September 1, 2011

Taste & Create: Carrot Hummus


Taste & Create is a monthly food blog event, created by my friend Nicole of For the Love of Food. Participants are randomly paired, and must choose and create a recipe from their partner's blog. It is FUN. If you'd like to sign up, check out How it Works or email me at cowgirlmin07[at]gmail[dot]com by the 8th of every month!

~~~~~~~~~~~~~~~


My partner for this month was Melynda of Mom's Sunday Cafe. I really thought I knew what I was going to make. I had (still have) a bunch of plums in the drawer in my fridge, and I was going to make Melynda's plum jam with port wine. And I still will. But time has gotten so far away from me, I don't even know where to look for it. And then I kept going back to Mom's Sunday Cafe for one more look around...and after that, I couldn't decide!

Now here it is, past the deadline, but I just ran across a couple more intriguing recipes! Have you ever heard of Carrot Pie? I haven't, but I am totally going to make one. When my parents are in town in a couple weeks, because I think my dad will really like it. So that won't do for THIS month's Taste & Create. However, I also found this recipe: Carrot Hummus. I love hummus, my boys love carrots, it sounds perfect for us. Here we go.

I realized I didn't have tahini or toasted sesame oil, which Melynda uses. I substituted roasted walnut oil instead. I also bypassed the cumin seed garnish, not because I didn't like the sound of it, but because I caught a nasty head cold yesterday and today just didn't have the energy to get it done.

I used 1 large carrot and 2 small ones, I probably could have used a couple more if I had them. Who runs out of carrots, I ask you??

I like the bright orange color of this dip, and the flavor is good too. I had some toasted pita triangles that I made the other day. I'm sure it will taste even better when my taste buds are back to normal, when I will definitely be making this again!

Let me know what you think! And isn't my little carrot spreader the cutest thing you've ever seen?!


Carrot Hummus
Makes approximately 2 cups.

2 large or 3 small carrots, peeled sliced and cooked till tender, drained well.
1 15 oz can garbanzo beans, drained well
1 - 2 cloves garlic
1/4 t salt
2 T lemon juice
1 t toasted sesame oil (I used roasted walnut oil)
1/4 - 1/3 c olive oil

Combine all ingredients and process until smooth, stopping to scrape down sides of processor bowl as needed. Transfer to a serving/storing container. Garnish and enjoy.

Cumin seed & salt garnish: 1 - 2 t cumin seed and 1/4 t salt.
Pan toast until fragrant, crush lightly.

Drizzle a little more olive oil over the top, add the cumin seeds, store in the refrigerator.

Serve with assorted vegetable dippers and crackers.

Sunday, May 1, 2011

Gingered Watercress

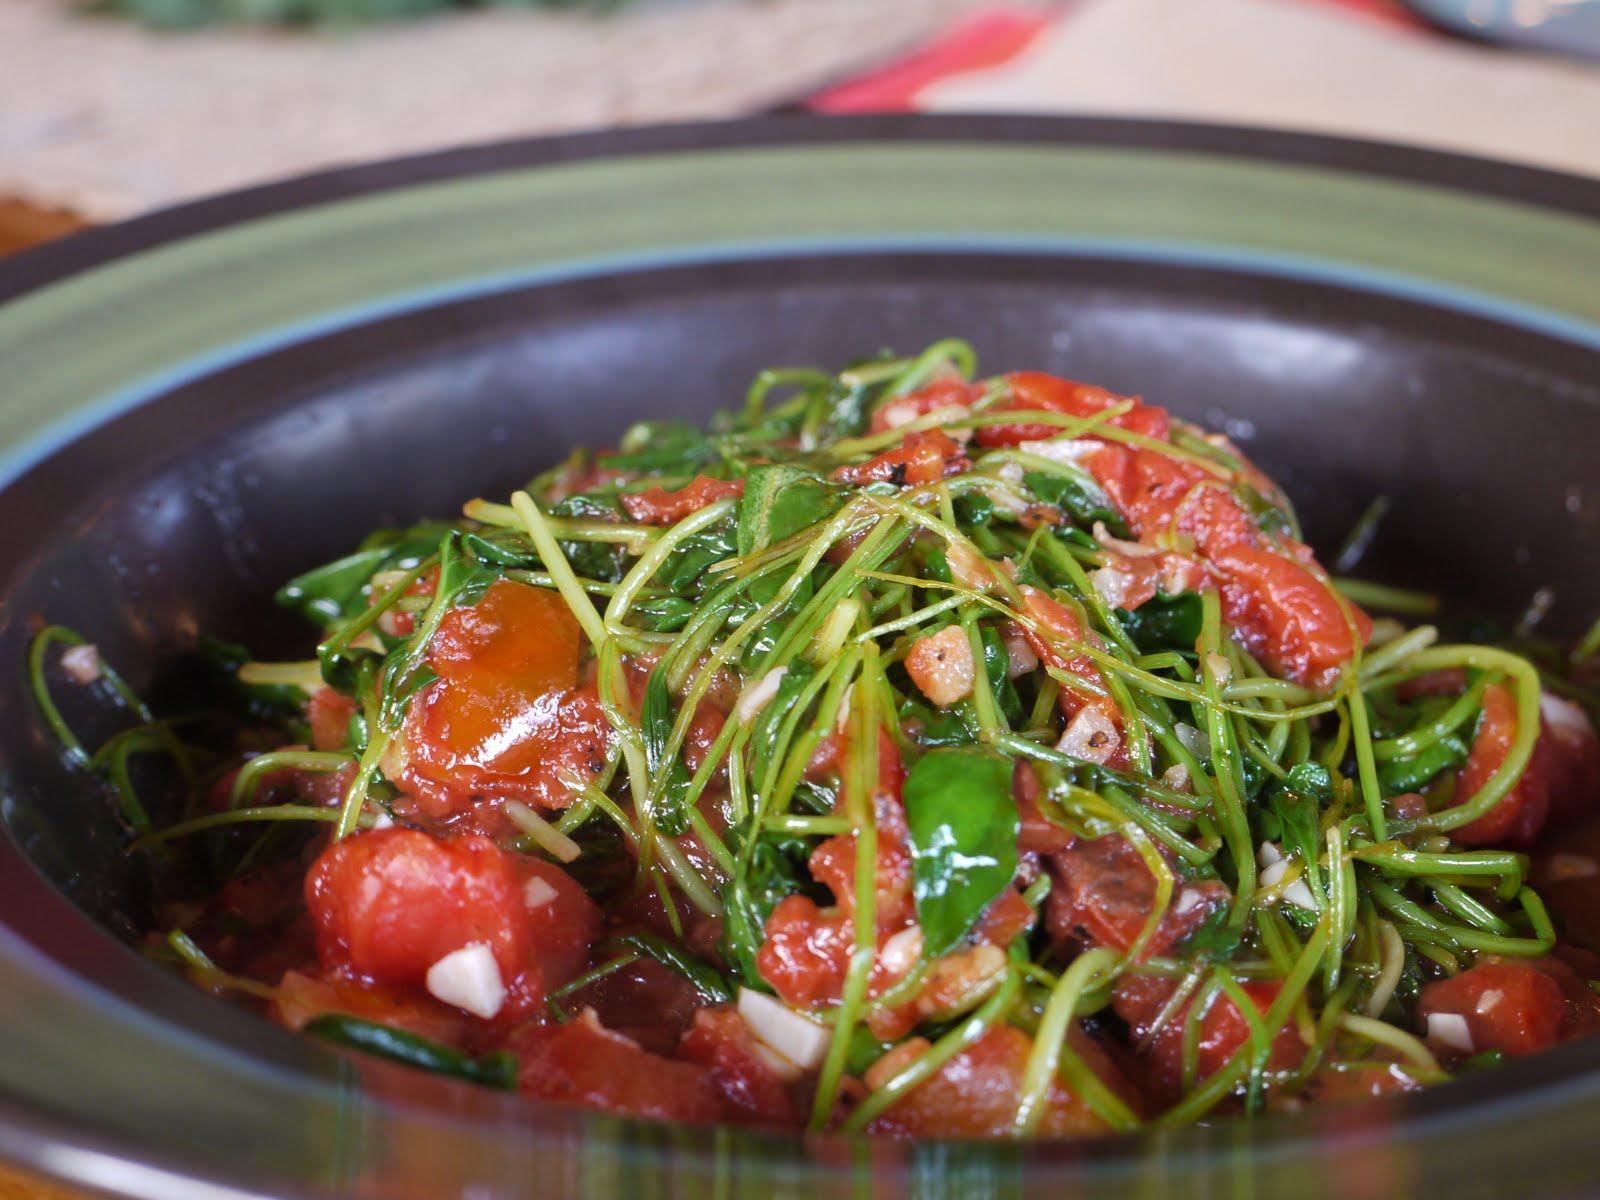
I happened across a television show on the Cooking Channel called French Food at Home, where this dish was being prepared. I'd never seen the show before, never heard of the "cooking channel" before and I've never had watercress before. It looked so easy I was intrigued and decided to try it. Of course calling it French didn't hurt either!

This is an interesting side dish, and good for something a little different. The watercress stems are sort of crunchy and take on the flavor of the other ingredients (which is good, because I wasn't impressed with the raw watercress flavor). Our boys said they didn't like it, but did take a few bites each. My husband and I didn't love it, but it was pretty good.

I didn't have a fresh tomato, so I used canned diced tomatoes. If you are going to do this substitution, only use half a can. Next time I will also chop the diced tomatoes finer. I would also use a bit more ginger. On French Food at Home, she said to use about 1 inch of ginger. Measure generously.

I still don't understand why our teeny tiny grocery store carries watercress and not kale...but regardless you should try this dish for a change.


Gingered Watercress

Recipe courtesy Laura Calder

Prep Time: 10 min
Cook Time: 15 min
6 servings


2 bunches fresh watercress, trimmed (about 1 1/2 pounds)
3 tablespoons oil
2 cloves garlic, minced
1 knob (1-inch) fresh ginger, peeled and minced
1 tomato, seeded and chopped
Kosher salt and freshly ground black pepper

Wash the cress and spin it dry. Heat the oil in a wok or skillet. Add the garlic and ginger and cook 1 minute. Add the tomato and cook to paste. Add the cress, and cook down, turning occasionally with tongs, until tender, about 10 minutes. Season and serve.

Sunday, January 30, 2011

French Onion Soup

This is my version of a Tyler Florence recipe. Hope you enjoy!

Ingredients:

3 large onions, sliced (I used a combination of red, white and sweet onions - 1 of each)
4 T butter
1 T EVOO
2 large garlic cloves, minced
1/4 cup balsamic vinegar
1.5 cups red wine
1.5 quarts of beef stock
3 - 5 dashes worcestershire sauce
kosher salt
freshly ground black pepper
2 bay leaves
2 sprigs fresh thyme
6 slices of baguette, toasted
1.5 cups shredded gruyere or swiss cheese (I used Sargento's shredded swiss & gruyere cheese)

Directions:

1. Over medium to medium-high heat, saute onions in butter and extra virgin olive oil until lightly carmelized (this will take a good 30 - 40 minutes). Do not season until onions are translucent (about 10 minutes), once they are, season to taste with salt and black pepper. (A little trick to help the carmelization process -- add 1 teaspoon of granulated sugar once the liquid released from the onions is almost evaporated)
2. When onions are carmelized, add garlic and saute for 30 seconds, until fragrant, then add balsamic vinegar and deglaze bottom of pan.
3. Add red wine and simmer until reduced by at least 1/3 (about 15 minutes)
4. Add beef stock, worcestershire sauce, bay leaves and thyme and return to a boil, then continue simmering for 30 minutes on low heat.
5. Adjust seasoning as needed and ladle into 6 oven-proof bowls or crocks. (Remove bay leaves and thyme stems)
6. Place 1 toasted baguette slice in each bowl and heap 1/4 cup of shredded cheese on top
7. Broil until cheese is melted and bubbly

Enjoy!

Sunday, December 19, 2010

Grow Your Own Sprouts!

2nd batch, Clover Sprouts


I've read about how easy it is to grow your own sprouts, and how delicious, but I'd never tried until now! (and now we are hooked!)

I was searching on amazon.com for plastic lids for canning jars for our sourdough because the one we had broke. I ran across this strainer lid for growing sprouts. (Although you don't really need a strainer lid if you have cheesecloth, which you can secure with the ring from a canning jar lid). I didn't have any cheesecloth, so I added the strainer lid to my order, along with a sampler pack of Organic Sprouting Seeds!

I did have a large canning jar around, so I was all set there. When the seeds arrived-- 2.5 pounds with 10 different varieties--I let the boys pick which kind they wanted to try first. H-Bomb promptly chose the 5 Part Salad Mix, which contains alfalfa, radish, mung bean, lentil and broccoli seeds. Yum!

I placed 2 tablespoons of the seed mix in my quart jar and covered with 8 tablespoons of warm (not hot) water, and let soak overnight.

The next morning, I drained the seeds, rinsed them and drained them again. I swirled the jar gently to help the seeds separate and coat the sides of the jar, laid the jar on its side and covered it with a towel on the counter.

The recommendations for rinsing vary wildly, so I just followed the instructions on the package, which says "Sprouts MUST be RINSED and DRAINED WELL 2 to 3 times per day during the growing period." They're pretty serious about it, the capitalization is right there like that on the package. Who am I to presume anything different?

I grew my sprouts in this manner for 3 days, keeping track on the calendar because this was the first batch. After that, there were sprouts! They needed to be exposed to light for 3 to 5 hours to develop the green color, then rinsed in a large bowl of cool water to remove the hulls. I covered the sprouts with cold water, then pressed the sprouts down while I removed the floating hulls with a spoon. After that, you can grab the sprouts out of the water, piling them in a colander to drain (and leaving any unsprouted seeds at the bottom of the bowl).

Store sprouts in an air tight container in the refrigerator and rinse 2-3 times per day to maintain freshness. And that's it!

We have already made the 5-part Salad Mix, a batch of Clover Sprouts, and are now on Green Lentil sprouts! It is so fun to see the seeds actually sprouting. As soon as one batch is ready to eat, we get another batch growing. So far we've only needed to grow one jar at a time, but I could see growing two jars of sprouts when the boys get older.

Tuesday, December 7, 2010

Carrot-Mushroom Loaf

I found this recipe in the Moosewood Cookbook (I have both the first edition and the revised 15th anniversary edition). This comes from the 15th anniversary edition.

If you're wondering why a cattle ranch household would be serving a vegetarian dish, there are several reasons. We like to mix it up, and this sounded good. Especially when you have just come home from a stock-up trip to Costco with 10 pounds of organic carrots that you just couldn't resist. So, there you have it.

It seems like Mollie's recipes are chronically underestimating the assembly time. Even having a precious assistant like Sawed Off (age 4) to help put carrots in the food processor, peel onions when my eyes were burning and chop mushrooms (I'm so proud!), it sort of seemed like this took forever to assemble. I used the food processor for the bread crumbs, carrots and cheese, as suggested. I also used it for the onions. I honestly can't say what took so long, or even how long it took. It just seemed like much longer than 30 minutes, Mollie. That's all I'm saying.

I took a couple liberties with the recipe. I added an extra egg because I felt like it needed another egg. Perhaps this was because after processing the last of our artisan bread, I had less than half the required bread crumbs, so I used oatmeal. Sawed Off, the little genius, suggested that I make "oatmeal crumbs" with the food processor, so I did. (*I use oatmeal instead of bread crumbs in my meat loaf too) I also used more butter with the onions and mushrooms. I felt like I had to.

I topped the loaf with a bit of cheese, some dill, a few sesame seeds. I made it early in the day, so I simply covered it with aluminum foil and put it in the refrigerator. This made it quick to pull out and toss in the oven before dinner, leaving time to make a salad, maybe have a glass of wine.

So, the recipe isn't very photogenic, plus we had a dinner guest and we were busy talking. No picture this time, but there will definitely be a next time! Everyone loved this dish! Stay tuned...


Carrot-Mushroom Loaf
30 minutes to assemble; 45 minutes to bake Yield: 6 to 8 servings

A food processor fitted with the grating attachment makes short work of this casserole. Use it first to make the bread crumbs, then to grate both the carrots and the cheese--without cleaning it in between.

You can use store-bought bread crumbs, but homemade ones will make this dish taste exceptional. To make superb bread crumbs, the trick is to use superb bread.

Note: Once baked, this casserole can be frozen. It reheats beautifully.

2 cups minced onion
1 tablespoon butter (I used at least 2 tablespoons)
1 pound mushrooms, chopped
1 1/2 teaspoon salt
1 teaspoon basil
1 teaspoon thyme
1 teaspoon dill
3 to 4 medium cloves garlic, minced
1 1/2 pounds carrots, grated (about 6 cups)
2 cups superb bread crumbs (I used about half bread crumbs and half "oatmeal crumbs")
1 cup (packed) grated cheddar
2 eggs, beaten (I used 3 eggs)
black pepper, to taste

Optional toppings:
extra dill, cheese, bread crumbs; a sprinkling of sesame seeds; any, some or all

Lightly oil a 9x13-inch baking pan. Preheat the oven to 350 degrees F.

In a large skillet, sauté onions in butter over medium heat for about 5 minutes. Add mushrooms, salt, herbs, and garlic, and continue to sauté for about 10 more minutes.

In a large bowl, combine carrots, bread crumbs, cheese, eggs, and pepper. Add the sautéed mixture and mix well. Spread into the prepared pan and sprinkle with your choice of toppings. Cover the pan with foil.

Bake for 30 minutes covered, then uncover and bake 15 minutes more. Serve hot or warm.

Tuesday, August 10, 2010

Peanut Sauce

I love peanuts. Peanut butter. Peanut butter cookies. Roasted peanuts. Spicy peanuts. There is something about the flavor of peanuts that is very appealing to me and I am so very grateful I do not suffer from peanut allergies.

That said, I don't eat many peanuts anymore because I mostly eat almonds. Almond butter, roasted almonds, etc. So, it is always a special treat when I decide to make peanut sauce for something like peanut noodles or Gado Gado, a traditional Indonesian vegetable salad covered in peanut sauce. Yum. That always brings me back to one of my favorite places on earth: Indonesia- the inspiration for this sauce.

So, here's your warning: This isn't really a quick sauce to prepare. You need to follow through with a few steps, but it is well worth the time and effort, I promise.

Step 1: Thinly slice 4 cloves of garlic and fry them with 3-5 dried Thai chilies (I always go with 5) in a couple tablespoons of peanut oil until the garlic is golden and toasted and the chilies are a little puffed.


Step 2: Remove these from the heat and oil to stop them from cooking. Let them cool on some paper towels while prepping the rest of the sauce.


In my kitchen, I have a step 3: Make peanut butter. I put 2 cups of peanuts in the Vita-Mix and make fresh peanut butter in about one minute's time. If you don't own a Vita-Mix yet, make sure you are using real peanut butter. Basically, that means please, please, please only use peanut butter if the the ingredients read: Peanuts. Or, Peanuts and Salt.

Step 4: In a bowl or large Pyrex measuring cup, add approximately 1 cup of peanut butter. Everything in this recipe is approximate, so you can play with the flavors and add more of something or less according to your tastes.

Next, add:
  • 5 TB soy sauce
  • 1/2 cup honey
  • juice from 2 lemons
  • juice from 1/2 lime
  • 1/4 cup warm water (it is easier to mix with warm water rather than cold)
Mix this well.

Step 5: Grind your garlic and chilies in your mortar and pestle.


I have a special attachment to my mortar and pestle because I bought it in Indonesia.


Add the garlic and chilies to your sauce and mix well.


I made a big bowl of peanut noodles with this sauce. Too bad I didn't double the recipe and store some in the fridge for a week or so. Next time.

Wednesday, March 31, 2010

Marinara Sauce


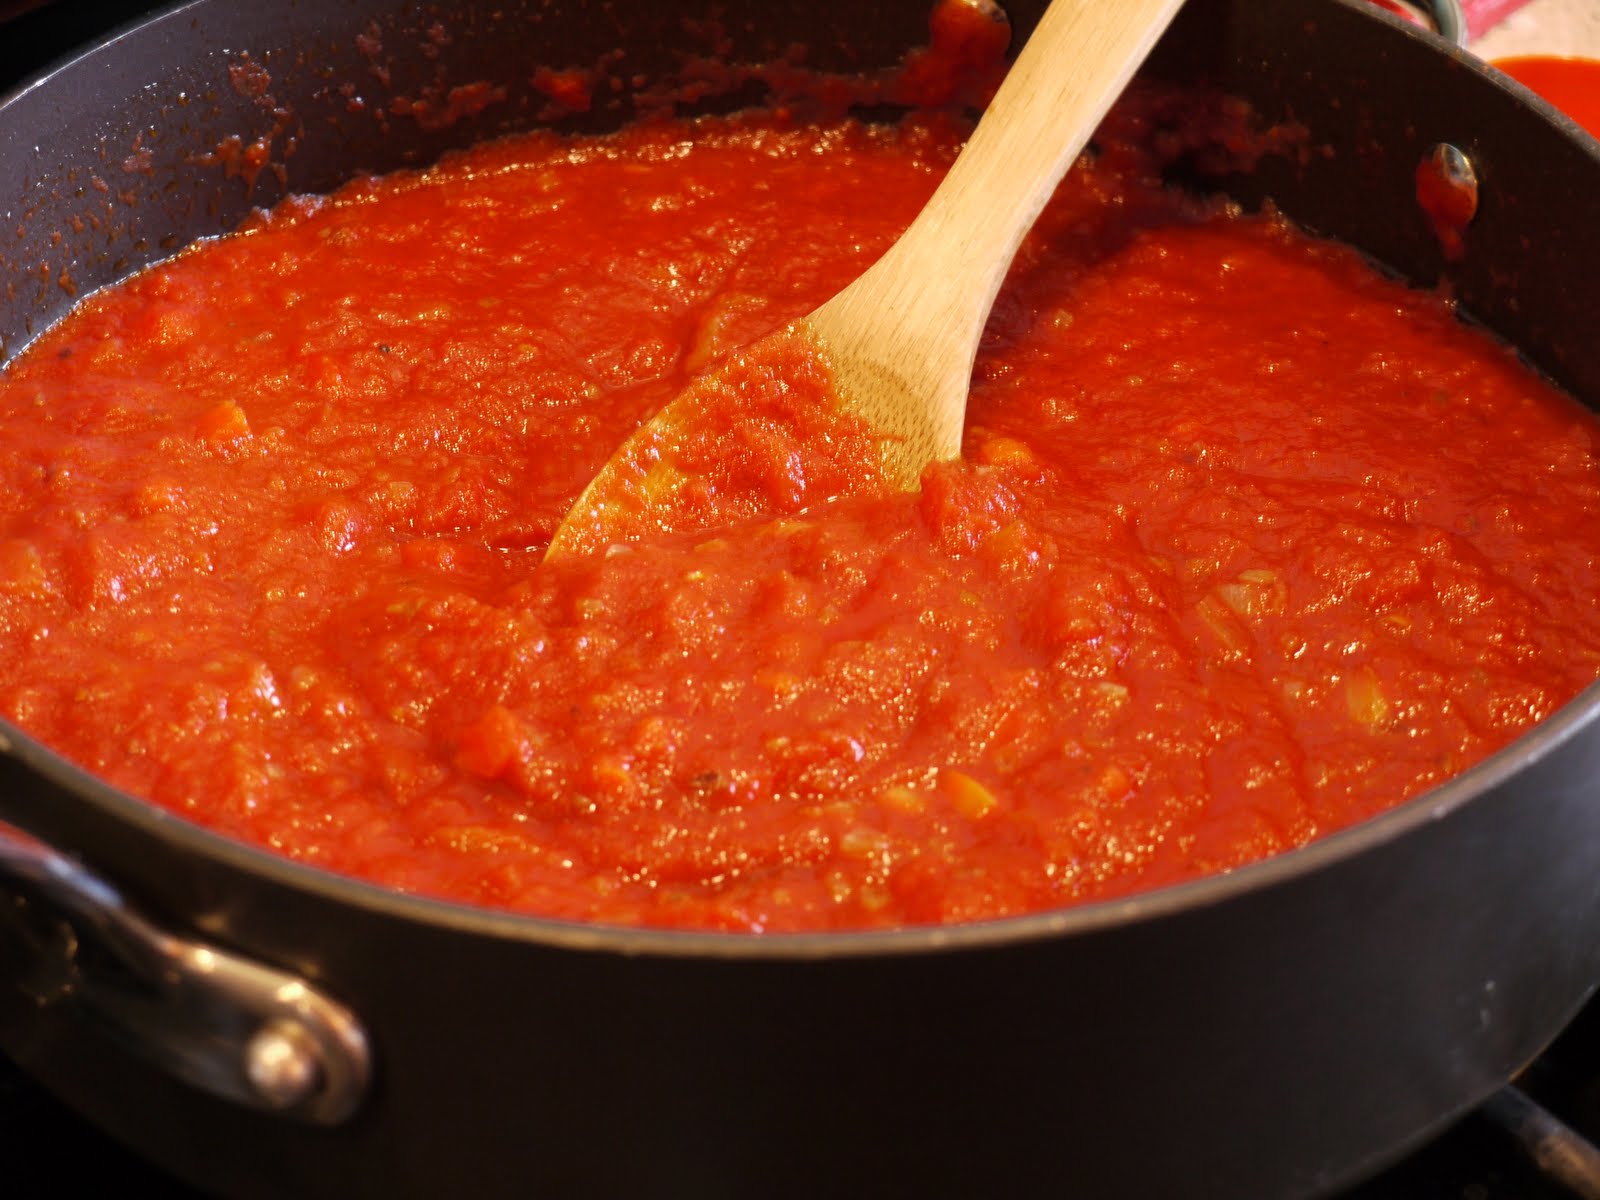
I knew there had to be a decent tomato sauce for pasta that was easy to make, yet didn't come out of a jar! So I pulled out my trusty cookbook by the lovely Giada De Laurentiis, Everyday Italian. Since it hasn't been tomato season for months, I was happy to note that her marinara recipe calls for canned crushed tomatoes.

I was considering lessening the amount of olive oil, 1/2 cup seems excessive to me, but I do trust Giada. (It really wasn't too oily). I did like that I didn't have to sit and chop everything at once. I chopped the onions and garlic, then while they were cooking chopped the carrots and celery. It's really quite simple.

Other than that, medium-high was a bit too high for the onions and vegetables, so I reduced the heat to just under medium. It could simply be my burner (it's a big one), so for the simmer I moved to a different burner. Just keep an eye on things so they don't get too brown before you add the tomatoes.

Giada says this is the basic tomato sauce she uses the most, and this recipe makes a healthy amount (probably enough for freezing). Giada doubles the recipe and freezes half in two-cup portions, which gets another vote from me!


Marinara Sauce

Makes about 2 quarts (8 cups) 1 quart will serve 4 over pasta as a first course

1/2 cup extra-virgin olive oil
2 small onions, finely chopped
2 garlic cloves, finely chopped
2 celery stalks, finely chopped
2 carrots, peeled and finely chopped
1/2 teaspoon sea salt, plus more to taste
1/2 teaspoon freshly ground black pepper, plus more to taste
2 (32-ounce) cans crushed tomatoes (the only size I had were 28-ounce, so that's what I used)
2 dried bay leaves

In a large pot, heat the oil over a medium-high flame. Add the onions and garlic and saute until the onions are translucent, about 10 minutes. Add the celery, carrots, and 1/2 teaspoon each of salt and pepper. Saute until all the vegetables are soft, about 10 minutes. Add the tomatoes and bay leaves, and simmer uncovered over low heat until the sauce thickens, about 1 hour. Remove and discard the bay leaves. Season the sauce with more salt and pepper to taste.

The sauce can be made 1 day ahead. Cool, then cover and refrigerate. Rewarm over medium heat before using.

Store extra sauce by allowing it to cool completely, then pour two-cup portions into freezer bags and freeze for up to three months.

Wednesday, March 17, 2010

Taste & Create: Vegetable Kurma


Is there anyone out there who hasn't heard of Taste & Create? In case there's one person who hasn't, Taste & Create is a monthly food blog event, created by the lovely Nicole of For the Love of Food, in which participants are randomly paired off and tasked with preparing a recipe from their partner's blog. It is very fun and as challenging as you'd like since you get to choose what you'll prepare, and there are lots of participants from foreign lands (Nicole herself lives in Germany) so you never know with what sort of cuisine you'll end up. I love it. And you all should try it!!

For this month, my partner was Padmajha of Seduce Your Tastebuds. I've done so many Taste & Creates that I honestly can't remember if PJ and I have been partners before?? At any rate, I do love perusing her blog and trying to figure out what all the ingredients are!

I chose to make Padmajha's Vegetable Kurma. She says "Vegetable Kurma is the most preferred side dish for Chapthi / Poori /Parotta in South India. Each restaurant or household has its own version and each one is as tasty as the other."

We are big Kurma fans. Once when Number One and I were dating, I spent 5 hours preparing a Lamb Kurma for him...it was just okay because although it needed more spices, I had no idea which ones to add. He loved me for it though. Every single time we go to our favorite Indian restaurant (a few times a year, since it's a 4-hour drive), I order Lamb Coconut Kurma. Every single time. So anyway, I knew this was the dish to make.

I was going to make Meethi Paratha to go with the Kurma, but by the time I mixed it up and read the part about it needing to rest "several hours" it was simply too late. I will make the Paratha tomorrow! In a pinch, we ended up eating our Kurma with tortillas.

I saved the water from boiling the vegetables (I used potatoes, carrots, broccoflower, peas and corn with a bit of salt) to add to the kurma at the end. After looking at Padmajha's pictures again, it is apparent that I should have added more liquid...I also used a can of diced tomatoes, and I wish I had run the tomatoes through a food processor first to make them smaller. I was also wishing I had done that with the onions.

But before I get too far into all that, this dish is delicious! I loved the smell of the coconut paste (which I should have processed longer to avoid the bigger chunks of cinnamon), and it really wasn't that hard. I do chronically underestimate the time it takes ME to prepare Indian food, but that is no one's fault but my own.


I didn't have curry leaves, and didn't substitute anything for them. I actually made a double batch of kurma tonight, but only used 1 teaspoon of chile powder and did not double the garlic because I thought the cloves I had were quite big. I used dried coconut, again all that I had. I probably should have used more coconut, and next time I may add some coconut milk in place of some of the water. I did like using the water from the boiled vegetables--no lost vitamins!--but I wanted a bit more coconut flavor. I had enough veggie water left to put in the freezer to add to soup in the future.

We served this as a main dish, because for me it's labor-intensive, and I didn't have time to make anything else! It's good to eat vegetables for dinner once in a while!


Vegetable Kurma

2 cups boiled mixed vegetables [ carrots, beans, peas, cauliflower, corn, potato]
1 small onion, chopped
1 small tomato, chopped
1 bay leaf
a few curry leaves
1 teaspoon mustard (I used ground mustard)
1 teaspoon chile powder
2 teaspoons oil (I used about a tablespoon)
Salt to taste

Grind to a smooth paste with a little water:
5 tablespoons grated coconut
1 small piece cinnamon (I used about 1/2")
1 teaspoon fennel seeds
5 small cloves garlic
1/2" piece ginger, peeled and chopped

1. Heat oil in a pan and put in the mustard, bay leaf and curry leaves
2. When it crackles add the onion and sauté till translucent
3. Add the tomato and cook till mushy
4. Put in the ground paste, chile powder, salt and mix well. Add a little water if it is dry.[The color of the kurma will be pale at this stage.On further cooking the color will deepen.]
5. Cook for a few minutes till the raw smell of the masala disappears. (just keep smelling it, you'll know the difference)
6. Add the cooked vegetables and water to get the desired consistency.
7. Simmer for 5 minutes and remove from heat.

Serve as a side dish.

Sunday, February 28, 2010

Grilled Caponata


It's unusually snowy at my house this February, which makes me all the more jealous when someone says, "Hey, guess what? We're moving to the VIRGIN ISLANDS!" Seriously? That is some kind of luck! That is just what happened to Dave, of My Year on the Grill, or more importantly, to Dave's wife Jackie, who scored a job down there!! Dave is the lucky s.o.b. who gets to tag along!!!

So to commiserate, er
celebrate with all of the friends Dave & Jackie left behind on the Mainland and Points Beyond, us girls at OuR KrAzy kItChEn decided to throw Dave a Beachwarming Party.

You best be wearing your speedo, Dave, this is going to be a doozy! Oh, and you'll need your blender, and little umbrellas, and it goes without saying, your grill.

The closest I can get to the Islands is my cookbook, The Beach House Cookbook, in which there are fabulous recipes for mouth-watering seafood, the likes of which can't be found in this god-forsaken desert. (Wait. I love it here. I love it here. I love it here. Okay, deep breath. Ahhh.)

Take 2:
Given the lack of fresh OR frozen seafood in this gorgeous snow-covered desert, I chose a dish which would go well with a nice slab of fish, and, because I'm sure Dave will have the grill fired up and ready, guess what? It's GRILLED.

I'm so ready for a tour of Dave & Jackie's apartment, minutes from the beach, and can't wait to feel the sand between my toes and see the blue water stretching into the horizon...this is going to be a PAR-TAY, and my Grilled Caponata on Homemade Crostini is going to go over very well. I think I might stop by the market on my way and pick up some fresh fish to grill with my Margarita Marinade!

Of course, it wouldn't a party without booze, so I'm also bringing all the ingredients for my Famous Piña Coladas. Enjoy!!

Congratulations on your new island home!!
Visit OuR KrAzy kItChEn to see what everyone else brought to the party!


Back to business, I actually baked the onions about 5 minutes longer to soften them more. I used my grill pan over medium-high heat, and just grilled until I had nice marks on each slice (much longer than the 5 minutes in the recipe).

Man, did my kitchen smell good, and I don't even really like eggplant! (but I always think I should, hence trying this recipe). Plus, did you see those fabulous eggplants Dave & Jackie saw at the Farmer's Market in St. Thomas?? I bet I know what he'll be picking up next time it's open!

Aside from all the chopping, this recipe is fairly easy, and since it needs to sit for 6 to 8 hours can sit for up to a week, it is perfect for my make-ahead repertoire.

This caponata was wonderful, smoky and sweet, and perfectly complimented by my homemade Artisan Crostini.

Hope you like it!

Grilled Caponata
Serves 12; Makes about 6 cups

3 medium eggplants, peeled and cut into 1/2-inch thick slices
2 large red onions, cut into 1/2-inch thick slices
1/2 cup olive oil for brushing
1/2 cup golden raisins
3/4 cup red wine
1 can (28 ounces) plum tomatoes, coarsely chopped, juice reserved (*I totally cheated, and used two cans of diced tomatoes!*)
3 tablespoons capers, drained
1/2 cup Kalamata olives, drained, pitted and chopped
1/4 cup balsamic vinegar
1/2 cup chopped fresh flat-leaf parsley
Salt and freshly ground black pepper
Homemade crostini, pita crisps, crackers or bread for serving

1. Preheat the oven to 400 degrees F. Prepare a charcoal or gas grill. Let the coals heat until medium-hot, so they are covered with a light coating of ash and glow deep red. (I'll let Dave handle that part).

2. Generously brush the eggplant and onion slices with olive oil and arrange on separate baking sheets. Roast in the oven, turning once, until soft, 10 to 15 minutes.

3. Transfer the eggplant and onions to the grill and cook until nicely browned, turning often, about 5 minutes total cooking time. Set aside to cool. Note: our grill is on its last legs, so I just used our grill pan for the grilling.

4. Put the raisins in a small saucepan and cover with the wine. Bring to a simmer over medium heat and cook for 3 minutes. Set aside and allow the raisins to plump.

5. Put the tomatoes and their juice into a large mixing bowl. Stir in the raisins and wine, capers, olives and vinegar. Chop the grilled eggplant and onions into small pieces and add to the tomato mixture. Toss well to combine.

Add the parsley and salt and pepper to taste. Cover and let the mixture mellow for 6 to 8 hours or overnight in the refrigerator. The caponata will keep in the refrigerator, covered, for up to 1 week.

6. Before serving, taste and adjust the seasonings, if necessary. Serve at room temperature with crostini, pita crisps, crackers or bread.

Sunday, February 21, 2010

Stuffed Mushrooms a la France


I got this recipe many years ago from one of my co-workers who was a vegetarian and a really good cook. Neither of us are still at the hospital where we once worked, but I still make his recipe from time to time -- it's a great appetizer, and very quick and easy to make. Depending on the size of your mushroom caps (and how many mushroom-lovers are in your crowd), plan on 2 - 3 mushroom caps per person. You can also make this ahead and then just pop them in the oven to bake when your guests arrive.

The measurements below do not have to be precise -- honestly, I don't even measure when I make this anymore. If I end up with extra stuffing at the end, I just put it in the bottom of the baking dish and cook it with the mushrooms -- it is delicious all by itself. This recipe will yield 3 - 4 servings, depending on the size of your mushroom caps.


Stuffed Mushrooms a la France


Ingredients:

8 - 10 large gourmet mushrooms
6 Tablespoons bread crumbs (unseasoned)
6 Tablespoons minced yellow onion (I use shallots instead -- I like the milder flavor)
3 Tablespoons minced green onion
4 - 6 Tablespoons half & half or heavy cream (I usually use heavy cream)
8 Tablespoons fresh parsley, minced (I use flat leaf parsley)
1 teaspoon tarragon (I usually substitute fresh or dried thyme, whichever I happen to have. I'm not a big tarragon fan)
3 Tablespoons butter
1 Tablespoon oil (I use olive oil, but you can use any kind of oil you like)
1/2 cup grated parmesan cheese
1/2 cup shredded Swiss cheese (I usually use shredded parmesan cheese, but both are good)
salt and pepper to taste

Directions:

1. Pre-heat oven to 425 degrees Farenheit

2. Clean mushrooms and remove stems. Mince the stems and reserve. (If there are some small mushrooms in the package, like there usually are, I also clean and mince them up.)

3. Add oil and butter to a non-stick saute pan and saute the yellow onion (or shallots, whichever you use) for 3 - 4 minutes.

4. Add green onion and mushroom stems, season with salt and pepper to taste, and saute for 2 - 3 minutes more, then turn off heat.

5. Add remaining ingredients (except for shredded Swiss cheese) to the onion-mushroom mixture (I just add it all to the saute pan, but you can do this in a bowl if you prefer) and stir well to thoroughly combine. You want the mixture to be moistened, but not dripping extra liquid, so adjust bread crumbs or cream amounts as needed to get the right consistency (like a thick paste).

6. Place the mushroom caps in a baking dish and fill with stuffing (I usually heap it on pretty good, about 1 heaping Tablespoon per mushroom cap). If you have leftover stuffing, just put in in the baking dish around the mushrooms.

7. Top stuffed mushrooms with shredded Swiss cheese and bake at 425 degrees Farenheit for 20 minutes.

Enjoy!
Adrienne

Saturday, February 13, 2010

Wild Mushroom Risotto


I love risotto, and it is so easy to make. Don't let anyone scare you off by telling you its complicated, or difficult. All it takes is a little patience and a lot of stirring. :-) You can use any combination of mushrooms you like -- I usually use a mix of white button mushrooms and cremini, oyster and shitake mushrooms (half white button mushrooms, half a mix of the others). You can also rehydrate porcini mushrooms and add those if you like. If you do, be sure to reserve the soaking liquid (you'll need to strain it to remove the grit -- you'll probably have about 1/2 cup). Hope you enjoy!

Ingredients:

2 pounds of mushrooms, cleaned, stemmed and chopped (I usually just slice them -- looks prettier, I think)
4 Tablespoons of unsalted butter
2 Tablespoons of Extra Virgin Olive Oil
2 cups Arborio rice
3 Tablespoons of diced shallots
1 Tablespoon minced garlic (I like to grate it using a microplane -- that way you don't bite into a chunck of garlic)
5 - 6 cups of hot chicken stock
1-1/2 teaspoons kosher salt
1 teaspoon finely chopped fresh thyme
1/2 teaspoon finely chopped fresh rosemary
1/2 teaspoon freshly ground black pepper
2 Tablespoons chopped fresh parsley (I like to use flat leaf parsley)
1/4 cup dry white wine
1 cup freshly grated parmesan cheese

Directions:

Saute the mushrooms in 2 T of melted butter over high heat (I also add about 1 T of olive oil too -- keeps the butter from burning). First heat the butter (and oil, if you use it) over high heat until melted and foamy. Add half the shallots and garlic and saute for about 1 minute. Add mushrooms, 3/4 teaspoon of salt and 1/4 teaspoon of black pepper and cook until mushrooms release their liquid and turn golden brown. Deglaze the pan with the white wine. Add the fresh thyme and fresh rosemary and continue cooking until the wine evaporates. Remove from heat.

Heat 2 T butter and the olive oil (use high heat) in a large dutch oven or heavy pot until foamy. Add the rice and cook, stirring frequently until all the rice grains are coated and fragrant (about 1 - 2 minutes). You don't want to brown the rice -- just warm it to soften the outside husk so it can absorb the liquid. Add the remaining half of the shallots and garlic and cook for about 1 minute (stir frquently). If you're using porcini mushrooms and have reserved the soaking liquid, add it now (or you can use 1/2 cup of mushroom stock if you like). Stir frequently until all the liquid is absorbed. Reduce the heat to medium and add 2 cups of hot chicken stock, 3/4 teaspoon of kosher salt and 1/4 teaspoon of freshly ground black pepper. Cook, stirring constantly, until the broth is almost completely absorbed (don't let it get dry or you could burn the rice). Continue adding stock in 1/2 cup increments and cooking until almost completely absorbed before adding more broth. Cook until the rice is al dente (18 minutes or so). Fold in the sauteed mushrooms, fresh parsley and grated parmesan and stir to combine. Adjust seasoning if needed. Serve immediately. Makes about 8 side servings or 4 main course servings.

Enjoy! Adrienne
Blog Widget by LinkWithin