One of the many things I love about Artisan Bread is its versatility. You can make so many types of bread out of this simple dough, and it's all delicious! Someday, I will break down and buy the book: Artisan Bread in Five Minutes a Day
For our Housewarming Extravaganza back in October, I tried my hand at making baguettes for crostini, and it actually wasn't that difficult! I ended up with about 14 beautiful baguettes. I found a brief tutorial on shaping the baguettes on the Artisan Bread in 5 website that helped a lot. But then I had to wing it on baking them.
The biggest helpful hint, besides how much dough to use, was letting the dough relax in between steps--if you're forming the dough and feel it pulling or fighting against you, set it down and let it rest for a few minutes, come back and try again. I really let the dough rest in between each step, about 5 minutes, sometimes more. Other than that, I didn't add rosemary or any herbs, I just used the forming technique and studied the pictures. And then of course I was on my own for baking the baguettes, because there aren't any baking instructions on the post!
I'll just summarize the techniques here, please visit the Artisan Bread website for some great pictures that really helped me. (don't forget you'll have to come back here for the baking instructions!)
With so many baguettes, we had a mountain of crostini and a variety of delicious dips and toppings. The best thing about all this, you really have to make it ahead of time. You start the dough one day, make the baguettes the next day, the crostini the next day, and you can store the crostini in a ziploc for 2 days! I love it.
I learned the technique for forming the baguettes on a post on the Artisan Bread in Five website. They have great pictures of the technique.
Baguettes
Artisan Bread dough
cornmeal
flour
Start with a batch of Artisan Bread dough that's been in the refrigerator for a while. With floured hands, grab a peach-sized glob of dough, and quickly form into a ball by tucking the ends under each quarter turn (about 30 seconds), using a bit more flour if needed. Let rest at least 5 minutes.

Form into an oval--flour your hands again. I start gently stretching the dough, but mostly let gravity do the work for me. I hold it by an edge, and let the dough gently fall and stretch without really forcing it or squeezing too much air out. It looks more circular while this is going on, but then when it's stretched, I let it hang gently until it's more oval, then set it down and let it rest again. The ovals aren't huge, because there's not a lot of dough to start with. (use flour as needed)

After the ovals have rested, fold each oval of dough in thirds lengthwise and pinch the seam closed. Let rest again for at least 5 minutes.


Now it's time to stretch/squeeze the baguettes so they're longer and thinner and, well, shaped like baguettes. They won't be huge baguettes, so don't expect the "French" ones you see at the bakery. They'll be miniature baguettes. Flour your hands, pick up one baguette, and gently squeeze it and allow gravity to stretch it, gently tapering the ends. Be careful not to stretch and squeeze too much or you'll lose too much air in the dough and bad things will happen. I think.

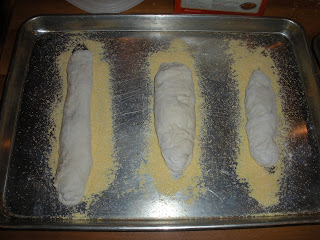
As the baguettes are formed, lay them on a baking sheet with cornmeal stripes on it. Of course I had my cornmeal running the wrong direction for the length of the baguettes, and had to prepare another sheet with lengthwise cornmeal. But, as luck would have it, I stretched one of the baguettes too much and it broke in two, giving me two smaller baguettes that fit perfectly on the short cornmeal! This is not an exact science, and since I'll be slicing them up anyway I really am not concerned with looks. (They will look great anyway!)


Let the formed baguettes rest/rise on the pans for at least 30 minutes, up to 60 minutes. Meanwhile, preheat the oven to 450 degrees F.

After the baguettes have risen, slash on a slight diagonal, two or three slashes per baguette, then quickly slide the pans into the oven. (If you have two pans and one oven, just let one pan rise 30 minutes, then bake it, and the other will be fine rising more while the first pan bakes).
Bake the baguettes at 450 degrees F for 25 to 30 minutes, or until golden brown and hollow-sounding. Remove from oven and let cool completely.

Crostini
Baguettes
Olive Oil
When the baguettes have cooled completely, or even the next day, slice them into thin, uniform slices about 1/4" thick.
Lay slices in a single layer on a baking sheet. Brush the top of each slice with olive oil.
Preheat oven to 375 degrees F. Bake slices for about 15 minutes, until just golden brown and quite crunchy. Let cool, then load up with your favorite toppings!
We like Crostini with toppings like:
Southwestern Hummus
Roasted Red Pepper Salad
Buffalo Chicken Dip
and many more...


2 comments:
I am so loving all things BREAD!
great job
This crostini is the best I've ever had, and it's soooo easy!
Last year I went crazy with sourdough starters.
Bread is good.
Post a Comment