


I got this recipe from my mom's cousin Jeanie, for inclusion in the Family Cookbook I am putting together. It is from her traditional Irish dinner repertoire, and therefore was a perfect accompaniment to my Corned Beef and Cabbage. It is excellent. Thanks, Jeanie!
Horseradish Sauce
1/2 cup sour cream
1/2 cup mayonnaise
2 tablespoons or more prepared hot horseradish
1 tablespoon chopped parsley
Mix all ingredients together, adding horseradish to taste. Let stand at least 1 hour before serving.
Saturday, February 28, 2009
Step By Step Cake Decorating: Curious George
I had some little gifts that I had purchased a couple years ago on clearance that were meant for a Curious George birthday party...so I figured it was time for one of the boys to have such a party before they were both "too old." That boy was Sawed Off, who was very agreeable to the idea, and who turned three on Monday.
His party is Saturday, so I had to come up with a cake. I do not have a Curious George cake pan. I decided to use the Wilton lion cake pan I have, basically because of the fun, wavy edge that is usually the lion's mane. I previously turned the lion cake into an "Alex the Lion" from Madagascar cake, so I was confident I could pull out my cartoonin' skills again.
Sawed Off chose a strawberry cake mix (I quit making birthday cakes from scratch after H-Bomb's first b-day "health cake" disaster almost six years ago). I made the usual Buttercream Frosting, but this time I used vanilla instead of coconut extract. I did have about half a batch of buttercream frosting, brown chocolate flavor, leftover from birthday cupcakes on the actual day of Sawed Off's birthday, the perfect color for Curious George's fur!
I baked the cake, and it came out looking exactly like a lion. No surprise.

I covered it with a generous crumb coat, both to keep crumbs at bay during the main decorating process and to cover the lion details in order to provide a clean palette for drawing Curious George.


I used a toothpick (and an angled icing spatula ) to draw (and erase) Curious George, then I let the frosting set up for a little bit.


I didn't think I had enough for all the colors, and it's so hard to match colors if you run out, so I mixed up another half batch of Buttercream Frosting and attempted to make it red (a difficult color, plus I ran out of one red coloring and had finish with a different kind). The red turned out not so red, but more a fun orange, so it worked as an accent color.
I outlined most of the cake first with the grayish-black, except for the face. This way, the details of the face would be more prominent.


Next, I decided to do a smoother face, rather than the usual "star" fill-in technique. I applied the light brown color with an angled icing spatula, a baby spoon, and toothpicks. I tried to make the frosting smoother, but wasn't too fussy about it, and used the toothpicks to push the frosting toward the edges and the outlines without disturbing or messing up the lines. I left some space where the details of the face would be.

I filled in the hands in the same manner, since they are the same color as the face.
Then I went back with the grayish-black and outlined the mouth, eyes and nose.

I used a star tip (my fallback, the tip with which I am most comfortable) to fill George's brown fur on his face, arms and body.

I used the same size star tip to fill in the yellow stripes and then the orange stripes, as well as the edges of the cake in orange.


Happy 3rd Birthday, Sawed Off!
His party is Saturday, so I had to come up with a cake. I do not have a Curious George cake pan. I decided to use the Wilton lion cake pan I have, basically because of the fun, wavy edge that is usually the lion's mane. I previously turned the lion cake into an "Alex the Lion" from Madagascar cake, so I was confident I could pull out my cartoonin' skills again.
Sawed Off chose a strawberry cake mix (I quit making birthday cakes from scratch after H-Bomb's first b-day "health cake" disaster almost six years ago). I made the usual Buttercream Frosting, but this time I used vanilla instead of coconut extract. I did have about half a batch of buttercream frosting, brown chocolate flavor, leftover from birthday cupcakes on the actual day of Sawed Off's birthday, the perfect color for Curious George's fur!
I baked the cake, and it came out looking exactly like a lion. No surprise.

I covered it with a generous crumb coat, both to keep crumbs at bay during the main decorating process and to cover the lion details in order to provide a clean palette for drawing Curious George.

This picture was my inspiration:

I used a toothpick (and an angled icing spatula

Meanwhile, I mixed up frosting in a lighter brown, grayish-black, and yellow.

I didn't think I had enough for all the colors, and it's so hard to match colors if you run out, so I mixed up another half batch of Buttercream Frosting and attempted to make it red (a difficult color, plus I ran out of one red coloring and had finish with a different kind). The red turned out not so red, but more a fun orange, so it worked as an accent color.
I outlined most of the cake first with the grayish-black, except for the face. This way, the details of the face would be more prominent.


Next, I decided to do a smoother face, rather than the usual "star" fill-in technique. I applied the light brown color with an angled icing spatula, a baby spoon, and toothpicks. I tried to make the frosting smoother, but wasn't too fussy about it, and used the toothpicks to push the frosting toward the edges and the outlines without disturbing or messing up the lines. I left some space where the details of the face would be.

I filled in the hands in the same manner, since they are the same color as the face.
Then I went back with the grayish-black and outlined the mouth, eyes and nose.

I used a star tip (my fallback, the tip with which I am most comfortable) to fill George's brown fur on his face, arms and body.

I used the same size star tip to fill in the yellow stripes and then the orange stripes, as well as the edges of the cake in orange.


Happy 3rd Birthday, Sawed Off!
Friday, February 27, 2009
Corned Beef & Cabbage
In an effort to get in touch with my ancestral roots, and to try out a recipe for our March Bunkhouse Brunch, I made Corned Beef and Cabbage. To be honest, the only "Irish" thing I remember my grandma making is "Boiled Dinner," but trust me, you won't ever be seeing that recipe here. I'm sure I still don't like it now that I'm grown, sorry Grandma. And I was afraid of the corned beef resulting in the same sort of scenario, only magnified because I have children: me choking it down, trying not to impose my dislikes on my boys.
Thankfully, this corned beef recipe is fantastic and flavorful. It is worth a try, most definitely. And it will be the star dish at our Irish-themed Bunkhouse Brunch in a couple weeks. The recipe is from The Best Recipe , in which they actually describe a method of "corning" your own beef. You can also choose which vegetables you'd like to include; I used a mix of carrots, parsnips, onions, potatoes and cabbage.
The great thing about this recipe is the vegetables do not get overcooked, so they aren't just a pile of flavorless, indistinguishable mush on your plate. They still have flavor and texture.
I got my corned beef from Costco, and with a dollop of my mom's cousin Jeanie's homemade Horseradish Sauce, it was delicious. The next day, the leftovers were just as good, making this our recipe of choice for the Brunch.
Make Ahead NOTE: If you are going to make this dish ahead, it is important to use a slotted spoon to remove the vegetables from the cooking pot when they are done so they don't continue to cook and get too mushy. I transferred mine to lidded casserole dishes, along with the beef and then some of the liquid, and refrigerated them overnight. To reheat, I simply stuck them in the oven, lids and all, at about 300 degrees F until they were warmed. (you could also cover your serving dishes with foil, just make sure they are oven-safe and leave the foil on when you are reheating so the meat doesn't dry out).
Since I didn't "corn" my own beef, I will omit that part of the recipe. If anyone would like to know how to corn the beef, leave a comment and I will update this post!


Corned Beef and Cabbage, New England Style
Serves 8 with leftovers
The meat is cooked fully when it is tender, the muscle fibers have loosened visibly, and a skewer slides in with minimal resistance. Serve this dish with horseradish or grainy mustard.
1 corned beef roast (4 to 6 pounds)
7 to 8 pounds prepared vegetables of your choice (from each of the two categories below):
Category 1: Once the meat has been removed from the pot, add the desired selection and quantity of vegetables from this category. Return the liquid to a boil and simmer for 10 minutes before adding vegetables from Category 2.
2. Heat oven to 200 degrees. Transfer meat to large platter, ladling about 1 cup cooking liquid over it to keep it moist. Cover with foil and set in oven.
3. Add vegetables from Category 1to kettle and bring to boil; cover and simmer until vegetables begin to soften, about 10 minutes. Add vegetables from Category 2 and bring to boil; cover and simmer until all vegetables are tender, 10 to 15 minutes longer.
4. Meanwhile, remove meat from oven and slice across the grain into 1/4-inch slices.
5. Transfer vegetables to meat platter, moisten with additional broth, and serve. (I just put the vegetables in a large bowl and ladled some broth on top).
Thankfully, this corned beef recipe is fantastic and flavorful. It is worth a try, most definitely. And it will be the star dish at our Irish-themed Bunkhouse Brunch in a couple weeks. The recipe is from The Best Recipe
The great thing about this recipe is the vegetables do not get overcooked, so they aren't just a pile of flavorless, indistinguishable mush on your plate. They still have flavor and texture.
I got my corned beef from Costco, and with a dollop of my mom's cousin Jeanie's homemade Horseradish Sauce, it was delicious. The next day, the leftovers were just as good, making this our recipe of choice for the Brunch.
Make Ahead NOTE: If you are going to make this dish ahead, it is important to use a slotted spoon to remove the vegetables from the cooking pot when they are done so they don't continue to cook and get too mushy. I transferred mine to lidded casserole dishes, along with the beef and then some of the liquid, and refrigerated them overnight. To reheat, I simply stuck them in the oven, lids and all, at about 300 degrees F until they were warmed. (you could also cover your serving dishes with foil, just make sure they are oven-safe and leave the foil on when you are reheating so the meat doesn't dry out).
Since I didn't "corn" my own beef, I will omit that part of the recipe. If anyone would like to know how to corn the beef, leave a comment and I will update this post!

Corned Beef and Cabbage, New England Style
Serves 8 with leftovers
The meat is cooked fully when it is tender, the muscle fibers have loosened visibly, and a skewer slides in with minimal resistance. Serve this dish with horseradish or grainy mustard.
1 corned beef roast (4 to 6 pounds)
7 to 8 pounds prepared vegetables of your choice (from each of the two categories below):
Category 1: Once the meat has been removed from the pot, add the desired selection and quantity of vegetables from this category. Return the liquid to a boil and simmer for 10 minutes before adding vegetables from Category 2.
- Carrots - peeled and halved crosswise; thin end halved lengthwise, thick end quartered lengthwise
- Rutabagas (small) - peeled and halved crosswise; each half cut into six chunks
- White turnips (medium) - peeled and quartered
- New potatoes (small) - scrubbed and left whole (I used regular potatoes, quartered)
- Boiling onions - peeled and left whole
- Green cabbage, uncored (small head) - blemished leaves removed and cut into six to eight wedges
- Parsnips - Peeled and halved crosswise; thin end halved lengthwise, thick end quartered lengthwise (I added the parsnips with the carrots above)
- Brussel sprouts - Blemished leaves removed stems trimed, and left whole
2. Heat oven to 200 degrees. Transfer meat to large platter, ladling about 1 cup cooking liquid over it to keep it moist. Cover with foil and set in oven.
3. Add vegetables from Category 1to kettle and bring to boil; cover and simmer until vegetables begin to soften, about 10 minutes. Add vegetables from Category 2 and bring to boil; cover and simmer until all vegetables are tender, 10 to 15 minutes longer.
4. Meanwhile, remove meat from oven and slice across the grain into 1/4-inch slices.
5. Transfer vegetables to meat platter, moisten with additional broth, and serve. (I just put the vegetables in a large bowl and ladled some broth on top).
Sinful Cinnamon Rolls

A few years ago while helping run a neighborhood yard sale, a woman made cinnamon rolls to sell. They were absolutely delicious. She was kind enough to email me a copy of the recipe. I made a few small changes and it's been a family favorite ever since.
Cinnamon Rolls
ROLLS
1 1/4 oz. dry yeast
1 tsp. salt
1 cup warm milk
2 eggs
1/2 cup granulated sugar
4 cups all purpose flour
1/3 cup butter, melted
Dissolve yeast in warm milk in a large bowl. Add sugar, butter, salt eggs, and flour. Mix well. Once dough is mixed, knead dough into large ball using your hands dusted with flour. Put in bowl, cover, let rise in a warm place about an hour, or until dough has doubled in size. *** What works best for me is making the dough at night, refrigerating, and then taking the dough out a few hours before you plan on baking them. Roll dough onto lightly floured surface, into a rectangular shape, until it is about 1/4 in. thick.
Preheat oven to 400 degrees.
FILLING
1 cup packed brown sugar
1/3 cup butter, softened
2 1/2 Tbp. cinnamon
For filling, combine brown sugar and cinnamon. Spread softened butter evenly over surface of dough, and sprinkle cinnamon and sugar evenly over surface. Working carefully from top, roll dough down to bottom edge (roll so that the roll is long and thin, rather than short and very thick). Cut rolled dough into 1 1/2 in. slices and place on a greased baking pan, evenly spaced (leave a few inches between each roll). Bake 10 to 12 minutes, or until light brown on top.
ICING
1/2 stick butter, softened
1/2 cup cream cheese
1/2 tsp. vanilla
1 1/2 cup powered sugar
1/8 tsp. salt
2 Tbp. whipping cream
*** Original recipe called for 1 stick butter and 1/4 cup cream cheese. I prefer it with more cream cheese and less butter. I also added the whipping cream. I like the texture and also the creamy taste. It is optional.
While rolls cook, combine icing ingredients. Beat well with an electric mixer until fluffy. When rolls cool slightly, coat each generously with icing. Makes 12 rolls.
Monday, February 23, 2009
Taste & Create XVII: Grilled Beef Flank Steak with Double-Mushroom Ragoût
For this month's Taste & Create, I was paired with Dolores of Chronicles in Culinary Curiosity. If you're not familiar with Taste & Create, it is a fantastic event (my favorite, in fact) hosted by the lovely Nicole from For The Love of Food. Participants are randomly paired off, and tasked with creating a recipe from their partner's blog.
Dolores has some delicious looking recipes...but I narrowed it down to a couple from her Christmas Feast '08: Slow-Roasted Beef Tenderloin with Double-Mushroom Ragoût.
I decided on this recipe because 1) we like beef and 2) we like mushrooms. Not too complicated. And we were heading to the Big City this month, so I thought I would able to get specialty ingredients including beef tenderloin, dried porcini and fresh cremini mushrooms, without even having to special order anything. =) Perfect timing!
But then. Sheesh. At Costco, beef tenderloin comes in one size: HUMONGOUS. And, it costs in the neighborhood of $50 +. I just couldn't justify it. I decided to look at some other grocery stores. "Some" turned into "a lot" because none of the grocery stores seem to carry beef tenderloin. Pork tenderloin is everywhere. Beef tenderloin, as luck would have it, is nowhere.
At the last store I checked, they did have beef tenderloin! However, despite the fact that it was "on sale" it was still too expensive: about $40 for the size this recipe calls for. On SALE!!! It was late and I was exhausted and we were still an hour from home, so I chose Flank Steak instead. Flank Steak marinates well and cooks up quick. There goes the slow-roasted aspect, but at least I can sleep at night knowing I didn't blow $50 on a little piece of beef for one meal.
Upon my return to the, ahem, cattle ranch, I discovered that the recipe called for "beef tenderloin roast." Is this different than "beef tenderloin?" This cowgirl was too delirious from shopping last night to remember if there was a distinction, or even something in the meat case labeled "beef tenderloin roast." I will check when I get back to the grocery store (clarify with butcher if necessary) and report back.
So this recipe will differ greatly from the original. I will still use the marinade and marinate the flank steak for several hours, but grill it instead of roasting it. Thankfully the only change in the double-mushroom ragoût will be the type of wine (too busy to hunt down a liquor store and search for Marsala, plus the liquor stores close early 'round these parts. Red of some sort will do, I'm certain).
Although I didn't end up having the time, I was pleased to notice that you can make the ragoût up to two days ahead, and start seasoning the tenderloin 6 hours ahead.

The mushroom ragoût is delicious, whichever cut of beef it is atop! Thanks to Number One our flank steak was perfectly grilled, and the subtle marinade complemented the beef and the ragoût very nicely. We will definitely be making this again.

Grilled Beef Flank Steak with Double-Mushroom Ragoût
Serves 6
2 Tbs. extra-virgin olive oil
2 tsp. coarsely chopped fresh thyme
2 tsp. minced garlic
Kosher salt and freshly ground black pepper
1 beef flank steak
1 recipe Double-Mushroom Ragoût
You can make and refrigerate the ragoût up to 2 days ahead. Just before serving, reheat it in a medium saucepan over medium heat. Stir in 1 or 2 Tbs. of the reserved mushroom-soaking liquid and 1 or 2 Tbs. heavy cream, letting both reduce slightly until the ragoût is just loose and saucy enough to spoon around the tenderloin. Stir in the parsley.
Dolores has some delicious looking recipes...but I narrowed it down to a couple from her Christmas Feast '08: Slow-Roasted Beef Tenderloin with Double-Mushroom Ragoût.
I decided on this recipe because 1) we like beef and 2) we like mushrooms. Not too complicated. And we were heading to the Big City this month, so I thought I would able to get specialty ingredients including beef tenderloin, dried porcini and fresh cremini mushrooms, without even having to special order anything. =) Perfect timing!
But then. Sheesh. At Costco, beef tenderloin comes in one size: HUMONGOUS. And, it costs in the neighborhood of $50 +. I just couldn't justify it. I decided to look at some other grocery stores. "Some" turned into "a lot" because none of the grocery stores seem to carry beef tenderloin. Pork tenderloin is everywhere. Beef tenderloin, as luck would have it, is nowhere.
At the last store I checked, they did have beef tenderloin! However, despite the fact that it was "on sale" it was still too expensive: about $40 for the size this recipe calls for. On SALE!!! It was late and I was exhausted and we were still an hour from home, so I chose Flank Steak instead. Flank Steak marinates well and cooks up quick. There goes the slow-roasted aspect, but at least I can sleep at night knowing I didn't blow $50 on a little piece of beef for one meal.
Upon my return to the, ahem, cattle ranch, I discovered that the recipe called for "beef tenderloin roast." Is this different than "beef tenderloin?" This cowgirl was too delirious from shopping last night to remember if there was a distinction, or even something in the meat case labeled "beef tenderloin roast." I will check when I get back to the grocery store (clarify with butcher if necessary) and report back.
So this recipe will differ greatly from the original. I will still use the marinade and marinate the flank steak for several hours, but grill it instead of roasting it. Thankfully the only change in the double-mushroom ragoût will be the type of wine (too busy to hunt down a liquor store and search for Marsala, plus the liquor stores close early 'round these parts. Red of some sort will do, I'm certain).
Although I didn't end up having the time, I was pleased to notice that you can make the ragoût up to two days ahead, and start seasoning the tenderloin 6 hours ahead.

The mushroom ragoût is delicious, whichever cut of beef it is atop! Thanks to Number One our flank steak was perfectly grilled, and the subtle marinade complemented the beef and the ragoût very nicely. We will definitely be making this again.

Grilled Beef Flank Steak with Double-Mushroom Ragoût
Serves 6
2 Tbs. extra-virgin olive oil
2 tsp. coarsely chopped fresh thyme
2 tsp. minced garlic
Kosher salt and freshly ground black pepper
1 beef flank steak
1 recipe Double-Mushroom Ragoût
In a small bowl, combine the olive oil, thyme, garlic, 1 tsp. salt, and several generous grinds of black pepper. Rub oil mixture on flank steak, then put the flank steak in a ziploc bag with any remaining marinade and put the bag on a rimmed sheet pan (to catch any leaks) in the refrigerator. Marinate in the refrigerator for at least two hours, turning bag over about every half hour.
Heat grill to high. Grill flank steak, about 5 to 7 minutes on one side, then flip, reduce grill to medium and grill another 5 to 7 minutes. (it is important not to overcook flank steak). Transfer to a carving board, tent with foil and let rest for at least 5 minutes before serving.
Cut the flank steak against the grain into 1/2-inch slices. Serve with the ragoût.
You can season the tenderloin up to 6 hours ahead and refrigerate.
Double-Mushroom Ragoût
Yields 2 to 2-1/2 cups
1 oz. dried porcini mushrooms (about 1 cup)
3 Tbs. unsalted butter
2 Tbs. extra-virgin olive oil
20 oz. cremini (baby bella) mushrooms, sliced 1/4 inch thick
Kosher salt
1/3 cup finely chopped shallot
1/3 cup dry Marsala (I used Merlot)
1 Tbs. coarsely chopped fresh thyme
3/4 cup heavy cream; more for reheating
Freshly ground black pepper
2 Tbs. chopped fresh parsley
Soak the porcini in 1-1/2 cups very hot water, stirring occasionally, until they're rehydrated, about 20 minutes. With a slotted spoon, transfer them to a cutting board and chop coarsely. Strain the soaking liquid through a coffee filter into a small bowl and set aside.
In a 10-inch straight-sided saute pan, heat 2 Tbs. of the butter with the olive oil over medium heat. Add the cremini and 1 tsp. salt and cook, stirring occasionally, until the mushrooms have softened and released their liquid, 5 to 8 minutes. Increase the heat to medium high and cook, stirring more frequently, until the mushrooms are shrunken and very well browned, 8 to 10 minutes more.
Reduce the heat to medium, add the shallots and the remaining 1 Tbs. butter and cook, stirring, until the shallots are softened, 1 to 2 minutes. Add the Marsala, thyme, porcini, and 1/4 cup porcini-soaking liquid (reserve the remaining soaking liquid if making ahead). Cook and stir until most of the liquid evaporates, 1 to 2 minutes. Add the cream and cook until reduced to a saucy consistency, 1 to 2 minutes. Stir in the parsley and season to taste with salt and pepper.
Make Ahead:You can make and refrigerate the ragoût up to 2 days ahead. Just before serving, reheat it in a medium saucepan over medium heat. Stir in 1 or 2 Tbs. of the reserved mushroom-soaking liquid and 1 or 2 Tbs. heavy cream, letting both reduce slightly until the ragoût is just loose and saucy enough to spoon around the tenderloin. Stir in the parsley.
Tuesday, February 17, 2009
Sourdough Orange Pancakes with Orange Syrup

My son, Marc has been after me to post these recipes. Mindy's blog has made him hungry for any and all sourdough recipes. He came home several weeks ago for the weekend and much to his delight I made Sourdough Orange Pancakes. This is one of our family's favorite recipes, give it a try, it just might become one of your family favorites as well. You don't have to mix this the night before like many sourdough pancake recipes. Just make sure your starter is alive and active and that you have enough.
Sourdough Orange Pancakes
2 cups sourdough starter
3 TBL melted butter
2 eggs
1 6 oz. can frozen orange juice concentrate, thawed
2 TBL sugar
1 tsp. salt
1 tsp. baking powder
1/2 tsp. soda
Mix together and cook on a griddle.
Orange Syrup
1 6 oz. can frozen orange juice concentrate, thawed
1 cup sugar
1/2 cup butter
Mix together in a small saucepan, bring to a boil and simmer for about 5 minutes. It will thicken slightly as it cools.
A Family Dinner

Oh, did we ever eat well over the weekend! I am hoping to get a recipe for Megan's cinnamon rolls, among other things: Buttermilk Syrup, Becky's Sourdough Pancakes with Orange Syrup, fabulous pasta sauces, vinaigrettes, etc.!
For Sunday night's dinner, three of us were tasked with making different pasta dishes. Maraley prepared Spinach Ravioli with Toasted Pine Nuts in a scrumptious Brown Butter Sauce. Diane made Whole Wheat Spaghetti with Chicken Alfredo Sauce. I made Creamy Baked Penne and Chicken with Artichokes, Tarragon and Lemon. (Eventually, I was even able to serve it...)

To accompany all this, Kathy made a gorgeous Garden Salad with a custom Vinaigrette. Becky and Gina made Artisan Bread loaves and Focaccia (from the same dough), and Erik and Ashlie served up an array of different Ice Creams.
 Artisan Bread
 Artisan Focaccia
Wednesday, February 11, 2009
Dublin Coddle
We had our first monthly Bunkhouse Brunch last Sunday, and it was a smashing success! We had a great turnout, were surrounded by friends and family, and everyone brought such fabulous food! We made a Strata with Asparagus, Sausage and Fontina. Among the other dishes were roasted sweet potatoes, sausage links, donut holes, coffee, an assortment fruit, Yoghurt Coffee Cake (with roasted almonds instead of walnuts!), and fresh squeezed orange & grapefruit juice, and a new taste sensation, Espressicles. Quite a spread!
Since the brunch is a monthly event, we are already thinking about the next one...
Various things pushed the brunch a bit further into the month of March, but what a lucky thing that turned out to be. With the March Bunkhouse Brunch scheduled for March 15, we are running with an Irish theme in honor of St. Patrick's Day.
In preparation, and honestly just because they sound delicious, we are trying out several new recipes. My ancestry is almost completely Irish, but sadly the only Irish dish that comes to my mind is Boiled Dinner. I'm not a big fan, but I feel like I ought to give it another try at some point. Just not right now. First, I ran across this recipe for "Dublin Coddle."
The recipe sounds fabulous: bacon, sausage, potatoes, onions and carrots slow-cooked in beer or broth. I found it in The Gourmet Slow Cooker: Simple and Sophisticated Meals from Around the World , and I can't say if I've ever tried a recipe out of the book before. Looking through it the other day, I know I will be trying several more out of this fantastic little book. Lucky you!
This stew is savory, hearty and delicious, and H-Bomb says "Super yummy!"

Dublin Coddle
Serves 6 Dublin Coddle is true Irish comfort food: no fancy sauces, and none of the spices found in hotter regions. Yet every Dublin pub and every Dublin mum has a version of it. It sounds simple--just bacon, sausage, potatoes, onions, carrots and water or hard cider--but the flavors meld together into a delicious stew. Note: This dish is an exception to the better-the-day-after rule. I like it hot out of the pot.
4 slices lean bacon (I used 6 slices)
1 1/2 pounds pork sausages (6-8 sausages) ~I used about 10 I think
2 yellow onions, sliced
Salt and freshly ground black pepper
2 large potatoes, peeled and sliced
2 carrots, peeled and sliced
1 cup water, hard cider, chicken stock or beer (I used a dark Oatmeal Stout beer)
1/4 cup chopped fresh parsley, for garnish
Heat a large saute' pan over medium-high heat. Add the bacon and fry for 7 minutes, or until crisp. (If there is one thing I can do with bacon, it is fry until crisp!) Using tongs, transfer to paper towels to drain.
Add the sausages to the pan and cook, turning frequently, for 10 minutes, or until browned. Using tongs, transfer to a plate. Drain any excess fat from the pan.
Add the onions to the pan and saute', stirring frequently, for 10 minutes, or until lightly browned.
Spread half of the onions in a layer in the bottom of the slow cooker. Sprinkle with salt and pepper. Place half of the potatoes in a layer on top of the onions and sprinkle with salt and pepper. Lay the strips of bacon over the potatoes. Lay the sausages over the bacon. Spread the carrots over the sausages and sprinkle with salt and pepper. Spread the remaining onions over the carrots and sprinkle with salt and pepper. Top with the remaining potatoes and sprinkle with salt and pepper.
Add the water. Cover and cook on low for 5 to 6 hours, until the vegetables are very tender.
Transfer to a warmed serving dish and sprinkle with the parsley. Serve immediately.
To Drink: Harp Lager or Newcastle Brown Ale. (we'll be drinking Oatmeal Stout)
Since the brunch is a monthly event, we are already thinking about the next one...
Various things pushed the brunch a bit further into the month of March, but what a lucky thing that turned out to be. With the March Bunkhouse Brunch scheduled for March 15, we are running with an Irish theme in honor of St. Patrick's Day.
In preparation, and honestly just because they sound delicious, we are trying out several new recipes. My ancestry is almost completely Irish, but sadly the only Irish dish that comes to my mind is Boiled Dinner. I'm not a big fan, but I feel like I ought to give it another try at some point. Just not right now. First, I ran across this recipe for "Dublin Coddle."
The recipe sounds fabulous: bacon, sausage, potatoes, onions and carrots slow-cooked in beer or broth. I found it in The Gourmet Slow Cooker: Simple and Sophisticated Meals from Around the World
This stew is savory, hearty and delicious, and H-Bomb says "Super yummy!"

Dublin Coddle
Serves 6 Dublin Coddle is true Irish comfort food: no fancy sauces, and none of the spices found in hotter regions. Yet every Dublin pub and every Dublin mum has a version of it. It sounds simple--just bacon, sausage, potatoes, onions, carrots and water or hard cider--but the flavors meld together into a delicious stew. Note: This dish is an exception to the better-the-day-after rule. I like it hot out of the pot.
4 slices lean bacon (I used 6 slices)
1 1/2 pounds pork sausages (6-8 sausages) ~I used about 10 I think
2 yellow onions, sliced
Salt and freshly ground black pepper
2 large potatoes, peeled and sliced
2 carrots, peeled and sliced
1 cup water, hard cider, chicken stock or beer (I used a dark Oatmeal Stout beer)
1/4 cup chopped fresh parsley, for garnish
Heat a large saute' pan over medium-high heat. Add the bacon and fry for 7 minutes, or until crisp. (If there is one thing I can do with bacon, it is fry until crisp!) Using tongs, transfer to paper towels to drain.
Add the sausages to the pan and cook, turning frequently, for 10 minutes, or until browned. Using tongs, transfer to a plate. Drain any excess fat from the pan.
Add the onions to the pan and saute', stirring frequently, for 10 minutes, or until lightly browned.
Spread half of the onions in a layer in the bottom of the slow cooker. Sprinkle with salt and pepper. Place half of the potatoes in a layer on top of the onions and sprinkle with salt and pepper. Lay the strips of bacon over the potatoes. Lay the sausages over the bacon. Spread the carrots over the sausages and sprinkle with salt and pepper. Spread the remaining onions over the carrots and sprinkle with salt and pepper. Top with the remaining potatoes and sprinkle with salt and pepper.
Add the water. Cover and cook on low for 5 to 6 hours, until the vegetables are very tender.
Transfer to a warmed serving dish and sprinkle with the parsley. Serve immediately.
To Drink: Harp Lager or Newcastle Brown Ale. (we'll be drinking Oatmeal Stout)
Monday, February 9, 2009
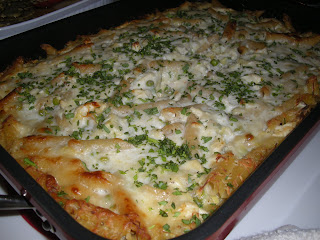
Creamy Baked Penne and Chicken with Artichokes, Tarragon and Lemon
I was tasked with preparing a pasta dish for an upcoming family meeting of sorts. Not knowing exactly how many people would be there, or anything about the kitchen, combined with two aunts cooking other two other pasta dishes simultaneously, I decided to try this oven-baked recipe. Making it ahead will free up the stove top for our aunts, and all I will have to do on Saturday night is pop it in the oven! (That's my kind of cooking, as you may know).
I plan to make this dish tomorrow, then pop it in the freezer until we leave Friday morning, and it should travel beautifully in a cooler. When we get there, the dish will go directly into the refrigerator to thaw, and be completely thawed and ready for the oven Saturday night.
Every recipe from The Best Make-Ahead Recipe has been a winner, and I expect this will be no different.
UPDATE: Although I removed this dish from my freezer early Friday morning, and stored it in a refrigerator until Sunday evening, evidently the refrigerator was too cold because my dish was still frozen when it was time to bake! Ack! So, I was forced to bake it longer than I had anticipated, and it came out of the oven after most of the dinner was over. Our gracious family valiantly sampled some, and everyone declared their love for this dish. It really is quite flavorful and bright, I love the texture of the shredded chicken and the fresh tarragon enhances everything. Just be sure to check on the temperature of the refrigerator in which you are attempting to "thaw" your dish...
Also, a double batch is a LOT of food. Just so you know. For more on the family dinner, go here.
Creamy Baked Penne and Chicken with Artichokes, Tarragon and Lemon
If you can't find frozen artichokes, you can substitute3 (14-ounce) cans artichoke hearts; you will need to drain, rinse and pat them dry thoroughly before using. Shredded Italian cheese blend is a mix of 4 to 5 cheeses, often including mozzarella, provolone, Parmesan, fontina, and Asiago.
Salt
1 pound penne
4 tablespoons olive oil
3 (9-ounce) boxes frozen artichokes, thawed, patted dry and chopped coarse (or see note above)
1 medium onion, minced
8 medium garlic cloves, minced or pressed through a garlic press (about 8 teaspoons)
1/4 teaspoon grated zest from 1 lemon
1/4 cup unbleached all-purpose flour
2 cups low-sodium chicken broth
1 cup dry white wine
1 cup heavy cream
2 pounds boneless, skinless chicken breasts (about 5 breasts), trimmed
3 bay leaves
1 1/2 cups frozen peas
8 ounces shredded Italian cheese blend (about 2 cups)
3 tablespoons juice from 2 lemons
Ground black pepper
3 tablespoons minced fresh tarragon leaves (for serving)
1. Bring 4 quarts of water to a boil in a Dutch oven over high heat. Stir in tablespoon salt and the pasta and cook, stirring occasionally, until just beginning to soften, about 5 minutes. Drain the pasta through a colander and toss with 1 tablespoon of the oil; leave in the colander and set aside.
2. Wipe the pot dry, then add the remaining 3 tablespoons oil, and set it over medium heat until shimmering. Add the artichokes, onion, and 1 teaspoon salt and cook until the artichokes are lightly browned, 8 to 10 minutes.
3. Stir in the garlic and lemon zest and cook until fragrant, about 30 seconds. Stir in the flour and cook, stirring constantly, until golden, about 1 minute. Slowly whisk in the broth, wine and cream.
4. Add the chicken breasts and bay leaves, partially cover, and bring to a simmer. Reduce the heat to low, cover completely, and cook until the thickest part of the chicken registers 160 degrees on an instant-read thermometer, 10 to 15 minutes.*
*If I remember correctly, the last time I cooked chicken using this method, it took a lot longer for the chicken to cook--even twice or three times as long. I'm not sure if this is due to altitude or what. I will report back tomorrow with exact cooking time for the chicken...
UPDATE: After 15 minutes, my chicken was barely at 125 degrees. So yes, it took longer for me; about 25 minutes total.
5. Remove the pot from the heat and discard the bay leaves. Remove the chicken and set aside to cool; keep the sauce covered. When the chicken is cool enough to handle, shred it into bite-sized pieces. Stir the shredded chicken back into the sauce with the cooked pasta, peas, 1 cup of the cheese, and lemon juice; stir until well combined. Season with salt and pepper to taste. Transfer to a 13 by 9-inch baking dish and sprinkle with the remaining cup cheese.
6. To Store: Wrap the dish tightly with plastic wrap and then foil and refrigerate for up to 2 days or freeze for up to 1 month. (If frozen, the casserole must be thawed completely in the refrigerator, about 24 hours).
7. To Serve: Thaw completely in refrigerator, about 24 hours. Adjust an oven rack to the middle position and heat the oven to 400 degrees. Unwrap the dish and cover tightly with aluminum foil that has been sprayed with vegetable oil spray (or use nonstick foil). Bake until the sauce is bubbling around the edges, 30 to 40 minutes. Remove the foil and continue to bake until hot throughout and browned on top, 25 to 30 minutes longer. Sprinkle with the tarragon before serving.
To Serve Right Away:
Bake the casserole in a 400-degree oven, uncovered, until the sauce is bubbling and the top is browned, 25 to 35 minutes. Sprinkle with the tarragon before serving.
I plan to make this dish tomorrow, then pop it in the freezer until we leave Friday morning, and it should travel beautifully in a cooler. When we get there, the dish will go directly into the refrigerator to thaw, and be completely thawed and ready for the oven Saturday night.
Every recipe from The Best Make-Ahead Recipe
UPDATE: Although I removed this dish from my freezer early Friday morning, and stored it in a refrigerator until Sunday evening, evidently the refrigerator was too cold because my dish was still frozen when it was time to bake! Ack! So, I was forced to bake it longer than I had anticipated, and it came out of the oven after most of the dinner was over. Our gracious family valiantly sampled some, and everyone declared their love for this dish. It really is quite flavorful and bright, I love the texture of the shredded chicken and the fresh tarragon enhances everything. Just be sure to check on the temperature of the refrigerator in which you are attempting to "thaw" your dish...
Also, a double batch is a LOT of food. Just so you know. For more on the family dinner, go here.
Creamy Baked Penne and Chicken with Artichokes, Tarragon and Lemon
If you can't find frozen artichokes, you can substitute3 (14-ounce) cans artichoke hearts; you will need to drain, rinse and pat them dry thoroughly before using. Shredded Italian cheese blend is a mix of 4 to 5 cheeses, often including mozzarella, provolone, Parmesan, fontina, and Asiago.
Salt
1 pound penne
4 tablespoons olive oil
3 (9-ounce) boxes frozen artichokes, thawed, patted dry and chopped coarse (or see note above)
1 medium onion, minced
8 medium garlic cloves, minced or pressed through a garlic press (about 8 teaspoons)
1/4 teaspoon grated zest from 1 lemon
1/4 cup unbleached all-purpose flour
2 cups low-sodium chicken broth
1 cup dry white wine
1 cup heavy cream
2 pounds boneless, skinless chicken breasts (about 5 breasts), trimmed
3 bay leaves
1 1/2 cups frozen peas
8 ounces shredded Italian cheese blend (about 2 cups)
3 tablespoons juice from 2 lemons
Ground black pepper
3 tablespoons minced fresh tarragon leaves (for serving)
1. Bring 4 quarts of water to a boil in a Dutch oven over high heat. Stir in tablespoon salt and the pasta and cook, stirring occasionally, until just beginning to soften, about 5 minutes. Drain the pasta through a colander and toss with 1 tablespoon of the oil; leave in the colander and set aside.
2. Wipe the pot dry, then add the remaining 3 tablespoons oil, and set it over medium heat until shimmering. Add the artichokes, onion, and 1 teaspoon salt and cook until the artichokes are lightly browned, 8 to 10 minutes.
3. Stir in the garlic and lemon zest and cook until fragrant, about 30 seconds. Stir in the flour and cook, stirring constantly, until golden, about 1 minute. Slowly whisk in the broth, wine and cream.
4. Add the chicken breasts and bay leaves, partially cover, and bring to a simmer. Reduce the heat to low, cover completely, and cook until the thickest part of the chicken registers 160 degrees on an instant-read thermometer, 10 to 15 minutes.*
*If I remember correctly, the last time I cooked chicken using this method, it took a lot longer for the chicken to cook--even twice or three times as long. I'm not sure if this is due to altitude or what. I will report back tomorrow with exact cooking time for the chicken...
UPDATE: After 15 minutes, my chicken was barely at 125 degrees. So yes, it took longer for me; about 25 minutes total.
5. Remove the pot from the heat and discard the bay leaves. Remove the chicken and set aside to cool; keep the sauce covered. When the chicken is cool enough to handle, shred it into bite-sized pieces. Stir the shredded chicken back into the sauce with the cooked pasta, peas, 1 cup of the cheese, and lemon juice; stir until well combined. Season with salt and pepper to taste. Transfer to a 13 by 9-inch baking dish and sprinkle with the remaining cup cheese.
6. To Store: Wrap the dish tightly with plastic wrap and then foil and refrigerate for up to 2 days or freeze for up to 1 month. (If frozen, the casserole must be thawed completely in the refrigerator, about 24 hours).
7. To Serve: Thaw completely in refrigerator, about 24 hours. Adjust an oven rack to the middle position and heat the oven to 400 degrees. Unwrap the dish and cover tightly with aluminum foil that has been sprayed with vegetable oil spray (or use nonstick foil). Bake until the sauce is bubbling around the edges, 30 to 40 minutes. Remove the foil and continue to bake until hot throughout and browned on top, 25 to 30 minutes longer. Sprinkle with the tarragon before serving.
To Serve Right Away:
Bake the casserole in a 400-degree oven, uncovered, until the sauce is bubbling and the top is browned, 25 to 35 minutes. Sprinkle with the tarragon before serving.
Friday, February 6, 2009
Grace's Sourdough Gingammonbread
Grace has discovered the most innovative uses for her sourdough starter. I'm so fortunate our paths have crossed...whenever I need inspiration for ole Virgil, off to Grace's blog I go. This morning, I fed Virgil because I felt like he looked a bit hungry, but I didn't have a real plan for him. We have plenty of bread, so that was out, even though I really felt like making some. Then I found this recipe. (follow the link and read Grace's account!)
I love molasses, cinnamon, ginger...I had to have some. I just wasn't sure about the lemony glaze, so I didn't make any. I prefer mine with a dollop of whipped cream. Too bad we are all out! The cake is moist and delicious, and wonderful warm-from-the-oven!
*If you have been waiting for an excuse to make sourdough starter, this would be the one!

Sourdough Gingammonbread
1/2 cup brown sugar, firmly packed
1/2 cup butter, room temperature
1/2 cup molasses
1 egg
1 1/2 cups all-purpose flour
1/2 teaspoon salt
1 teaspoon baking soda
2 teaspoons cinnamon
2 teaspoons ginger
1/2 cup hot water
1 cup sourdough starter
For icing (optional):
1 1/4 cup powdered sugar
2 tablespoons lemon juice
1-2 tablespoons water, if needed
Preheat oven to 375 degrees F. Grease up a 8x8-inch baking dish or mini loaf pan.
In a large bowl, cream together the brown sugar and butter. Add the molasses and egg, beat until well blended, and set aside.
In a separate bowl, combine the dry ingredients and blend in the hot water to form a sort of dough. Beat the doughy stuff into the creamed mixture like there's no tomorrow. (I used my Kitchenaid). Gradually add your starter, mixing carefully to maintain a bubbly batter.
Pour into the prepared pan and bake for about 30 minutes or until the toothpick test is passed. I had to bake mine for 45 minutes before it was done~could be an altitude issue, let me know how it works for you!
For the icing, whisk the lemon juice into the powdered sugar and gradually add the water, if needed. Spread over the cooled gingammonbread and try to let it set before cutting.
Sunday, February 1, 2009
Chicken Chili
We had a gathering of friends yesterday to watch a hockey game and have a beer tasting event. What goes better with beer than Mexican food! After the beer tasting I had a crock pot full of this Chicken Chili and Jalapeno Cornbread. It was delicious!! I got the recipe from Big Sky Cooking by Meredith Brokaw & Ellen Wright.
The original recipe in the book said it serves 6-8 people. I doubled the recipe but barely had enough for 8 adults & 4 kids. Just a word to the wise... double the recipe. Below is the original recipe.... double it if you want leftovers! And you will!
Here's what you'll need...
1-Tbs Olive oil
1/4-cup Chopped onion
1-cup Chicken broth (canned is fine)
1/2-cup Spicy salsa
1 4-oz can of green chiles (drained and chopped)
2-lbs Grilled chicken meat cut into bite-size pieces (I used boneless, skinless thighs)
2-Tbs Fresh cilantro
1-tsp Dried oregano (or 2-tsp fresh)
2-tsp Ground cumin
1-tsp Garlic powder
1/8-tsp Cayenne pepper
1 15-oz can Cannellini beans, drained
- In a large saucepan, heat the olive oil over moderate heat until hot but not smoking. Add onion and cook, stirring until opaque (about 2-3 minutes).
- Stir in the broth, salsa (or tomatoes), chiles, chicken, cilantro, oregano, cumin, garlic powder and cayenne. Simmer for 20 minutes.
- Add the beans and cook, stirring occasionally, until the sauce thickens, about 20 minutes longer.
- Serve with sour cream, salsa, grated cheddar or jack cheese and/or onions or scallions.
Jalapeno Cornbread
My husband bought me a cookbook on his trip to Montana last year. This recipe is from that book titled, Big Sky Cooking by Meredith Brokaw & Ellen Wright. I made it to go with the Chicken Chili recipe from the same book.
I've been looking for a good cornbread recipe that is easy, moist and slightly sweet. Well here it is! I also made a batch without the jalapeno for those that wanted. Both came out fabulous.
Here's what you'll need...
1-cup Yellow cornmeal
1-cup All-purpose flour
1/4-cup Sugar
1-Tbs Baking powder
Pinch Kosher salt
3 Large eggs
1-cup Heavy cream* (See note below)
1/4-cup Butter, melted (1/2 stick)
1-cup Fresh or frozen corn kernels
1/3-cup Grated sharp white cheddar cheese
1 Small jalapeno pepper, seeded and finely chopped
- Preheat oven to 375 degrees
- Butter an 8-inch square baking dish.
- In a large bowl, combine the cornmeal, flour, sugar, baking powder and salt; mix with a fork.
- Stir in the eggs, cream and melted butter.
- Fold in the corn, cheese and jalapeno pepper until well distributed.
- Spoon the batter into the prepared baking dish.
- Bake approximately 30-35 minutes or until a toothpick or knife inserted in the center comes out clean.
*I didn't have heavy cream. I used 2% milk and added a little extra melted butter. Everything came out just fine.
Subscribe to:
Posts (Atom)


