Showing posts with label Grilling. Show all posts

Sunday, July 14, 2013

Grilled Pineapple Chicken

This month, my assignment for Secret Recipe Club was:


Maria has lots of great-sounding recipes, but it's summer and it's hot and I wanted to cook something on the grill.  So I made my choice:  her Grilled Pineapple Chicken Kabob Foil Packets.  While the name is a mouthful, the recipe is pretty darn good.  Easy to put together, I had just about everything in my kitchen to whip these up.  We make Campfire Potatoes a lot, but I don't remember doing any packets with meat in them, not sure why.

I packaged mine up ahead of time, then tossed them on the grill just before dinner. 

My husband didn't make it home for dinner, so I had two younger taste-testers.  My oldest boy liked it and ate his whole dinner.  I should have made rice to go with these!  My youngest said he didn't like the chicken, but he did eat a couple bites.

These would be very good with rice, and I think next time I'll cook them just a bit less.  I used my own peach jam from last summer, and I decided to coat the chicken with the preserve mixture first, instead of piling it on with the vegetables.  It worked great.
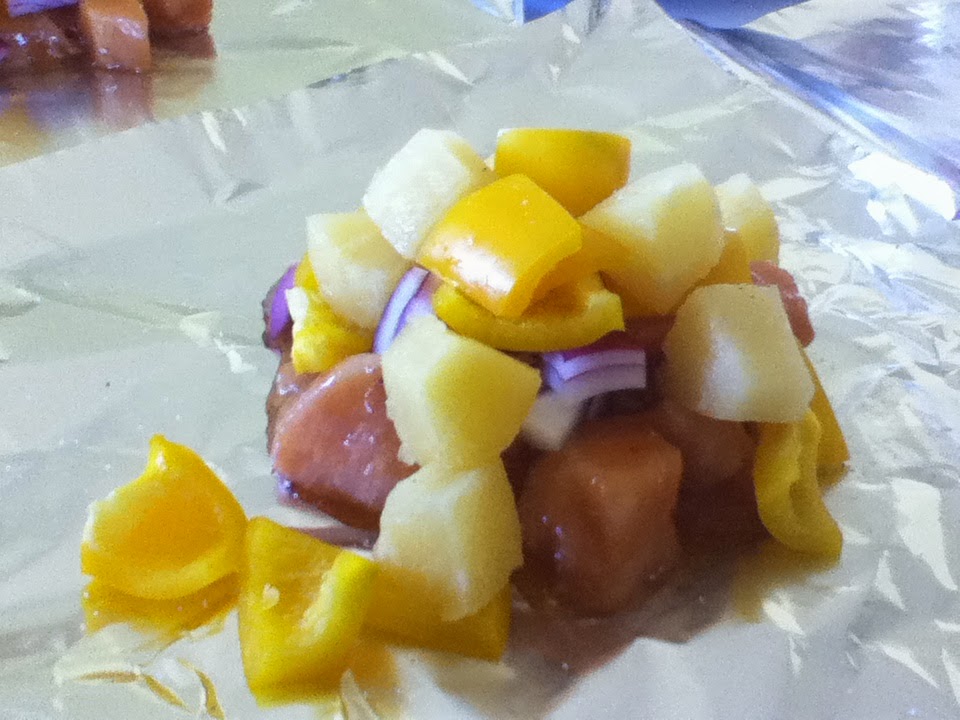
Before grilling, 1 serving


Grilled Pineapple Chicken Foil Packs
Adapted from Close to Home 
Makes 4 servings
 
1/3 cup pineapple, peach or apricot preserves (I used my own peach jam)
2 tablespoons packed brown sugar
1 tablespoon soy sauce
1/4 teaspoon crushed red pepper (I used a pinch)
4 boneless skinless chicken breasts, cut into 2-inch cubes (1 lb)
1 medium red bell pepper, cut into 1 1/2-inch cubes (I used 2 yellow peppers I had)
1 cup pineapple chunks
1 red onion, cut in 1 inch cubes (I only used 1/2 an onion)
salt, to taste

Heat grill on medium heat.  In small bowl, stir together pineapple preserves, brown sugar, soy sauce and crushed red pepper.  Add chicken breast chunks and toss until coated.

Cut 8 (12×12-inch) sheets of heavy-duty foil. Divide coated chicken, bell peppers, pineapple chunks and onion evenly among foil sheets. Sprinkle each lightly with salt. Seal edges tightly, folding and rolling in toward the center three or four times.  Seal opposite sides, then fold edges in on last two sides and roll in a similar fashion, taking care not to package the food too snugly but sealing edges carefully so juices don't leak out when flipped.

Reduce grill to low.  Place packets on grill over low heat. Cover grill; cook 6 minutes. Using tongs, carefully turn packets over, taking care not to puncture foil. Cook 10 to 12 minutes longer or until chicken is no longer pink in center and vegetables are crisp-tender.

***If you're looking for a fun new food blog event, look no further!  Taste & Create is a fabulous monthly blog event in which participants are randomly paired off to choose and prepare a dish from their partner's blog. 
 If you'd like to join us, please email me at 
cowgirlmin07 [at] gmail [dot] com for more information!  
We'd love to have you.***


Secret Recipe Club

Tuesday, July 9, 2013

BBQ HERBED CHICKEN

It was another scorcher here today of 112 degrees and monsoony humid so we stayed inside and painted the bathroom and a bedroom.  I'm exhausted though so decided to make this simple recipe for the grill.  It was made even simpler by having the lime juice in the freezer.  I buy the fruit and then squeeze it all at once making it into cubes for future recipes. And then even simpler yet by converting the fresh herbs into dry measurements and using a mortar & pestle to revive them.  This was a substitute for tonight, but I highly recommend using the fresh when you can.

HERBED BBQ CHICKEN
1/2 cup vegetable oil
1/2 cup lime juice
2 tablespoons fresh chopped basil
2 tablespoons fresh chopped oregano
1 teaspoon onion powder
1/4 teaspoon lemon pepper
4 chicken thighs, about 1 pound*
4 chicken drumsticks, about 1 pound*
  • In a small food processor mix together everything except the chicken.
  • Wash and dry the chicken pieces.
  • Pour herb mixture into a large ziploc bag and add chicken pieces.  Marinate chciken for 30 minutes to 24 hours.
  • Heat grill and spray with PAM for grilling especially if using skin free pieces.
  • Place chicken pieces on grill, reserving the marinade.
  • Cook on one side and then turning to other side.  Time will vary drastically based on type of chicken pieces you are using.
  • Pour reserved marinade into a small saucepan.
  • Bring to a boil over a medium-high heat and then remove from heat.
  • Brush over chicken pieces.
*I use whatever I have on hand - breasts, tenders, etc....

Wednesday, July 7, 2010

Classic Barbecue Spareribs


"That meat looks yummy and smells yummy."
- H-Bomb, upon seeing the ribs come out of the oven.

This recipe comes from Real Simple magazine, and it is a WINNER all-around. It's so easy to prepare, just mix up a quick rub, then baking it in the oven is completely hands-off! Grilling the meat and basting with barbecue sauce for a few minutes before serving puts the perfect finishing touch on a wonderful dish. Everyone loved these ribs! The sauce is delicious too, there were barely any leftovers!


Classic Barbecue Spareribs
Hands-on Time: 15 minutes Total Time: 3 1/2 hours Serves: 4

1 scant tablespoon chili powder (or 1/2 tablespoon if your chili powder is strong)
1 tablespoon ground coffee
1 scant teaspoon ground cumin
4 tablespoons brown sugar (divided)
3/4 teaspoon cayenne pepper (divided)*I leave this out entirely*
Kosher salt and black pepper
6 pounds spareribs (2 racks), trimmed of excess fat
3/4 cup ketchup
1/3 cup apple cider vinegar
1/4 cup molasses
2 tablespoons tomato paste

Heat oven to 275 degrees F. Make the rub: In a small bowl, combine the chili powder, coffee, cumin, 2 tablespoons of the brown sugar, 1/2 teaspoon of the cayenne, 2 teaspoons Kosher salt, and 1 teaspoon black pepper.

Place the ribs on a large rimmed baking sheet. Rub the ribs with the spice mixture and tightly cover the baking sheet with foil. Bake until tender and the meat easily pulls away from the bone, 2 1/2 to 3 hours.

Meanwhile, make the sauce: In a saucepan, combine the ketchup, vinegar, molasses, tomato paste, the remaining 2 tablespoons of brown sugar and 1/4 teaspoon of cayenne, and 1/2 teaspoon black pepper. Simmer, stirring occasionally, until slightly thickened, 8 to 10 minutes. Transfer 1/2 cup of the sauce into a small bowl for serving.

Heat grill to medium-high. Grill the ribs, basting with the remaining sauce and turning occasionally, until just beginning to char, 4 to 5 minutes. Serve with the reserved sauce.

Wednesday, May 5, 2010

Mary's Green Curry Turkey Burgers with Asian-Style Cucumber Relish

When Mary of One Perfect Bite stopped by my blog today with her sweet comment on Make Your Own Pizza, I knew I wanted to stop by hers. I had been at a loss for what to make for dinner. I know we all have those moments, mine just seems to be dragging on for a week or two.

Mary's recipe for Green Curry Turkey Burgers was the first one I saw, and it was all I needed. I had an afternoon trip to the store planned (H-Bomb is always always hungry when he gets out of school and needs a snack or three for the 45-minute ride home), so I was able to pick up the few ingredients I needed.

I did finally find ground turkey in the freezer section of the teeny tiny grocery store, but it's not anywhere near what sounds like Mary's freshly-ground turkey. This turkey was too finely ground, like mush to be precise, and when I mixed it up with the relish, there was no way it would hold its shape. I added a cup of oats to the mix, and it was just right.

I'm glad I used two whole pounds of turkey, because the green curry I had (I only used a teaspoon, I swear!) is s p i c y, and I've got two young, hungry boys to feed! I didn't adjust any of the other ingredients, other than what is noted below. I felt like my burgers were quite large, so I cooked them for about 6 minutes on a side. I wanted to grill them, but I was worried about how they would hold up, so I just fried them in a bit of olive oil.

These burgers are everything I thought they'd be. They were delicious, and slightly spicy, and a nice contrast of flavors and textures. The curry is a natural with the turkey, and the cucumber relish is such a perfect complement. The boys (ages 4 & 6 1/2, remember) didn't care for the burgers. Sawed Off at most of his bun, H-Bomb ate some cucumber relish with the onions picked out. Number One and I loved them.


Thank you Mary, for your lovely comment and your delicious recipe! I'm so happy you chose today to stop by!


Green Curry Turkey Burgers with Asian-Style Cucumber Relish

...from the kitchen of One Perfect Bite

Ingredients:


1 large English cucumber, cut in 1/4 to 1/2-inch dice
1/4 cup finely minced red onion
2 teaspoons finely chopped fresh hot green chilies

1/2 cup white vinegar
1/2 cup water
1/2 cup sugar
2 teaspoons salt, divided use

1 cup mayonnaise
1 to 3 teaspoons Thai-style green curry paste
1-1/4 pounds ground turkey meat (I used 2 pounds)
1 cup oats

4 lightly toasted brioche-style rolls
Garnish: Cilantro sprigs

Directions:

1) Combine vinegar, water, sugar and 1 teaspoon salt in a medium sauce pan and cook, stirring occasionally, over moderate heat until sugar dissolves. Remove from heat and let cool to room temperature.

2) Combine cucumbers, onions and chiles in a small bowl. Cover with cooled dressing and chill for several hours.

3) Combine mayonnaise, green curry paste and reserved 1 teaspoon salt in a small bowl. Mix well. Remove 1/4 cup of sauce to another small bowl and stir 1/2 cup drained cucumber relish into it.

4) Add relish mixture to ground turkey and mix just until combined. Shape into 4 patties. In a large nonstick skillet set over medium-high heat, cook patties for 4 minutes on each side. Spread reserved mayonnaise mixture on top and bottom of warm rolls. Place a pattie on bottom half of each roll and cover with relish and sprigs of cilantro. Set roll tops in place and serve.

Thursday, April 29, 2010

Paul's Grilled Cabbage

~~~~~~~
**I wrote this post on my actual birthday, April 9,
but couldn't get the pictures to load.
So here it is, 20 days later!!**

~~~~~~~


I know what you're thinking, because I was thinking the same thing. It just sounds sort of nasty, right? My mom mentioned it yesterday on the phone, one of my parents' friends in Florida was bringing some over for dinner. Okay then, whatever. (I do like raw cabbage, but I'm not a fan of cooked cabbage, unless it's in my Corned Beef & Cabbage)

But then today, when I talked to my dad, he was kind of raving about the cabbage. And describing it to me in detail, telling me exactly how to make it. He said they dug in with forks when Paul arrived, then had more with dinner. He said my mom (who doesn't really like cabbage) liked it a lot. He said it had bacon in it. I grabbed a pencil.

I've never met Paul, but I know for a fact that he thinks I'm hot. He told me so on the phone last year. So despite his advanced years, I guess he gets a point for that one. Sort of. And if he can cook too, well that's a bonus. (Little does he know, I don't generally look like a model. Just the one time when I was actually modeling. Generally I look like I could use a shower, a nap, or at least a hairbrush! Haha.)

So I figured this would go great with the grilled steaks we're planning to have for my birthday dinner tonight. Did I tell you I'm 40 today? I know it's unbelievable.

I don't have any measurements, but when you're grilling you should feel free to wing it a bit. That's what I do.


Paul's Grilled Cabbage. With Bacon.

1 head of cabbage, sliced in 6-8 wedges (core and all)
12-16 slices of bacon (I'm using thick bacon, so I'm using 6-8 slices)
butter, softened
minced garlic (I used garlic powder)
salt
pepper (I forgot about the pepper)


Preheat your grill to low. (I used a grill pan because my grill is still over at the bunkhouse).


Cut rectangles of aluminum foil that can be wrapped around an upright cabbage wedge. Place 1 or 2 strips of bacon in the middle of each piece of foil, then perch a cabbage wedge on top. Standing up.

Spread about 1 tablespoon or so of butter on the top of each wedge (or if you don't have softened butter, you can balance a slice of butter on top of the cabbage wedge. I'm speaking from experience, of course). Sprinkle each wedge with minced garlic and salt, or garlic salt (or garlic powder + salt). Grind some fresh pepper of each wedge.


Carefully wrap up each wedge, starting by bringing the long edges to the top above the wedge and folding down securely, then folding the edges in securely as well to make little packets of cabbage and bacon that will remain standing up. (If your foil just isn't big enough, cut a new piece. Don't feel badly, I had to do it too).

Place each packet on the grill, bacon side down, and grill over low heat for 1 hour. Carefully unwrap and serve! The cabbage will be perfectly cooked, not too mushy, and the flavors are wonderful.

Sunday, March 14, 2010

Steak Marinade

This is a great all-around marinade for any kind of steak you want to throw on the grill! I found it in Big Sky Cooking by Brokaw/Wright. The original recipe calls for Elk steaks... being that that isn't readily available where I am, I settled for a couple thin sirloin steaks.

Here's what you'll need to marinate 6-8 (6-8oz each) steaks.

1/2 cup soy sauce
1/4 cup olive oil
3 Tbs honey
3 cloves garlic, minced
1 Tbs fresh ginger root, minced
Juice of 2 limes

  • Combine all ingredients in a nonreactive pan, add your steaks.
  • Cover and refrigerate for 3-4 hours or overnight.
  • Remove from the refrigerator about 1 hour prior to grilling to bring steaks up to room temperature.
  • Grind black pepper generously over each side of the steaks.
  • Grill as usual!!!

Saturday, August 1, 2009

Chicken Burgers with Portobello Mushrooms, Spinach & Sundried Tomato Mayo

This is another recipe from my previous Taste & Create partner, Liza of Knick Nosh, although she uses ground turkey. I simply had to try it. I still don't have ground turkey, but I finally remembered to thaw a pound of ground chicken for this recipe. Number One also decided that grilling would be the cooking method of choice for these burgers, so that's what we did. Our adaptation of the recipe is below; you can see the original recipe here.


Chicken Burgers with Portobello Mushrooms, Spinach & Sundried Tomato Mayo
Serves 4

1 pound of ground chicken (or turkey)
¼ cup seasoned bread crumbs
1 tablespoon Worcestershire sauce
½ teaspoon salt
¼ teaspoon pepper
¼ teaspoon garlic powder (I didn't have any garlic powder, so I used Johnny's Garlic Spread).

¼ cup mayonnaise
1 tablespoon sun-dried tomatoes packed in oil, chopped

4 large portobello mushrooms

2 cups fresh spinach

4 low-fat English muffins

Heat grill to medium.

Combine sundried tomatoes with mayo. Set aside.

Combine ground turkey with bread crumbs and seasonings. Form into 4 burgers. Spray portobello mushrooms with cooking spray (or brush with olive oil) and season with salt and pepper. Grill chicken until cooked through, about 5 minutes per side. At the same time, grill the mushrooms about 5 minutes per side.

Toast English muffins just before serving. Spread all English muffin halves with sun-dried tomato mayo. Place a burger on each bottom English muffin half. Top each burger with a mushroom, 1/4 of the spinach and the top English muffin half.

Tuesday, November 18, 2008

Pressed Cuban-Style Burger


This is one of Bobby's recipes, from his Boy Gets Grill cookbook. The cookbook is one of our favorites, but we keep returning to a few select recipes. The Cuban-Style Burger has been calling my name for quite a while. I've never had a Cuban Burger or Cuban Sandwich before, but there is something intriguing about them, to me at least. So since Number One is running to town, I decided today is the day to try them and sent him to the grocery store too.

We proceeded with the wrapping in tin foil, but I also think these would be great put together and pressed panini-style. Also, Number One brought home generic grocery store hamburger buns. You know the ones, eight to a package, fluffy white. I think buns just a step or two above that kind, like store bakery-made but not crusty, would have been better. Also a better variety of ham. But beggars can't be choosers, especially when you've asked your husband to run to the grocery store for you. I won't even mention the pickle incident. Let's just sum it up by saying, my husband went to the store!

I roasted the garlic in a dry pan, on top of the stove. It is faster that way than doing it in the oven, which is fortunate because I forgot about the roasted garlic until I was ready to start grilling! Just heat a skillet over medium heat, and add unpeeled garlic cloves. Turn them so all sides get heated on the pan, in about 10 or 15 minutes they should be great--you should be able to squeeze them down with your fingertip. If they don't feel soft, just leave them on longer. (If some parts turn a bit black, that's fine! Remove from heat, peel and puree.

These sandwiches are delicious! I loved them, pickles and all. Number One said he preferred them without pickles. I think they are just perfect. The garlic mayonnaise is wonderful, and all the flavors just complement each other so well. H-Bomb liked them too, although he didn't end up eating all the components.

We will definitely be making these burgers again! (And, the next time I'm in Miami, I already know what I'm going to order!)


Pressed Cuban-Style Burger

Serves 4; can be doubled for 6 to 8

When I'm really, really hungry,all I think about is a big, fat burger oozing melted cheese and pickles. Unless I'm in Miami, when all I think about is a big, fat Cuban sandwich oozing melted cheese and pickles. Cheeseburgers and Cuban sandwiches are my two favorite indulgences, and they're actually pretty similar. This sandwich combines the two. Don't be tempted to use fancy crusty bread here. Only soft rolls will get the perfect crisp crust you want to play against the soft interior. As for the meat, chuck is about 80 percent lean, which grinds to the right texture for burgers. Note that you'll need a heavy pot or a couple of bricks to press the burgers.

1 pound freshly ground beef, preferably chuck (see headnote)
Salt and freshly ground black pepper
1/2 cup mayonnaise
3 cloves garlic, roasted and pureed
4 hamburger buns
2 to 3 tablespoons Dijon mustard
8 thin slices Swiss cheese
4 thin slices ham
2 dill pickles, cut into 1/4-inch-thick slices (about 16)

1. Heat your grill to high.

2. Form the meat into four burgers. Season all over with salt and pepper. Grill the burgers until medium-rare, about 3 minutes on each side. Remove from the grill and leave the grill on.

3. Combine the mayonnaise and roasted garlic in a small bowl and season to taste with salt and pepper. Spread the cut sides of each bun with garlic mayonnaise and mustard. Place a slice of cheese on the bottom of each bun and a burger on top of the cheese, then top the burger with a slice of ham. Add another slice of cheese, then the pickle slices. Cover with the tops of the buns and wrap each burger individually in aluminum foil.

4. Place the burgers close together on the grill and rest a heavy skillet or a couple of bricks on top of them, pressing down if needed to flatten them. Grill for 2 to 3 minutes until the cheese is melted. Serve immediately.

Sunday, August 31, 2008

Campfire Potatoes with Herbs

I'm sure there are more versions of this recipe than there are stars in the sky. And that's the beauty of these potatoes. The recipe is basic, yet the variations are limitless.

I just christened them "Campfire Potatoes" because you can easily throw these packets in a campfire to cook them, and we have done so. They can also be grilled at home, in case you don't plan to have a campfire anytime soon. I'm sure you could bake them in the oven as well, but I have never done that.

Today, this is how I made them.

Campfire Potatoes with Herbs

8 Potatoes, sliced or chopped
1 Onion, thinly sliced and rings separated
4-5 Carrots, sliced
Coarse salt
Garlic cloves, peeled (optional)
Any other vegetable your heart desires (optional)
Fresh herbs of your choice (rosemary, tarragon, basil, parsley, etc.)

Lay out a large piece of tin foil (use a double layer if your tin foil is flimsy). If you're making a lot, use several separate pieces--you will be making packets of vegetables to put on the grill. For the quantity of vegetables listed above, I made three packets, with all the ingredients divided among them.

Slice or chop several potatoes and place them on the tin foil. Thinly slice an onion or two, and lay some of the rings over each pile of potatoes. Slice some carrots, and add those as well. I also meant to throw in some peeled cloves of fresh garlic, but I forgot! You can really add anything you'd like: zucchini, mushrooms, whatever you have available.

Generously sprinkle with coarse salt, and top with several tablespoons of butter. The amount of butter depends on the size of your packet. Don't be afraid to use a whole stick or two if you're making a lot. I used a whole stick, divided between three packets. Mine looked like this:


I couldn't decide on just one herb, so in my three different packets, I used three different herbs (top to bottom): rosemary, Italian parsley, sage. If you don't have any fresh herbs, you could use dried or just leave the herbs out. They'll be delicious either way.

It is very important to seal these packets well, because you will be flipping them on the grill about half-way through cooking. Top your vegetables with an additional piece of foil, roughly the same size as the bottom piece. Join the two side edges together, and fold them over one another, the way you roll your coffee beans or cereal bags closed. Do the same with each side, then with each end, and it should be good.


Place your packets on the grill over medium-low heat, and grill for about 20 to 30 minutes. Gently flip over (use oven mitts or be careful not to pierce the foil with your tongs) and grill for another 20 minutes or so. You should hear the butter sizzling and smell the onions cooking.

When you open them, they will be perfectly tender, and will look like this:


And they will taste amazing.

Monday, July 28, 2008

Grill-Roasted Chicken with Potato Fans

This is an excellent recipe for roasted chicken, very simple and delicious, and the potato fans are one of my favorites. It's from the Williams-Sonoma Complete Grilling Cookbook. I can't get over how easy this chicken is. You should try it. I'm going to make it again soon!

Grill-Roasted Chicken with Potato Fans
Serves 4

Baking potatoes and a roasting chicken are good grill partners because both cook in the same amount of time.

For the chicken:
1 roasting chicken, 5-6 pounds
1 lemon, halved
salt (I use coarse kosher) and freshly ground pepper to taste
several fresh rosemary, thyme, sage, or parsley sprigs
1-2 tablespoons olive oil or vegetable oil (I use olive)

For the potatoes:
4 baking potatoes, about 1/2 pound each, peeled
3 tablespoons unsalted butter, melted
1 teaspoon salt (kosher, again)
1/2 teaspoon freshly ground pepper

Prepare a fire for indirect-heat cooking in a covered grill. Turn on both burners of your grill to heat.

To prepare the chicken, rinse and then pat dry with paper towels. Rub the chicken inside and out with a cut side of the lemon. Sprinkle inside and out with salt and pepper. Tuck the herb sprigs inside the cavity. Rub the skin with the oil. Truss the chicken: Cross the drumsticks and, using kitchen string, tie the legs together, then tie the legs and wings close to the body. Set the chicken aside.

To prepare the potatoes, slice each one crosswise at 1/4-inch intervals, cutting only three-fourths of the way through; the slices must remain attached. In a large bowl, gently turn the potatoes in the melted butter. (I spoon butter over the potatoes also, so some gets in between the slices) Sprinkle with the salt and pepper.

Place the chicken, breast side down, on one side of the grill rack. (the flame under the chicken and potatoes should be turned off, with only the other side of the grill turned on) Place the potatoes, cut side up, alongside the bird. Cover and open the vents halfway. (I don't have vents, don't worry about it if you don't either) After 30 minutes, using large tongs so you don't pierce the chicken!, turn the chicken breast side up and turn the potatoes cut side down. Cook the chicken until the juices run clear when the thigh joint is pierced, or until an instant-read thermometer inserted into the thickest part of the thigh registers 180 degrees F, about 1 hour total. Add more hot coals to the fire as needed to maintain a constant temperature (I use our gas grill, between 250 to 300 degrees--use an oven thermometer set next to the chicken to monitor the temperature, see this post for more information) The potatoes will be tender in about the same amount of time.

Transfer the chicken to a warmed platter, cover loosely with aluminum foil, and let rest for 10 minutes; keep the potatoes warm on the grill. To serve, snip the strings and carve the chicken. Arrange the potatoes alongside.

Wednesday, July 9, 2008

Taste & Create Gets Grilling: Grilled Margarita Tilapia

Although we left on vacation in the middle of this event, I couldn't resist. We grill all the time. This is a seasonal version of Taste & Create, hosted by Nicole of For Love of Food. (Nicole, I will add the logo when we get home--my mom has rotary dial-up, which is virtually impossible)


I was paired with Becke of Columbus Foodie, and quickly became enamored with her recipe for Grilled Margarita Grouper. I honestly don't know what kind of fish "grouper" is, but I figured since we were traveling to Michigan (many, many lakes) and my husband likes to fish, I could improvise! Plus, you probably guessed I love margaritas.


We went fishing the other day, and I got more bites than my husband did, but my line wasn't strong enough for whatever kept biting. I caught a small blue gill, but that was it. We came home empty-handed. He went back out that night with my dad, nothing. Back out at 5:AM this morning, still nothing. So I went to the grocery store.

On the menu tonight is:


Grilled Margarita Tilapia!


2 pounds tilapia filets (I used about 2 1/4 pounds for the family)

1/3 cup tequila

1/2 cup triple sec

3/4 cup fresh lime juice

1 teaspoon salt

1/2 tablespoon minced garlic (I used 2 cloves)

2 teaspoons vegetable oil


Combine all ingredients except the fish, and set aside. Place fish in a single layer in a large baking pan (I used 9x13"). Pour marinade over fish, and marinate for 1/2 hour at room temperature, or 3 hours in the refrigerator.


Remove fish from marinade and pat dry. Brush fish on both sides with oil and grill (preferably in a fish basket) for 4-5 minutes each side, or until flesh is opaque and flakes easily. Season with salt and pepper if you wish.


This fish was perfectly grilled, tender and moist and flavorful. I only marinated the fish for 1/2 hour, I was nervous about marinating for more than an hour or two because with all the tequila and lime juice it could start to "cook." I was tempted to follow the directions from the original recipe (link through Becke's post) and boil the marinade for a topping, but after a day of canoeing, I wasn't up for it. Maybe next time, because this dish is wonderful! You should get some fish~however you can~and grill it!

Sunday, June 15, 2008

Grilled Pizza

My mom reminded me about this grilled pizza recipe we tried during one of my parents' visits. It's one of Bobby's, from his Bobby Flay's Boy Gets Grill cookbook. He tops his grilled pizza with grilled sausage, peppers, onions and oregano ricotta, but as you know you can top a pizza with just about anything! Although Bobby has his own recipe for flatbread dough, you could purchase fresh or refrigerated pizza dough, or try out Shell's delicious pizza dough recipe. And if you don't want to put your dough directly on your grill for some reason, reddquilter has an ingenious idea for using clay saucers on the grill.

Here's Bobby's recipe. Let us know what delicious combinations you come up with!

Grilled Pizza with Grilled Sausage, Peppers, Onions and Oregano Ricotta

Bobby writes: "Rolling out pizza dough is one of the first cooking skills I learned...Sausage and peppers was always my favorite combination. People are sometimes intimidated by the idea of grilling pizza, but it's actually very easy--a lot easier than grilling chicke in fact! Precooking the crusts on the grill is the key. If you don't want to make your own pizza dough, you can often buy it fresh from a local pizzeria or refrigerated at the supermarket."

Serves 4 as an entree, 6 to 8 as an appetizer

1 recipe flatbread dough or 16 to 20 ounces fresh or refrigerated pizza dough
Olive oil
Salt and pepper
10 ounces Italian sausages, hot, sweet, or a combination of the two
1 large red onion, sliced into 1/4-inch-thick rounds
2 large yellow bell peppers, stemmed, seeded and quartered lengthwise
2 large red bell peppers, stemmed, seeded and quartered lengthwise
8 ounces (1 cup) whole-milk ricotta, preferably sheep's milk
1 tablespoon chopped fresh oregano leaves
8 ounces fontina cheese, coarsely grated
Fresh basil and/or flat-leaf parsley leaves

1. Heat your grill to medium-high.

2. Divide the dough into quarters and roll out on a lightly floured surface until thin but still stretchy (you don't want it so thin that it will easily tear). The pizzas can be approximately 6-inch rounds, squares, or whatever shape you prefer.

3. Brush the crusts with olive oil, season with salt and pepper, and grill for 2-3 minutes, until golden brown on the bottom. (IMPORTANT NOTE: Do NOT close the grill lid. Bobby didn't say to close the grill lid. Closing the grill lid is a Big Mistake. Trust me). Turn them over and grill until crisp, 1 to 2 minutes more. Remove from the grill and set aside on a large cookie sheet (or two if needed), or sheet of foil that will fit on your grill. Leave the grill on.

4. Grill the sausages on both sides until golden brown and cooked through, about 10 minutes on each side. Brush the onions and peppers with oil and season with salt and pepper. Grill the onion and the peppers until soft and browned, 3 to 4 minutes on each side.

5. Remove the sausages from the grill (leave the grill on), let rest for 5 minutes, then slice 1/4 inch thick. Remove the onion and separate into rings. Remove the peppers and slice each quarter lengthwise in half.

6. Mix the ricotta and oregano in a small bowl and season to taste with salt and pepper.

7. To assemble the pizzas, divide the fontina cheese among the crusts (leave the crusts on the cookie sheet or foil). Divide the sausages, onion and peppers over the cheese. Transfer the cookie sheet to the grill, close the cover, and grill until the cheese has melted, 2 to 3 minutes. When the pizzas are almost done, raise the lid and put few dollops of the ricotta mixture on each one. If using two cookie sheets, do this step in two batches.

8. Remove from the grill and sprinkle with the basil. Let rest for 3 minutes before serving, then serve the pizzas whole or in slices.

Bobby's Flatbread Dough

Another recipe from Bobby Flay's Boy Gets Grill.


Bobby says, "Making flatbread on the grill is easy. (I honestly don't think we've tried this, but I do love every other one of his recipes that we've tried, so I don't think he'd steer us wrong. I don't remember if we used this for Bobby's grilled pizzas or not). It does take a while, but most of the time you are just leaving the dough alone to rise. And the fresh, yeasty flavor is so satisfying! The repeated risings make the breads light and crackly."

For the Flatbread:

1 1/2 cups warm water
1/2 teaspoon dry yeast
4 cups all-purpose flour
1/2 teaspoon salt, plus extra for sprinkling
2 tablespoons olive oil, plus extra for brushing
Freshly ground pepper

1. Mix the water and yeast in the bowl of a mixer fitted with a dough hook and let stand for 15 minutes.

2. Start the mixer at medium-low speed and slowly add 2 cups of the flour. When this flour is lightly mixed in, mix for about 1 minute more. Let rise, covered with a kitchen towel, until doubled in size, 1 to 2 hours.

3. Start the mixer again at medium-low speed and mix in the salt and oil. Add the remaining flour 1/2 cup at a time, mixing after each addition just until the flour is incorporated. Remove the dough from the bowl and knead for a few minutes until the dough is smooth. Place in an oiled bowl, cover with a kitchen towel, and let rise in a warm place until puffed, about 2 1/2 hours.

4. Divide the dough into quarters and roll into balls with your hands. Cover with a kitchen towel and let rise in a warm place for another 30 minutes.

(At this point, you are ready to prepare Bobby's Grilled Pizza, or just continue making flatbread).

5. Heat your grill to high.

6. On a lightly floured surface, roll each ball into a 6-inch round. Brush the rounds with olive oil and season with salt and pepper.

7. Grill the breads for 2 to 3 minutes, turn them over, and grill for another 1 to 2 minutes, until lightly charred, firm and crisp. Remove from the grill and brush with more olive oil. Cut into wedges for serving.

Bobby's Balsamic-Marinated Flank Steak

This recipe comes from one of our favorites, Bobby Flay. (We just call him Bobby). It's in his cookbook we have,Bobby Flay's Boy Gets Grill, on page 215. You'll just have to believe me when I say I didn't even have to look that page number up. That, my friends, is how good this steak is.

Some people are afraid of flank steak, or, like my dad, hadn't had a good flank steak until we cooked this up. Honestly I think a lot of people just overcook it. Don't be afraid of a rarer steak--this steak is best on the medium rare side, or even rarer than that. Trust me. You will not be disappointed.

Here we go:

Serves 4; can be doubled for 6 to 8 (no need to double the marinade)

½ cup balsamic vinegar

¾ cup olive oil

4 cloves garlic, coarsely chopped

2 tablespoons coarsely chopped rosemary leaves

1 (1 ½- to 1 ¾-pound) beef flank steak

Salt and freshly ground pepper


1. Whisk together the vinegar, the oil, the garlic and rosemary in a large dish (or use a thick, sealable plastic bag). Add the steak and turn to coat. Cover and let marinate in the refrigerator for at least 4 hours and up to 8 hours, turning every 2 hours.

2. Heat your grill to high.

3. Remove the steak from the marinade and season with salt and pepper. Grill until lightly charred and crusty, 4 to 5 minutes. (do not close lid on grill unless it is cold and/or windy) Turn steak over, reduce the heat to medium or move to a cooler part of the grill, and grill until medium-rare, 3 to 4 minutes more. *(If your steak is larger, grill for an extra 1 to 2 minutes per side, but be careful not to overcook).

4. Remove the steak to a cutting board and let rest for 5 minutes. Cut into ½ inch thick slices against the grain of the meat.


Serve immediately with slices of grilled crusty bread and a salad. We usually just have steak, to be completely honest. We're beef people, after all.

Tuesday, June 10, 2008

Barbacoa de Borrego


Also known as Min's Famous Lamb Tacos!

Lamb Barbacoa from the Backyard Grill has got to be one of our all-time favorite recipes from Rick Bayless' Mexican Kitchen. If you have ever been curious about preparing authentic Mexican foods, you cannot live without this book. Find one, and buy it.

This is slow-roasted lamb at its best. Although the roasting takes virtually all day for a larger roast, it is a simple dish to prepare. Almost everything else can be prepared ahead of time, and because it is roasted on the grill, there is virtually no clean up, and minimal hands-on time. The recipe also includes a soup that is cooked right underneath the lamb. We save the soup in the freezer for a rainy day, and it is delicious.


We usually prepare this dish for dinner guests, as we did last night. We have also prepared this special meal for Christmas Eve dinner--that is how good it is. The lamb roasts we buy are larger than the recipe calls for, so they take a bit more roasting time, but you just have to start a bit earlier. The roast pictured weighed almost 6 pounds. There are some things in the soup that we typically leave out, so I will leave them out of this post as well.


Lamb Barbacoa From the Backyard Grill

Serves 6 to 8, with 7 cups of soup

3 medium red potatoes, cut into 1/2-inch dice
2 medium carrots, peeled and cut into 1/2-inch dice
1 medium onion, halved and thinly sliced
2 garlic cloves, peeled and halved
1 cup cooked (or canned) garbanzo beans (I just throw in a whole can)

One 3-pound rolled and tied boneless lamb shoulder roast
Coarse salt

For serving:
- Salsa (my homemade Roasted Tomato-Jalapeño Salsa, if you're lucky enough to have the recipe)
- finely crumbled Mexican Queso Fresco or Queso Añejo (these come in 12-ounce rounds, we crumble the whole package with a fork)
- 1 cup good-quality olives (we use a mixture of jalapeño- and garlic-stuffed olives)
- warm tortillas

1. Preparing the grill and soup ingredients. You will need a gas grill with two controls--so you can turn off the flame on one side for indirect cooking, and two grill racks. (*If you'd like me to post the directions for charcoal, leave a comment and I will. I've never used charcoal, but you can) Turn on both sides of your grill to preheat, about 10 minutes or so before.

In a 12 x 9-inch heavy-duty aluminum foil pan (or something similar), combine the potatoes, carrots, onion, garlic and garbanzos. Position the pan to one side of the lower grate and turn off the flame under the soup. Pour water into the pan to about 1 inch from the top (it'll take about 5 cups). Position the second cooking grate 8 inches above the flame.

2. Grilling the meat. Sprinkle the lamb liberally with salt. Lay the roast on the top grate directly over the soup, and set an oven thermometer next to it, if you have one. (if you don't have one, I recommend you go out and buy one for this purpose.) Cover the grill and cook, maintaining a moderately low temperature (between 250 and 300 degrees), checking the temperature every 30 minutes. the will be beautifully smoky-roasted--it'll register about 170 degrees on a meat thermometer and be fall-apart tender in about 2 1/2 hours. Be sure to check periodically the slow-simmering soup that's capturing all those aromatic lamb juices to ensure the liquid level remains more or less the same, adding more water if needed.

3. Finishing the dish. With a big pair of tongs, a couple of meat forks or spatulas, remove the roast to a platter. Sprinkle with salt and let rest, loosely tented with foil, in warm place for about 20 minutes.

Meanwhile, with the precision of a steady-handed circus performer, carefully remove the pan of soup from the bottom of the grill. (I take a sheet pan out and slide the soup onto the pan before attempting to carry it. Also, since don't usually eat the soup with the meal, I just leave it on the turned-off grill until dinner is over--but don't forget to bring it in after dinner!!). Taste the soup and season with salt, usually about 3/4 teaspoon. Ladle into small, warm soup cups. (or into a container for freezing!)

Remove strings from lamb. Slice into good thick slabs and arrange on a warm platter. Strew the olives around the platter and carry to the table with a flourish. Pass the meat, salsa, cheese and lots of warm tortillas for everyone to make delicious soft tacos.

Friday, May 30, 2008

Dry Rub for Barbecue


This is the rub that I use, in combination with Mid-South Carolina Mustard Sauce, to prepare Pulled Pork Sandwiches. The rub recipe is from The Cook's Illustrated Guide To Grilling And Barbecue.

The authors say: "You can adjust the proportions of spices in this all-purpose rub or add or subtract a spice, as you wish. For instance, if you don't like spicy foods, reduce the cayenne. Or, if you are using hot chili powder, eliminate the cayenne entirely. This rub works well with ribs and brisket as well."

Makes about 1 cup

4 tablespoons sweet paprika
2 tablespoons chili powder
2 tablespoons ground cumin
2 tablespoons dark brown sugar
2 tablespoons salt
1 tablespoon dried oregano
1 tablespoon sugar
1 tablespoon ground black pepper
1 tablespoon ground white pepper
1-2 teaspoons cayenne pepper

Mix all of the ingredients together in a small bowl.

This rub should be stored in an airtight container and used within a week or two of preparation, because it contains brown sugar.

Tuesday, May 27, 2008

Steak Fajita Marinade

This is a fabulous fajita marinade from my sister-in-law. We use flank steaks for fajitas, and this meal has rendered guests speechless in the past. I believe that is the best complement. Enjoy!

In a large ziploc bag, or non-reactive dish, mix:

1/4 Cup Olive oil

1/4 Cup lime juice

Tons of chopped garlic

2 Tablespoons cumin

2 Tablespoons coarse salt (Kosher)

1 Tablespoon Pepper

2 Tablespoons Mexican Oregano

1 teaspoon cayenne

2 Tablespoons tequila


Place your flank steaks in the bag or dish and turn to coat. Marinate in the refrigerator for a couple hours, turning over every half hour or so. Don't marinate it much longer.

We marinate flank steaks for fajitas, then grill the steaks on high to medium-high about 5 minutes on a side along with onions and colorful bell peppers. Slice the meat thinly against the grain, and serve with warmed tortillas and some beans (these beans or these beans), and you have the Best Fajitas Ever.

Come over, I'll make you some.

Monday, May 12, 2008

Jalapeño Flank Steak

We had Balsamic-Marinated Flank Steak last night; we hadn't had any kind of flank steak in a long time. It was delicious! You should try it! (I forgot to take pictures, but you should know that the balsamic marinade takes just a couple minutes to prepare, yet is one of the most flavorful marinades, our favorite in fact.)


Dinner also reminded us of the following marinade, which is a bit too spicy for the boys but is perfect for us! After a frantic search for a missing little cookbook, I realized once upon a time I had typed the recipe up to attach to an email-whew! When we get more flank steaks, we will marinade one (or two!) of them in jalapeños just for us...


The key to a good flank steak is NOT to overcook it. We just throw it on the grill (we always grill them, never broil) for a few minutes a side, and it is excellent. As I said on the Balsamic Marinated Flank Steak post, don't be afraid of a rarer steak--this steak is best on the medium rare side, or even rarer than that.

{picture soon!}

Jalapeño Flank Steak

3 jalapeños

4 garlic cloves, peeled

½ tablespoon cracked black pepper

1 tablespoon coarse salt

¼ cup lime juice

1 tablespoon dried oregano

½ cup olive oil

1 ½ pounds flank steak


Combine the jalapeños, garlic, black pepper, salt, lime juice and oregano in a blender or food processor and purée. Pour over steak in shallow roasting pan and rub all over. Cover and marinate in refrigerator 2 to 24 hours. Preheat grill or broiler.


Grill or broil 5 minutes per side for medium-rare. Let sit 5 minutes before slicing. Cut in thin slices across grain and serve hot or cold. Leftovers are great on sandwiches.


Serves 4.

Monday, January 14, 2008

Grilled Garlic-Rosemary Elk Roast


This is a recipe from one of our favorite cookbooks, The Complete Hunter: Venison Cookery. I have posted another recipe from this book on The Cowgirl's Kitchen blog. Every single recipe we have tried from this cookbook has been excellent, so I'm hopeful for this one as well. Right now I have an elk roast marinating. I will post a picture and let you know how it turned out later this evening.

Makes 6 to 8 servings

MARINADE:

1 1/2 cups dry red wine

1/2 cup packed brown sugar

1/2 oz. fresh rosemary sprigs, cut into 1-inch pieces (1/2 cup) *(my fresh rosemary is currently at the house in town, where it receives more sunlight and I hope will recuperate from accidentally getting too cold this winter. I used a bunch of dried rosemary, that I crumbled into the bag)

4 to 5 cloves garlic, crushed

1/2 teaspoon freshly ground pepper


2-lb. venison top round roast, 1 1/2 to 2 inches thick (obviously, I am substituting elk)


In 4-cup measure, combine all marinade ingredients. (I just combined in the bag) Stir to dissolve sugar. Place roast in large sealable plastic bag. Add marinade, seal bag and turn to coat roast. Refrigerate roast several hours or overnight, turning bag occasionally.

Prepare grill for medium direct heat. Drain and reserve marinade from roast. (I have a problem with this. They recommend basting your roast with the marinade every 10 minutes, but that is raw meat juice! I'm not going to do it. Possibly in the beginning, but not near the end.)

Grill roast, covered, for 30 to 40 minute for medium-rare, or until desired doneness, turning roast every 10 minutes. Tent with foil. Let roast stand 10 minutes before carving.


Now, for those of you who may not know this: "Tent with foil" does NOT mean to cover it tightly with foil. It means to take a sheet of tin foil, and loosely place it on top of the meat. You can conform it to the top of the meat a bit so it doesn't fall off, but DON'T tuck it underneath as you may be tempted to do.

Grilled Pizza & Baking Bread

reddquilter has included an awesome hint about a surprising use for red clay saucers in her Artisan bread post! Thanks, reddquilter!
Blog Widget by LinkWithin