Tuesday, August 21, 2012

Peach Vanilla Bean Butter

A friend of mine asked me if I wanted some peaches.  I did, so I met her and we hiked back to an old, neglected, almost abandoned but certainly untended orchard where huge organic peaches were literally falling off the trees.  We picked boxes and boxes of peaches, and ate almost a dozen peaches between us as we picked, then hauled the boxes back out to the cars on foot.  It was a very nice way to spend a few hours.

Then I drove almost an hour home, and tried to decide what to do with all the peaches!


The first recipe I decided on was Peach Butter from Smitten Kitchen.  I love that she used less sugar, and that it tastes more like peaches than anything else.  I doubled her recipe from the start.  The only problem was that it took FOREVER...way longer than the supposed "15 to 20 minutes + 30 to 40 minutes" stated in the recipe, and it seemed like there was a big risk of sticking/scorching no matter how I adjusted my burner.  After about 2 hours of simmering, with the peach butter still not being the right consistency, I got a slow cooker and emptied the peach mixture into it. 

The slow cooker worked great, as it always has for my pear butter, apple butter, etc.  It probably took another 12 hours, but I didn't have to watch and stir it, and it turned out really delicious.  After it was canned I decided to start from scratch and come up with my own recipe. I felt like there was way too much water added in the beginning of Deb's recipe, or maybe my organic peaches were just juicier?  I also happened to have some vanilla beans in the pantry, and I thought this would be a good way to use one. 

This recipe is inspired by the original (link above), but the technique and ingredients have been changed, so this is mine.  And it is delicious!  The vanilla bean adds a subtle depth to the peach butter that is just amazing. 

I was able to fit 12 pounds of peaches in my oval slow cooker; I don't remember which size it is.  You can adjust the recipe to fit your slow cooker.  The peaches will exude a ton of juice while you're cooking, and at some points honestly won't look very appetizing, but hang in there and you will get some of the most amazing tasting fruit spread you've ever had.


Peach Vanilla Bean Butter
Makes about 12-14 half pints

12 pounds peaches, peeled, pitted and quartered
4 cups granulated sugar
Juice of two lemons
1/2 vanilla bean, split and scraped, pods reserved

To peel peaches:  Dip each into a pot of boiling water for about 30 seconds, and then into a bowl of ice water for a minute. The peels should slide right off.  If not, put them back in the hot water, then ice water.  It helps if your peaches are perfectly ripe.

Halve your peaches and remove the pits, then cut each half into quarters.  Place peaches, sugar and lemon juice in a large slow cooker.  Stir in vanilla bean paste, and add split pods as well.  Cover and cook on low for about 10-12 hours.

Remove lid, and remove bean pods.  (**If you want a stronger vanilla flavor, leave pods in and don't blend until you've cooked without the lid for a few hours**)  Using an immersion blender, puree' peaches to a smooth consistency, right in the crock pot.  If you don't have an immersion blender, you can transfer peaches to a food processor or blender in batches to puree'.

With lid off, continue cooking for another 2 to 10 hours, until peach butter is of the consistency you prefer.  I like mine pretty thick, so mine ended up cooking a good 10 hours at this stage.

Deb of Smitten Kitchen says:
"There are several methods to test for doneness: You can drizzle a ribbon of sauce across the surface; when that ribbon holds its shape before dissolve into the pot, it is done. Some people use cold or frozen plates; dollop a spoonful in the middle of one and if no water forms a ring around it in a couple minutes, it is done. Others use a spoon; if the butter remains rounded on a spoon for two minutes, it is done. You can also check the pot itself; the butter is usually done when a wooden spoon leaves a clear train when scraped across the bottom."

When the peach butter is done, wash and prep your jars, lids and rings.  Ladle peach butter into half pint jars, wipe rims and put lids on, then submerge in a pot of boiling water.  Process as directed for jams at your altitude.  I am at about 7,000 feet, so I processed my peach butter for about 25 minutes.

Tuesday, August 14, 2012

MONTEREY CHICKEN

Today I used what I had on hand and we liked it even better.  Instead of 4 slices of ham I used a small ham steak and just cubed it.  I also used Muenster cheese instead of Jack.  I'm thinking next time I should cut up the chicken into bite sized pieces for a complete casserole. Hubs loved it.
MONTEREY CHICKEN


4 large boneless/skinless chicken breasts
1 (10.75 oz.) can Cream of Chicken soup (see soup substitutes)
1 cup milk
4 slices ham
4 slices Jack cheese
6 ounce pkg of herb or chicken flavored stuffing mix (such as Stove Top)
1/4 cup butter, melted
1/4 cup water
PURE
  • In a small bowl whisk together the cream of chicken soup and milk until well blended.
  • Spray crock pot with PURE.
  • Pour half of the soup mixture into the bottom of a 6 quart oval crock pot.
  • Place the chicken breasts over the sauce in a single layer.
  • Cover the chicken with a layer of ham and then a layer of Swiss cheese.
  • Pour the remaining soup mixture over the chicken.
  • Sprinkle the chicken with the dry stuffing mix.
  • Whisk together the butter and water.
  • Drizzle the butter mixture over the stuffing.
  • Cover and cook on low for 4-6 hours or on high for 2-3 hours.
  • Serve and enjoy!

Monday, August 13, 2012

Baked Donut Holes

Last month, I joined the The Secret Recipe Club.   It is a secret blog assignment, where you are set off into another foodie's blog alone, and no one else is supposed to know.  Someone else all together gets to peruse your blog.  We'll all find out who had which blog on the same day and time.

Without further ado, my assignment for the Secret Recipe Club this month was:

It's Yummy To My Tummy!

In perusing this new-to-me blog, the first recipe that caught my eye was Bacon & Sundried Tomato Guacamole.  I believe I will try this recipe at some point. 
But I kept coming back to the Baked Donuts.  I do have a donut pan, which I have not yet used, but as luck would have it, it wasn't at this house at the particular time I decided it was "time to make the donuts."  The donut pan languishes, unused and shiny (although probably a bit dusty by now) at the ranch.  

However, I had recently purchased a Bella Cake Pop & Donut Hole Maker for my son's Angry Birds birthday party, and that was right here where I needed it!  (the one I have is similar to this one, although I purchased mine at Target and it actually makes 12 at a time)

I didn't have the ingredients for Heather's chocolate or vanilla glazes, so I opted for a cinnamon sugar topping, which was delicious!  I also didn't have cake flour or nutmeg, but regular flour and cinnamon work just fine.  To see the original recipe and the yummy glaze recipes, please follow this link!  

These are easy to whip up and everyone loved them!


Baked Donut Holes
Adapted from  It's Yummy To My Tummy!
makes about 48, I think, we ate them pretty fast!

2 cups all-purpose flour
3/4 cup white sugar
2 teaspoon baking powder
1/4 teaspoon ground cinnamon
1 teaspoon salt
2 eggs, lightly beaten
2 tablespoons butter, melted
3/4 cup buttermilk (a big splash of lemon juice + enough milk to total 3/4 cup)

1/2 stick butter, melted
sugar mixed with cinnamon (I never measure, but I'd guess at least a 1/2 cup sugar and a teaspoon or two of cinnamon?  just mix and add more until it looks/tastes right)


In a large bowl, sift together flour, sugar, baking powder, nutmeg, and salt. Add eggs, 2 tablespoons melted butter, and buttermilk. Mix until just combined.

Preheat the donut hole maker.  Fill and cook as directed, mine took about 5 minutes per batch.  Meanwhile, melt the remaining butter in a bowl.  In a pie plate, mix sugar and cinnamon.

As each batch comes out, coat the donuts with melted butter and then swirl around in cinnamon sugar until coated.  I put about 6 donut holes at a time in the butter bowl, then transfer to the pie plate to coat.  If you don't use butter, the cinnamon sugar just won't stick.


I will definitely be making these again!  Enjoy!


Secret Recipe Club

Wednesday, July 25, 2012

Taste & Create: Gobi Masala/Cauliflower Curry

***Taste & Create is a fabulous monthly blog event in which participants are randomly paired off to choose and prepare a dish from their partner's blog. If you'd like to join us, please email me at cowgirlmin07 [at] gmail [dot] com by the 8th of the month!! *** 


This month I was paired with PJ of Seduce Your Tastebuds.  I love being paired with her, because she cooks delicious authentic Indian dishes, and her directions are quite easy to follow, once you figure out all the ingredients!  ;-)  Her blog is vegetarian, which is a welcome change from our usual fare.

Usually it takes me a while to choose which dish to prepare, but not this time.  This time I had just purchased an entire cauliflower, when I happened across this masala recipe!  It looked so good, and I had most of the spices, so I went for it.  I forgot that you can substitute basil for curry leaves, and used parsley instead.  Still good~

It's important with this dish to have your ingredients prepped before you start cooking, so everything is ready to toss in at the proper time.  Aside from that, it's pretty easy, and delicious!

Although PJ recommends serving with roti, we used tortillas because we always have them on hand.  Follow the link below for PJ's helpful step-by-step photos and many more yummy vegetarian recipes!
  

Serves 4-6
 
1 medium cauliflower
1 tablespoon salt
2 teaspoons oil
1 teaspoon fennel (anise) seeds
1 small onion, sliced
2 cloves of garlic, minced
1" piece of ginger, peeled and grated
a few curry leaves (I used flat Italian parsley) 
1 tomato, chopped (I forgot the tomato, so I added 1 can diced tomato, drained)
1 teaspoon garam masala
1 teaspoon red chili powder (I reduced to 1/2 teaspoon)
1 teaspoon ground coriander
1/4 teaspoon turmeric powder
salt, to taste
1 tablespoon kasuri methi (dried fenugreek) or celery leaves (I didn't have either of these, so I didn't add anything) 

Break cauliflower into florets in a large bowl.  Let it rest in hot water .Add a tablespoon of salt to that water and keep aside.

Heat 2 teaspoons oil in a pan and add fennel seeds.  When the fennel seeds sizzle, add onion, garlic, ginger, and a few curry leaves to the pan.  Saute until the onions turn soft.

Add 1 chopped tomato and cook till the tomato is mushy. Add garam masala, red chili powder, coriander, turmeric, and salt to taste.  Mix well. 

Discard the water that has the cauliflower and add the florets to the pan.  Mix well and add 1 cup of water. Cover and cook till the florets are soft but not mushy.  Stir a couple of times in between to prevent burning the florets and masala, add more water if needed.

When the cauliflower is cooked add 1 tablespoon kasuri methi.  Mix well and simmer over low heat for a few minutes. 

Serve with rice and tortillas.

Sunday, July 22, 2012

Fried Chicken Tacos with Avocado-Tomatillo Salsa

I couldn't resist this recipe, which comes from my FOOD & WINE Annual Cookbook 2012.  It's a recipe from Andrew Zimmern, whose recipes I had not tried...until now.  And now, I will be trying MORE of them!  We've already had these tacos twice since Spring, and our neighbors love them too!

I learned to debone chicken thighs, not as hard as it may seem, as the recipe calls for boneless, skin ON thighs.  Believe me, you want the skin on, because it is delicious.

The fresh salsa is delicious and easy to make.  Our addition of a little extra squeeze of lime juice sends these tacos over the top. 

While Andrew serves his with corn tortillas, our family prefers flour, so that's what we use.  I'll just say "tortillas" down below and you decide for yourself!


Fried Chicken Tacos
Total:  35 minutes active plus 2 hours marinating
Serves 4


1/4 cup fresh lime juice (divided)
Kosher salt
4 large boneless chicken thighs with skin (about 5 ounces each), pounded 1/3 inch thick

1/2 pound tomatillos—husked and quartered
2 garlic cloves, chopped
2 serrano chiles or 1 large jalapeño with seeds, chopped
1 small onion, coarsely chopped
3 tablespoons cilantro leaves
1 Hass avocado, cut into 1/2-inch dice

1/3 cup all-purpose flour
1/2 teaspoon freshly ground black pepper
Large pinch of cayenne pepper

Vegetable oil, for frying

Warm tortillas & lime wedges, for serving

In a large bowl, combine 2 tablespoons of the lime juice with 1 teaspoon of salt, stirring to dissolve the salt. Add the chicken thighs and turn to coat. Refrigerate for 2 hours.

In a food processor, combine the tomatillos, garlic, serranos, onion and cilantro and process to a coarse puree. Transfer the salsa to a bowl and stir in the avocado and the remaining 2 tablespoons of lime juice. Season with salt.

Pat the chicken dry with paper towels. In a shallow bowl, combine the flour with the pepper, cayenne and 1/2 teaspoon of salt.

In a large skillet, heat 1/3 inch of oil until shimmering. Dredge the chicken in the flour, shaking off any excess. Fry the chicken over moderately high heat until well-browned and crisp, about 3 1/2 minutes per side. Transfer to paper towels to drain.

While chicken is still hot, cut the chicken into thin strips and serve with the tomatillo salsa, warm tortillas and lime wedges.  And Coronas, of course!

Monday, July 16, 2012

Greek Stuffed Burgers

In an effort to connect with more bloggers, last year I asked to join the Secret Recipe Club.  I was finally accepted in June (9 months later!) and here we are.

The premise of the Club is quite similar to my FAVORITE blog event, Taste & Create, in that participants are assigned a blog from which to prepare a recipe.  The main difference is that this one is a "secret."

In Taste & Create, participants are partners, fully aware of who is paired with whom, and tasked with creating recipes from each other's blogs.  This has the benefit of being able to communicate and get to know your partner in advance of making the recipe, and also you can directly ask your partner questions about methods or ingredients.  We've formed quite a tight-knit community this way, and lasting friendships.

By contrast, The Secret Recipe Club is a secret assignment, where you are set off into the blog alone, and no one else is supposed to know.  Someone else all together gets to peruse your blog.  We'll all find out who had which blog on the same day and time, if it all comes together.  There are so many different members, it makes me wonder about feeling part of any sort of community at all...Since this is my very first month of participation in this club, I will let you know later how that goes.

If any of you would like to join either blog event, please follow the links above.  I think Secret Recipe Club still has a waiting list.  For Taste & Create, you will be welcomed immediately with open arms, and to sign up you can actually just leave me a comment or even email me at cowgirlmin07[at]gmail[dot]com.


Without further ado, my assignment for the Secret Recipe Club this month was:


Angela's Kitchen is Gluten Free and Dairy Free, in case any of you require some recipes like that.

After some debating over Angela's Fish TacosSteak and Potato Salad (still a contender for a later date), or one of her many recipes for the slow cooker, I ultimately chose one of her three Stuffed Burgers:  Greek Stuffed Burgers.  And I actually had absolutely every ingredient in my pantry, except for the beef!  (which doesn't make much sense, living on a ranch, but there you go)  Make sure you check out her other burger variations as well, there is bound to be one that calls your name!  We may end up trying every one...


These burgers are soooo flavorful!  We had a little debate about what to put on the burgers, and I opted for only mayonnaise.  As luck would have it, we were out of lettuce on the night we made them, otherwise I would have used some.  My husband also thought feta in the filling would have been good, and I think we'll try that next time.  (I also had an issue with my husband's choice of bun, but beggars can't be choosers when someone else goes to the store for you!)

We made our burgers bigger, because after dividing the meat into 16 pieces, we couldn't fathom putting 2 tablespoons of filling on each minuscule patty--it just wouldn't fit, and the patties looked so so small.  We combined the 16 pieces into 8, then felt like there was enough meat to support the filling.  We ended up with four stuffed burgers...what can I say, as cattle ranchers, we like a big burger!  ;-)
Greek Stuffed Burgers 
Adapted from Angela's Kitchen
Serves 8 (or 4 cattle ranchers)


2 pounds ground beef, turkey, chicken, pork (or a mixture)
1 clove minced garlic   (I used 2 cloves)
1/2 teaspoon ground pepper  (I omitted this)

Greek filling:
1/3 cup chopped sun-dried tomatoes
1/4 cup finely minced red onion
1/4 cup finely chopped pitted kalamata olives
2 tablespoons finely minced fresh basil
1/2 teaspoon red wine vinegar (I forgot to add this)
1/2 teaspoon olive oil
1/4 teaspoon dried oregano (or 1 teaspoon fresh).

Gently mix garlic and pepper into meat.  Divide meat into 16 pieces.  Flatten 8 portions of meat into thin patties.  Place about 2 tablespoons of filling in the center of each patty.  Flatten the 8 remaining pieces into thin patties, and carefully place each patty on top of the patty with the filling.  Seal the edges of the patties, sealing the filling into the patty.

Grill over low heat until done, about 20 minutes for our burgers!


Secret Recipe Club

Saturday, July 14, 2012

Rustic Cherry Apricot Galette

So I had glanced at Tamy's Apricot Cherry Galette when it was posted, enough to know it looked good, then my computer crashed and I had to put it away.

Then I got a text from a friend, saying that we were having a surprise going-away party for one of my cousins the very next morning, and we were supposed to bring something to share for breakfast.  I am in the middle (still) of processing fresh cherries and apricots, so my mind wandered back to the Galette.  I also debated making another Rustic Cherry Tart, but at that point it was already 9:pm and I was tired.  As much as I love that homemade almond paste, I just didn't feel up to it.  Breakfast was scheduled for 7:am, so I had to make something quick, shower and go to bed!

I grabbed my last sheet of puff pastry out of the freezer and thawed it on parchment paper.  (should have used a bit of flour).  I had all the ingredients except cherries for another Sweet Cherry Pie already in a bowl, just waiting to be mixed up and tossed in the freezer.  I decided rather than start a whole new recipe, I'd just improvise.

Here is my delicious Rustic Cherry Apricot Galette.  It was a hit with everyone at my cousin's party!


poorly lit nighttime shot... 
you can see the uneven "rustic" edges

and the remains after breakfast!

Rustic Cherry Apricot Galette
Serves 8-10

1 sheet puff pastry, thawed

3 cups pitted fresh cherries
about 12 apricots, cut in 8ths or roughly chopped (less if they're big, you want over 4 cups of fruit total)
4 tablespoons cornstarch
2/3 cup sugar
1/8 teaspoon salt
Juice of half a lemon
1/4 teaspoon almond extract

1 egg yolk
1 tablespoon heavy cream

1 tablespoon sugar, for sprinkling

Place pastry sheet on lightly floured parchment on a sheet pan.  When thawed, use a rolling pin to roll it a bit bigger.  Poke holes in the entire crust with a fork.

Gently stir together the cherries, apricots, cornstarch, sugar, salt, lemon and almond extract in a large bowl until well combined.  Set aside.

Mix egg yolk and cream, brush about half of the mixture on the inner part of the pastry sheet, leaving about a two-inch border with no egg wash.  Reserve the rest of mixture.

Using a slotted spoon, remove cherries and apricots to the center of the pastry sheet.  Spread them out, leaving a two-inch border and mounding slightly in the center. Use a tablespoon to remove any liquid that seeps out.

Fold the edges of the pastry over the fruit, gently squeezing the edges together so they stay.  As you work, remove liquid with the tablespoon.  This is kind of messy...but work your way around the entire pastry sheet.  The edges will not be even, and that's okay!  That is why it's called "rustic." Just fold the edges up and over the fruit, snuggling around the fruit.

Place galette in the refrigerator to chill while you preheat the oven to 425 degrees F.

When the oven is heated, brush the pastry with the remaining egg wash.  Bake for 15 minutes.  Sprinkle generously with sugar, and bake for about 10 minutes more, until the crust is golden brown.  Some of the juices may leak out, and that's okay too.

I chilled my galette in the fridge overnight, then cut it with a pizza cutter to serve.  You could definitely eat it while it's warm, but I'd let it sit 10 or 15 minutes out of the oven before slicing.


Friday, July 13, 2012

APRICOT CHERRY GALETTE

All of Min's recent activities with canning cherries and apricots reminded me of this recipe which is one of my favorites!

Pie Dough Ingredients*
For a 9-inch crust
  • 1 1/2 cups all-purpose flour
  • 1/4 cup granulated sugar
  • 3/4 teaspoon salt
  • 3/4 cup (1 1/2 sticks) of butter, cold and cubed
  • 1/4 cup ice water
Filling Ingredients**
For one 9-inch galette
  • 3/4 pound fresh apricots, pitted and chopped
  • 1/2 pound fresh cherries, pitted
  • 2 tablespoon cornstarch
  • 1/4 cup sugar + more for sprinkling
  • Juice of half a lemon
Ingredients for Assembly
  • 1 egg, beaten
ASSEMBLY
  • Cut butter into small cubes and place in the freezer for 15 minutes.
  • Preheat your oven to 400 degrees.
  • Pulse flour, sugar and salt in a food processor. 
  • Add butter and pulse until it resembles a coarse meal. 
  • Gradually add ice water and pulse until the dough forms a coarse meal. 
  • Turn the dough out onto a work surface and very lightly and sparingly, knead just to incorporate dry ingredients. 
  • Flatten into a circle; wrap individually in plastic. 
  • Refrigerate dough for at least an hour. 
  • Remove dough from refrigerator; place on floured work surface. 
  • Using a rolling pin, roll out the dough into a rough 11-inch circle. 
  • Trim the edges to a clean circle with a pairing knife. 
  • Transfer the circle to a baking sheet or pizza pan lined with parchment paper. 
  • Mix 1/2 teaspoon cornstarch and 2 tablespoons of sugar in a bowl and spread on the bottom of the dough. 
  • Toss apricots and cherries with the rest of the cornstarch, sugar and lemon juice. 
  • Arrange the fruit on the bottom of the dough, leaving 2 inches of dough left outside. 
  • Fold up and pleat the dough over the top of the fruit, leaving the center uncovered. 
  • Lightly brush the top of the pastry with the beaten egg and sprinkle both the dough and the fruit with 1/4 - 1/3 cup sugar. 
  • Place the Galette in the oven and cook for 40-45 minutes until golden brown and bubbly. 
  • Remove from oven and transfer to a cooling rack immediately. 
  • Serve warm or at room temperature with a scoop of vanilla ice cream.
*If you are in a huge hurry, Pillsbury from the dairy case can be substituted.
**1 can Comstock cherries can be substituted.  Just add apricots!

Tuesday, July 3, 2012

Sweet Cherry Pie

I totally knew you could make a delicious pie with sweet cherries!  After picking an entire tree-worth of cherries, making Cherry Jam and Rustic Cherry Tarts and assisting the kids with a cherry stand (packaging about 90 pounds of cherries for sale!), we still had a ton of cherries left!  And I wanted pie.

I googled and googled, and finally decided on a pie recipe from Smitten Kitchen, who said "Whoever said you can’t make a good cherry pie with sweet cherries was lying."  You bet they were!

I ended up making a couple changes, mainly because I already have a perfect crust recipe from Aunt Becky.  For some reason I'm opposed to using a whole egg on top of pie, although I have no qualms about using an egg YOLK.  Go here for the original recipe, below is my adaptation.  And a deliciously perfect one at that!


Number One pitted the cherries for this pie (he needs practice, because he found a pit in his piece of pie!)  My boys helped when I was putting the pie together, H-Bomb suggesting the shape of the vents to be reminiscent of "cartoon pies."  I used a different crimping technique, this one made with a spoon, which H-Bomb said was totally a cartoon pie, and Sawed Off said, "YEAH IT IS!"  The boys were happy.  And everyone was really happy when it was time for dessert!


I also have three or four batches of this pie filling in the freezer, waiting for a time after cherry season is long gone, when I JUST HAVE TO HAVE a cherry pie.  That time will come.

Sweet Cherry Pie
Adapted from Smitten Kitchen


Dough for a double-crust pie  (you'll need to double the recipe)
4 cups pitted fresh cherries
4 tablespoons cornstarch
2/3 cup sugar
1/8 teaspoon salt
Juice of half a lemon
1/4 teaspoon almond extract

1 tablespoon cold unsalted butter, cut into small pieces

1 egg yolk, beaten with 1 tablespoon heavy cream

 Coarse sugar, for decoration

Preheat oven to 400°F.

Gently stir together the cherries, cornstarch, sugar, salt, lemon and almond extract in a large bowl.

Roll out half of chilled dough on a floured work surface.  Gently place it in 9-inch pie pan, trim edges to about a half-inch overhang.

Spoon filling into pie crust.  Dot the filling with cold butter.

Roll out the remaining dough on a lightly floured surface, drape it over the filling.  Fold the overhang under the bottom crust, pressing the edge to seal it, and crimp the edge decoratively. Brush the egg wash over over pie crust, then sprinkle with coarse sugar.

Cut slits in the crust with a sharp knife, forming steam vents, and bake the pie in the middle of the oven for 25 minutes. Reduce the temperature to 350°F. and bake the pie for 25 to 30 minutes more, or until the crust is golden. Let the pie cool on a rack as long as you can before you dig in!

~~~~~~~~~~~~~

Incidentally, after hours of my cousin and I pitting a ton of cherries with a hand pitter, one of my friends let me borrow her old "automatic" cherry pitter.  OMG what a difference.  It was so fast, I pitted a pound of cherries in 1 minute, 5 seconds, including a hopper reload!  I searched and found this one which is remarkably similar to my friend's West German-made beauty.  If you have a cherry tree or just like to make cherry pie, you need one of these!  NEED. 


Tuesday, June 26, 2012

Rustic Cherry Tart


My friend/cousin/neighbor has some cherry trees on family property, and they are heavy with fruit!  The other day we picked about 50 quarts of cherries!  She pitted them, while I made jam and these fabulous tarts.  One for her family and one for mine.  The cherries went from tree to table in just a few hours, and oh, these tarts!  The tarts have an egg-washed puff pastry crust, lined with homemade almond paste and topped with freshly-picked cherries.  I can't tell you how delicious they are. 

You will just have to make one yourself.  

The recipe comes from The Martha Stewart Living Cookbook, which after all these years continues to reveal a few surprises now and again. I swear I've never seen this recipe before, but I am so glad I found it.  I made my own almond flour out of blanched slivered almonds, ground as finely as possible in the food processor.  I did not roll out the pastry and cut into a circle, I just flattened the dough a bit with my fingertips (I didn't have a rolling pin available) and then rolled up the edges for these imperfect squarish tarts, which I think look better than a circle ever could anyway.  Not to mention, there is no wasted dough.
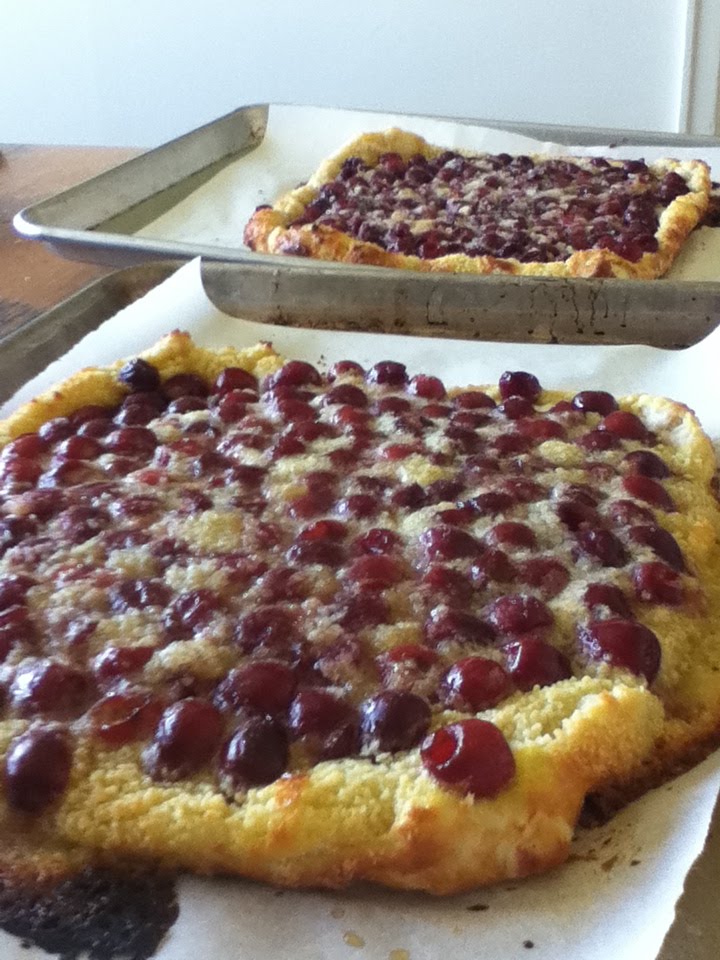
We are picking more cherries and making more tarts on Thursday!


Rustic Cherry Tart
Makes one 9-inch tart
Martha claims this will serve 8 to 10, but I disagree.  I'd say 4 to 6, maybe!

1/2 cup blanched almond flour (see method above), plus more for dusting
1 sheet frozen puff pastry, from a 17 1/4-ounce package, thawed
5 tablespoons unsalted butter, room temperature
1/3 cup plus 4 teaspoons sugar
1 large egg
1/2 teaspoon pure almond extract
1 large egg yolk
1 tablespoon heavy cream
1 pound fresh cherries, pitted

Preheat oven to 425 degrees F.  Line a baking sheet with parchment paper, sprinkle lightly with almond flour.  Gently flatten (by hand or with a rolling pin) to 1/8" thickness.  Roll up the edges, making roughly a 10" crust.  Transfer to the refrigerator to chill, about 30 minutes.

Place butter, 1/3 cup sugar almond flour, egg, and almond extract in a bowl; mix until combined.

Remove crust from refrigerator; prick entire surface with a fork.  In a small bowl, combine egg yolk and heavy cream to make an egg wash; brush the egg wash evenly over the surface and edges of the crust.  Using a spatula, spread the almond mixture evenly in an 1/8-inch-thick layer in the bottom of the crust; chill 15 minutes more.

Remove the tart from the refrigerator, and spread the cherries in a single layer over the almond mixture.  Bake 15 minutes.

Sprinkle the remaining 1 tablespoon plus 1 teaspoon of sugar over the tart, and continue baking until the edges turn deep-golden brown, 5 to 10 minutes.  Transfer to a wire rack to cool.  Serve warm or at room temperature.

*If you have any tart leftover, I found that it's best to refrigerate it.  Bring to room temperature before serving, or just eat it out of the fridge with a fork...have i said too much?
Blog Widget by LinkWithin