Sunday, July 14, 2013

Grilled Pineapple Chicken

This month, my assignment for Secret Recipe Club was:


Maria has lots of great-sounding recipes, but it's summer and it's hot and I wanted to cook something on the grill.  So I made my choice:  her Grilled Pineapple Chicken Kabob Foil Packets.  While the name is a mouthful, the recipe is pretty darn good.  Easy to put together, I had just about everything in my kitchen to whip these up.  We make Campfire Potatoes a lot, but I don't remember doing any packets with meat in them, not sure why.

I packaged mine up ahead of time, then tossed them on the grill just before dinner. 

My husband didn't make it home for dinner, so I had two younger taste-testers.  My oldest boy liked it and ate his whole dinner.  I should have made rice to go with these!  My youngest said he didn't like the chicken, but he did eat a couple bites.

These would be very good with rice, and I think next time I'll cook them just a bit less.  I used my own peach jam from last summer, and I decided to coat the chicken with the preserve mixture first, instead of piling it on with the vegetables.  It worked great.
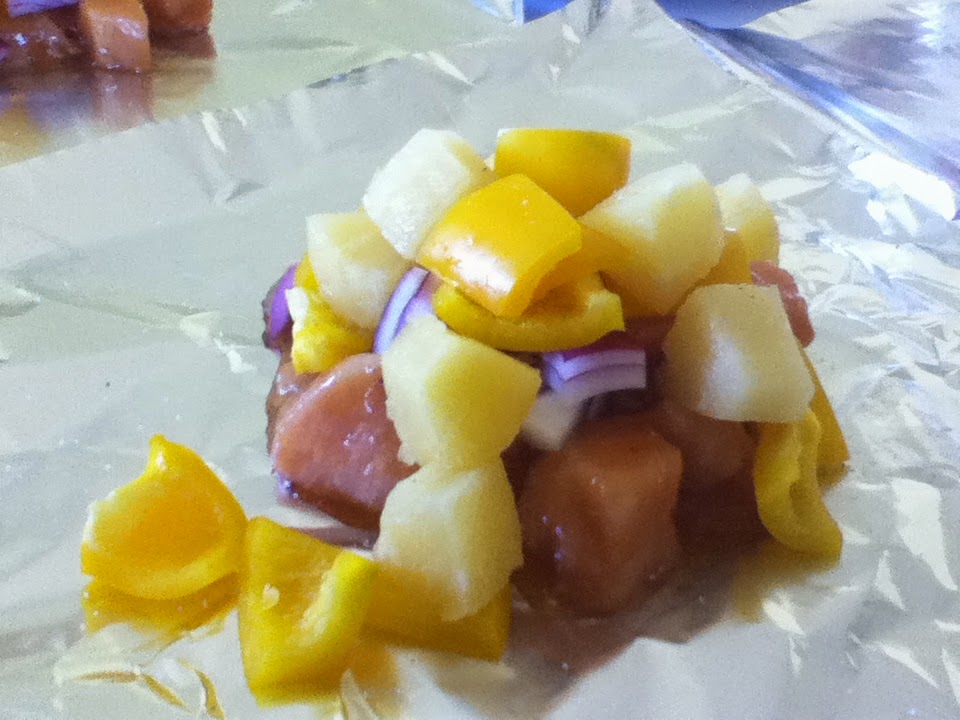
Before grilling, 1 serving


Grilled Pineapple Chicken Foil Packs
Adapted from Close to Home 
Makes 4 servings
 
1/3 cup pineapple, peach or apricot preserves (I used my own peach jam)
2 tablespoons packed brown sugar
1 tablespoon soy sauce
1/4 teaspoon crushed red pepper (I used a pinch)
4 boneless skinless chicken breasts, cut into 2-inch cubes (1 lb)
1 medium red bell pepper, cut into 1 1/2-inch cubes (I used 2 yellow peppers I had)
1 cup pineapple chunks
1 red onion, cut in 1 inch cubes (I only used 1/2 an onion)
salt, to taste

Heat grill on medium heat.  In small bowl, stir together pineapple preserves, brown sugar, soy sauce and crushed red pepper.  Add chicken breast chunks and toss until coated.

Cut 8 (12×12-inch) sheets of heavy-duty foil. Divide coated chicken, bell peppers, pineapple chunks and onion evenly among foil sheets. Sprinkle each lightly with salt. Seal edges tightly, folding and rolling in toward the center three or four times.  Seal opposite sides, then fold edges in on last two sides and roll in a similar fashion, taking care not to package the food too snugly but sealing edges carefully so juices don't leak out when flipped.

Reduce grill to low.  Place packets on grill over low heat. Cover grill; cook 6 minutes. Using tongs, carefully turn packets over, taking care not to puncture foil. Cook 10 to 12 minutes longer or until chicken is no longer pink in center and vegetables are crisp-tender.

***If you're looking for a fun new food blog event, look no further!  Taste & Create is a fabulous monthly blog event in which participants are randomly paired off to choose and prepare a dish from their partner's blog. 
 If you'd like to join us, please email me at 
cowgirlmin07 [at] gmail [dot] com for more information!  
We'd love to have you.***


Secret Recipe Club

Saturday, July 13, 2013

Olive and Eggplant Spread


Olive and Eggplant Spread
Serves 8


2 eggplants, each 1 to 1.5 pounds, washed and dried
½ cup olive oil, divided
¾ cup pitted Kalamata or other brine-cured black olives, pitted
2 to 3 tablespoons drained capers, rinsed
Salt and freshly ground black pepper


1. Halve eggplants lengthwise. Then score flesh ½-inch deep in a crosshatch pattern.

2. Rub eggplant halves all over with ¼ cup olive oil. Place cut sides down on a baking sheet.

3. Bake on the middle rack of a 375°F. oven until flesh is browned and very tender, about 1 hour. Let cool slightly.

4. Scoop flesh from eggplant into a large food processor; discard skin.

5. Into food processor, also add olives, capers, remaining ¼ cup olive oil, and salt and pepper to taste.

6. Process until mixture is smooth.

7. Transfer to a bowl and serve at room temperature with Pita Toasts, baguette slices, or water crackers.


NOTE: From the Gourmet Cookbook, which says, “This is very similar to the Provencal olive condiment known as tapenade, but it’s beefed up with eggplant, which gives it a more luxurious texture and, not incidentally, makes it less expensive to prepare.

Original recipe called for extra-virgin olive oil, but I used regular olive oil, and I thought the spread turned out deliciously.

The spread can be made up to 3 days ahead and refrigerated, covered. Bring to room temperature before serving.

Tuesday, July 9, 2013

BBQ HERBED CHICKEN

It was another scorcher here today of 112 degrees and monsoony humid so we stayed inside and painted the bathroom and a bedroom.  I'm exhausted though so decided to make this simple recipe for the grill.  It was made even simpler by having the lime juice in the freezer.  I buy the fruit and then squeeze it all at once making it into cubes for future recipes. And then even simpler yet by converting the fresh herbs into dry measurements and using a mortar & pestle to revive them.  This was a substitute for tonight, but I highly recommend using the fresh when you can.

HERBED BBQ CHICKEN
1/2 cup vegetable oil
1/2 cup lime juice
2 tablespoons fresh chopped basil
2 tablespoons fresh chopped oregano
1 teaspoon onion powder
1/4 teaspoon lemon pepper
4 chicken thighs, about 1 pound*
4 chicken drumsticks, about 1 pound*
  • In a small food processor mix together everything except the chicken.
  • Wash and dry the chicken pieces.
  • Pour herb mixture into a large ziploc bag and add chicken pieces.  Marinate chciken for 30 minutes to 24 hours.
  • Heat grill and spray with PAM for grilling especially if using skin free pieces.
  • Place chicken pieces on grill, reserving the marinade.
  • Cook on one side and then turning to other side.  Time will vary drastically based on type of chicken pieces you are using.
  • Pour reserved marinade into a small saucepan.
  • Bring to a boil over a medium-high heat and then remove from heat.
  • Brush over chicken pieces.
*I use whatever I have on hand - breasts, tenders, etc....

Saturday, June 29, 2013

Blueberry Butter

This recipe comes from a new-to-me cookbook, that I borrowed from a friend and decided was so good I just had to have my own copy!  The book is from Michigan, and is called Hollyhocks & Radishes: Mrs. Chard's Almanac Cookbook, which you may remember from the delicious Rhubarb Bundt Cake I posted a few weeks ago. There are so many recipes on my list to try.

I was planning on making this with a case of blueberries I bought, and even successfully found and purchased some mace, but my boys beat me to the fruit.  My friends in Oregon just harvested 163.4 pounds of blueberries, so I am publishing this for them.  I am sure it's fabulous.  Here's the book, you might as well go order your copy now!


Blueberry Butter
Yield:  8 pints
Prepare: 15 minutes
Cook: 1 hour

2 quarts fresh blueberries
8 large, green cooking apples
8 cups sugar
1 teaspoon allspice
1 teaspoon nutmeg
1 teaspoon mace

Wash and drain blueberries; peel, core and slice apples.  Combine in a Dutch oven or pot with remaining ingredients. 

Bring to a boil, stirring.  Lower heat and simmer 1 hour, stirring periodically, or until right consistency for spreading.

May be stored in the freezer or water-bath canned.  If the latter, process 10 minutes (or adjust for your altitude).

Thursday, June 27, 2013

Honey & Chili Chicken


Modified only slightly from theKitchn. Follow link to see a picture.

Honey & Chili Chicken
with Creamy Cilantro Sauce
Serves 8


½ cup amber ale
¼ cup cider vinegar
¼ cup honey
2 tablespoons olive oil
2 tablespoons chili powder
3 pounds boneless, skinless chicken thighs
Roughly chopped cilantro for garnish

Creamy Cilantro Sauce
1 cup sour cream
1 ½ cups loosely packed cilantro leaves (about 1 bunch)
1 lime’s zest and juice
½ teaspoon salt


1. Whisk together ale, honey, vinegar, olive oil, and chili powder in a large mixing bowl.

2. Add the chicken thighs to the bowl and stir until the thighs are evenly coated. The chicken can be cooked immediately or marinated in the fridge for up to three hours.

3. Arrange chicken thighs on a baking sheet or in a roasting pan, keeping the chicken pieces slightly separated. Drizzle any remaining dressing over chicken.

4. Roast in 450°F. until cooked thoroughly and the thickest part of the thighs register 165°F. with an instant-read thermometer, about 25 to 30 minutes.

5. If cilantro sauce wasn’t made up to a day ahead, then, while the thighs are roasting, make the cilantro sauce by placing all sauce ingredients in a small food processor.

6. Process continuously until the cilantro is minced very finely and the sauce is light green.

7. Serve the chicken after spooning any extra glaze from the pan over the hot chicken and garnishing it with roughly chopped cilantro. Serve with Creamy Cilantro Sauce.


NOTE: Easy, quick, and delicious! Easily multiplied. Great for a crowd. Good served with rice. Sometime try substituting apple juice for ale.

              Chicken thighs can be grilled covered over high heat for 4 minutes on each side.

Sunday, June 23, 2013

Chocolate Coconut Shell for Ice Cream


This is an incredibly easy and delicious recipe I got from Aunt Becky.  I got the coconut oil from Aunt Gina, who got it at Costco.  

You really won't believe how simple this is.  After it is melted together, you just pack ice cream onto a cone and dip it carefully!  Or you can spoon it over ice cream in a bowl.  Or just eat it with a spoon.  There's no judgement here at all.  You can see I used just the right amount of chocolate, it's pooling at the bottom of my very precariously top-heavy cone.

I made 1 batch, covered 4 ice cream cones with it, ate a couple spoonfuls, and still had almost a whole pint of chocolate leftover!  Don't forget to store this in the refrigerator and reheat as necessary.  

Becky uses a microwave, I used a saucepan, it's all good.  I had some Guittard Extra Dark Chocolate Chips in the cupboard, so that's what I used.  Becky told me she uses fancy chocolate sometimes, but usually semi-sweet or dark chips.  I was dreaming of that 11 pounds of gianduja I had once upon a time...might be time to order that again!  (and follow the link, if only to read my story!  Don't worry, I have an email in to the company, asking how I can get more since it didn't come up on a search)

Chocolate Coconut Shell
1/2 cup coconut oil
1-1/4 to 1-1/2 cup chocolate chips (guess which one I used?) 

Gently melt and stir together in microwave or saucepan.  Cool slightly, then dip solidly formed ice cream cones or spoon over ice cream.

Store in a jar in the refrigerator, if you can make it last that long.

UPSIDE DOWN APPLE PIE

UPSIDE DOWN APPLE PIE  Yield: 8 servings.
original recipe from Taste of Home

CRUST:
2 cups all-purpose flour
1/2 teaspoon salt
6 tablespoons shortening (Crisco stick)
2 tablespoons cold butter
5 to 7 tablespoons orange juice


FILLING:
6 tablespoons butter, melted, divided
1/2 cup packed brown sugar
1/2 cup chopped pecans (or walnuts)
1 cup Imperial Sugar
1/3 cup all-purpose flour (sifted)
1/2 teaspoon rum extract (optional)
1/2 teaspoon maple extract (optional)
1 teaspoon ground cinnamon
1/4 teaspoon ground nutmeg
8 cups thinly sliced peeled tart apples (I like honey crisp or Granny Smith) (about 1/8-inch thick)

GLAZE:
1/2 cup confectioners' sugar
2 to 3 teaspoons orange juice

  • In a large bowl, combine flour and salt; cut in shortening and butter until crumbly.
  • Gradually add orange juice, tossing with a fork until dough forms a ball.
  • Divide dough into two balls. Wrap in plastic wrap; refrigerate for at least 30 minutes.
  • Line a 9-in. deep-dish pie plate with heavy-duty foil, leaving 1-1/2 in. beyond edge; coat the foil with cooking spray.
  • Combine 4 tablespoons butter, brown sugar and nuts; spoon into prepared pie plate.
  • In a large bowl, combine the apples, sugar, flour, cinnamon, nutmeg and remaining butter; toss gently.
  • On waxed paper, roll out one ball of pastry to fit pie plate.
  • Place pastry over nut mixture, pressing firmly against mixture and sides of plate; trim to 1 in. beyond plate edge.
  • Fill with apple mixture.
  • Roll out remaining pastry to fit top of pie; place over filling. Trim to 1/4 in. beyond plate edge.
  • Fold bottom pastry over top pastry; seal and flute edges. Cut four 1-in. slits in top pastry.
  • Bake at 375° for 50-55 minutes or until apples are tender and crust is golden brown (cover edges with foil during the last 20 minutes to prevent over browning).
  • Cool for 15 minutes on a wire rack. Invert onto a serving platter; carefully remove foil. Combine glaze ingredients; drizzle over pie. 

Sunday, June 16, 2013

Potato-Fennel Gratin

My friend gave me this recipe after we each received a big fennel bulb in our weekly Bountiful Baskets.  She said it's one of her favorites, and when she says that you know it's good!

This is a savory, comforting dish, with the delicate flavor of fennel and sauteed onions.  I used regular Swiss as I was out of Gruyere and it was great.  Next time I'll watch mine a little closer, I had to run a long errand and put my husband in charge, and the edges were a bit burned, but still delicious!

Try some the next time you run across some fresh fennel!


Potato-Fennel Gratin 
From Ina Garten, The Barefoot Contessa Cookbook
Total Time: 2 hr 15 min
Prep 20 min
Inactive 10 min
Cook 1 hr 45 min

Yield: 10 servings

2 small fennel bulbs
1 yellow onion, thinly sliced
2 tablespoons good olive oil
1 tablespoon unsalted butter
2 pounds russet potatoes (4 large potatoes)
2 cups plus 2 tablespoons heavy cream
2 1/2 cups grated Gruyère cheese (1/2 pound), or regular Swiss cheese
1 teaspoon kosher salt
1/2 teaspoon freshly ground black pepper


Preheat the oven to 350 degrees F.

Butter the inside of a 10-by-15-by-2-inch (10-cup) baking dish.

Remove the stalks from the fennel and cut the bulbs in half lengthwise. Remove the cores and thinly slice the bulbs crosswise, making approximately 4 cups of sliced fennel. Saute the fennel and onions in the olive oil and butter on medium-low heat for 15 minutes, until tender.

Peel the potatoes, then thinly slice them by hand or with a mandoline. Mix the sliced potatoes in a large bowl with 2 cups of cream, 2 cups of Gruyère, salt, and pepper. Add the sauteed fennel and onion and mix well.

Pour the potatoes into the baking dish. Press down to smooth the potatoes. Combine the remaining 2 tablespoons of cream and 1/2 cup of Gruyère and sprinkle on the top. Bake for 1 1/2 hours, until the potatoes are very tender and the top is browned and bubbly. Allow to set for 10 minutes and serve.

Saturday, June 15, 2013

Coconut Granola

I found this recipe for granola on The Frugal Girl, and was intrigued because it uses coconut oil instead of vegetable oil.  Even healthier, right?

The good news is that this granola is fabulously delicious AND easy to make.  I made a double batch and took it to our family quilting retreat this week, and it was a HIT!  We ate it for breakfast two mornings in a row.  It's a keeper!
 
Picture to come!

Coconut Granola
Adapted from The Frugal Girl

6 cups regular oatmeal
1 cup chopped nuts (I used almonds and topped them off with peanuts to make a full cup)
1 cup dried fruit (I didn't use fruit, so I say Optional.  If it's bigger than a raisin, I'd chop it too)
1 cup raw dried coconut (find this in the organic/baking section of your grocery, if you're lucky!)
1/2 cup honey
1/2 cup coconut oil
3 tablespoons dark brown sugar
3 teaspoons vanilla extract

Preheat oven to 300 degrees.

In a large bowl, combine oats, nuts, fruit (if using), and coconut.

Heat the honey, oil and brown sugar on low heat in a small pot.  Stir until sugar is dissolved.  Stir in vanilla.

Pour honey mixture over oat mixture and stir well. Spread onto two rimmed baking sheets.

Bake for 15 minutes, then stir. Bake for another 5 minutes and stir. Bake in additional 2-5 minute intervals until granola is light golden brown.

Sunday, June 9, 2013

Baby Nutella Cheesecakes

This month, my assignment for Secret Recipe Club was:


As soon as I saw Sarah's recipe for Baby Nutella Cheesecakes, I knew what I was making! 


I only have one mini muffin pan, so the rest of my crust and batter are resting in the fridge for later.  I did have some trouble with the crust.  I couldn't get the crust to stop sticking to my wooden tart former, no matter how much butter I used to grease it.  I added another 1/4 stick of melted butter to the crust mixture, then ended up using a square of waxed paper over the tart former, which worked great.  Otherwise it was too fussy for me, I tried buttering my fingers, everything!

The only other change was halving the sugar in the sour cream topping. 

These little babies are soooo good!  Everyone loved them.  I'm glad I still have more to make.  Perfect little bites.


Baby Nutella Cheesecakes
Adapted from Everything in the Kitchen Sink

Crust:
1 package (about 8 full squares) of graham crackers
1/4 cup sugar
1/2 teaspoon salt
1/2 a stick of butter, melted  (I used 3/4 stick of butter)

Preheat the oven to 350 F.  Using the food processor, grind up the graham crackers into crumbs.  Add the sugar and salt, pulse 3 times, then add the melted butter.  Pulse a few more times and transfer to a small bowl, being sure to scrape any butter trapped under the blade.
Add 1-1/2 teaspoon of graham cracker crumbs to each well of the 24-mini muffin pan.  Press down using another mini-muffin pan, a tart former, or your fingers.

Bake for 5 minutes at 350 F.  Let cool while you prepare the cheesecake.

Cheesecake:
1 8-ounce package of cream cheese
1/2 cup mayonnaise
1/2 cup sugar
2 eggs
1/2 teaspoon vanilla extract
3/4 cup Nutella (6 ounces)

Let the cream cheese, mayonaise, eggs, and nutella come to room temperature.  For best results, let cream cheese sit overnight and the mayo and eggs brought out 1 hour before you want to bake, just to come to room temperature.  Combine the cream cheese and mayonaise with a hand mixer.  Add the sugar then beat in the eggs one at a time.  Add the vanilla and Nutella and combine well.

Sarah uses ziplocs as pastry bags to distribute the cheesecake filling and topping, but I just used spoons.

Fill the wells with cheesecake batter, almost to the top.  Lightly tap the pans to get rid of any bubbles.
Bake for 12 minutes at 350 F.  The tops will be puffed.  Let cool while you prepare the sour cream topping.

Sour Cream Topping:
1 cup of sour cream
2 tablespoons sugar *(I used 1 tablespoon)
1/2 teaspoon vanilla extract
pinch of salt *(I omitted)
Combine all ingredients.  Fill the divets in the cheesecakes created from cooling.  Bake for 2 more minutes, let come to room temperature, then refrigerate for 2 hours. 

To remove, use a butter knife slightly warmed with hot water to most cleanly retrieve your baby cheesecakes.

Serve chilled.
Secret Recipe Club
Blog Widget by LinkWithin