Tuesday, June 26, 2012

Rustic Cherry Tart


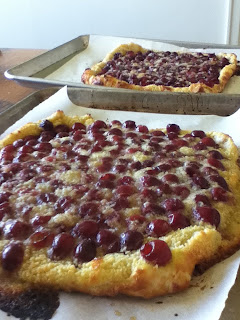
My friend/cousin/neighbor has some cherry trees on family property, and they are heavy with fruit!  The other day we picked about 50 quarts of cherries!  She pitted them, while I made jam and these fabulous tarts.  One for her family and one for mine.  The cherries went from tree to table in just a few hours, and oh, these tarts!  The tarts have an egg-washed puff pastry crust, lined with homemade almond paste and topped with freshly-picked cherries.  I can't tell you how delicious they are. 

You will just have to make one yourself.  

The recipe comes from The Martha Stewart Living Cookbook, which after all these years continues to reveal a few surprises now and again. I swear I've never seen this recipe before, but I am so glad I found it.  I made my own almond flour out of blanched slivered almonds, ground as finely as possible in the food processor.  I did not roll out the pastry and cut into a circle, I just flattened the dough a bit with my fingertips (I didn't have a rolling pin available) and then rolled up the edges for these imperfect squarish tarts, which I think look better than a circle ever could anyway.  Not to mention, there is no wasted dough.

We are picking more cherries and making more tarts on Thursday!


Rustic Cherry Tart
Makes one 9-inch tart
Martha claims this will serve 8 to 10, but I disagree.  I'd say 4 to 6, maybe!

1/2 cup blanched almond flour (see method above), plus more for dusting
1 sheet frozen puff pastry, from a 17 1/4-ounce package, thawed
5 tablespoons unsalted butter, room temperature
1/3 cup plus 4 teaspoons sugar
1 large egg
1/2 teaspoon pure almond extract
1 large egg yolk
1 tablespoon heavy cream
1 pound fresh cherries, pitted

Preheat oven to 425 degrees F.  Line a baking sheet with parchment paper, sprinkle lightly with almond flour.  Gently flatten (by hand or with a rolling pin) to 1/8" thickness.  Roll up the edges, making roughly a 10" crust.  Transfer to the refrigerator to chill, about 30 minutes.

Place butter, 1/3 cup sugar almond flour, egg, and almond extract in a bowl; mix until combined.

Remove crust from refrigerator; prick entire surface with a fork.  In a small bowl, combine egg yolk and heavy cream to make an egg wash; brush the egg wash evenly over the surface and edges of the crust.  Using a spatula, spread the almond mixture evenly in an 1/8-inch-thick layer in the bottom of the crust; chill 15 minutes more.

Remove the tart from the refrigerator, and spread the cherries in a single layer over the almond mixture.  Bake 15 minutes.

Sprinkle the remaining 1 tablespoon plus 1 teaspoon of sugar over the tart, and continue baking until the edges turn deep-golden brown, 5 to 10 minutes.  Transfer to a wire rack to cool.  Serve warm or at room temperature.

*If you have any tart leftover, I found that it's best to refrigerate it.  Bring to room temperature before serving, or just eat it out of the fridge with a fork...have i said too much?

Monday, June 18, 2012

Loaded Baked Potato Salad

This recipe came about when I received an email listing "summer salads."  There was a link to a recipe someone had called "Loaded Baked Potato Salad," which I thought sounded great...but when I read through the recipe, it was really a casserole...?! 

What do I mean by "casserole?"  It was a potato dish that was assembled and then BAKED in a 9x13 pan.  Sort of reminiscent of my Twice Baked Potato Casserole, actually.  Totally not a "salad" at all, (salad in my mind means "cold"), and certainly not a dish I would think about serving in the heat of summer. 

I set out to create a true potato salad.

First, I used my grill to bake the potatoes.  I just clean them, rub them with olive oil, then grill on the top rack over medium-ish heat for about one hour, turning over halfway through.  You want them baked but not too soft, keep in mind your grill may cook differently than mine.  Remove potatoes from grill and let cool before chopping, of course. I found that using a serrated knife helps the potatoes hold together better, while keeping the skin pieces intact.

Once salad ingredients are prepped, it's important not to mix it until you've added everything, because the potatoes are a bit fragile.  You want to gently fold the ingredients together.  I used a mixture of sour cream and real mayonnaise because that's what I prefer.  The real mayo adds a bit of flavor you wouldn't get with sour cream alone.  You need to put this salad together ahead of time, and I'd recommend chilling it in the refrigerator for at least an hour or so if you have time.

I have to tell you, this is an amazing potato salad!  Make it for your next barbecue, and everyone will be impressed!  I think the baked potatoes add so much to the flavor compared to a traditional potato salad made with boiled potatoes, that I may actually try to bake all my potatoes for salads from now on.

My family and I loved this potato salad; in fact my oldest son H-Bomb even asked for seconds although he's not a huge potato fan.  It's my new favorite, and I'm going to make more today!


Loaded Baked Potato Salad 
Serves 6 to 8 

6 baked potatoes, skin on
1/2 pound bacon, chopped and cooked until crisp, then drained and cooled on paper towels
3 - 4 scallions, chopped
1 cup shredded sharp cheddar cheese
1/2 cup sour cream
1/2 cup mayonnaise
Salt and pepper to taste  

Reserve a few pieces bacon, some green onions and cheese to use as garnish.   

Use a serrated knife to gently chop potatoes, leaving skin on.  I cut each potato in quarters lengthwise, before chopping in pieces.  Add to large mixing bowl.  

Add bacon, onions and cheese; do not mix. Season with salt and pepper. Set aside.

In a small bowl, mix sour cream and mayo.  Add to potato mixture and mix gently with a rubber spatula.  Taste and adjust salt and pepper, if needed.  Refrigerate until ready to serve.  

Before serving, garnish with reserved cheese, bacon and green onions.

Tuesday, June 12, 2012

Taste & Create: Pasta Puttanesca

***Taste & Create is a fabulous monthly blog event in which participants are randomly paired off to choose and prepare a dish from their partner's blog.  If you'd like to join us, please email me at cowgirlmin07 [at] gmail [dot] com by the 8th of the month!!  ***

 This month, Taste & Create had dwindling numbers for some reason, and an odd number at that.  We can't have an odd number, so I put my name in the hat twice.  Kat, of Study Food, is one of my partners this month.

I perused Study Food for a while, and knowing that there is no way I would ever think about trying Kat's Marmite Spaghetti, (but I had to look at the recipe anyway because I just couldn't believe it), I was excited to find her recipe for Pasta Puttanesca.  Or as she calls it, "Don't Ask Don't Tell Pasta Puttanesca!"

I've been looking for a good recipe for Puttanesca for some time, and actually my little boys have been excited to try it because it's something the Beaudelaire orphans prepare for Count Olaf in one of the Series of Unfortunate Events books. (If you haven't read them with your children, you must!  Check them out here:  The Complete Wreck (A Series of Unfortunate Events, Books 1-13))


Not only is this pasta EASY, it is delicious!  I love the complex flavors, and so did my almost-nine-year old son, and my husband.  The little brother was sleeping at the time, so no report there, but believe me when I tell you he missed out.  This is good stuff, and will be made in our house again and again.  Although I will totally have to employ Kat's Don't Ask Don't Tell strategy when I serve it up to my mom! 

Kat's Pasta Puttanesca

1 - 2 tablespoon olive oil
2 cloves of garlic, crushed
45g can anchovies - chopped finely (our cans come in 56g, a little larger but I used them all!)
2 cans crushed/chopped tomatoes (I used diced tomatoes)
12 ish olives - chopped (I used Kalamata, Kat's "favourite" but you can use any olives)
1/2 tablespoon capers
red chile flakes to taste (optional)
1 tablespoon finely chopped basil

Enough pasta for four. Long, thinnish varieties are best here. - cooked according to the directions on the packet.  (I used spaghetti)

Grated Parmesan to serve.

Heat the oil, garlic and anchovies together in a pan. Heating all three together - rather that putting the anchovies and garlic into hot allow helps to prevent the garlic from burning and becoming acrid and also helps the anchovies to melt and dissolve into the garlicky oil thus lowering the chances of coming across a lump on one's plate.

Stir in the tomatoes, olives, capers, chiles and basil... allow to heat through.

Combine the sauce with the well-drained pasta and toss gently until the sauce evenly coats the pasta.

Friday, June 1, 2012

Fresh Strawberry Sorbet

I have a family quilting retreat coming up next week, and my cousin/partner for one of the dinners is making lasagna or manicotti.  I'm making a nice salad, and I want to make some sort of light, refreshing dessert.  I have a couple options to try, or if those don't work I'll make Banana Split Pie.  Which is not quite light, not particularly refreshing, but soooo delicious that none of that matters.

So first up is this fresh strawberry sorbet, which can also be made into a granita if desired.  I'm going for sorbet.  The recipe comes from The Bon Appetit Cookbook: Fast Easy Fresh, which is a good cookbook to own.  I'm really just getting started with it, although I've had it on my shelf for a few years.  Incidentally, I noticed that if you follow the link, right now you can get the hard cover cookbook for a "bargain price" of $13.98!  Wow.  I'm tempted to order another one just because that's so cheap!!

I have to say that this sorbet is the winner right out of the gate.  Not only is it quite easy, you can make it 3 days ahead, and it is unbelievably fresh-tasting and delicious, and even fairly healthy!  A new family favorite.  Make some today!!

Picture soon, we ate it much too fast!

Fresh Strawberry Sorbet
 6 servings

2 cups water
1 cup sugar

1 quart fresh strawberries, hulled
1/3 cup fresh orange juice
1/3 cup fresh lemon juice

Stir 2 cups water and sugar in a heavy medium saucepan over high heat until sugar dissolves.  Boil 5 minutes, remove from heat.

Working in batches, puree strawberries in processor until smooth.  Add strawberry puree and orange and lemon juices to sugar syrup; stir to blend.  Cover and refrigerate until cold, about 2 hours.

Process strawberry mixture in ice cream maker according to manufacturer's instructions.

MAKE AHEAD:  Can be made 3 days ahead.  Cover and freeze in airtight container.  If sorbet is frozen solid, place in refrigerator for 15 minutes to soften before serving.